The greatest service which can be rendered any country is to add a useful plant to its culture.

A two-decade-old condo undergoes a resale-focused renovation in Bucktown, Chicago
“After” photos courtesy of Sweeten homeowner Before: Making old bathrooms new againFor this Chicago homeowner, updating her bathrooms were important. Plus, time was of the essence: she was living in the 1,500-square-foot condo in Bucktown (located on the northwest side of the city) and wanted to sell. However, she knew that putting some money into refreshing the place with a renovation would increase the resale value. So, that’s exactly what she did! 
“BEFORE” of master bathroom 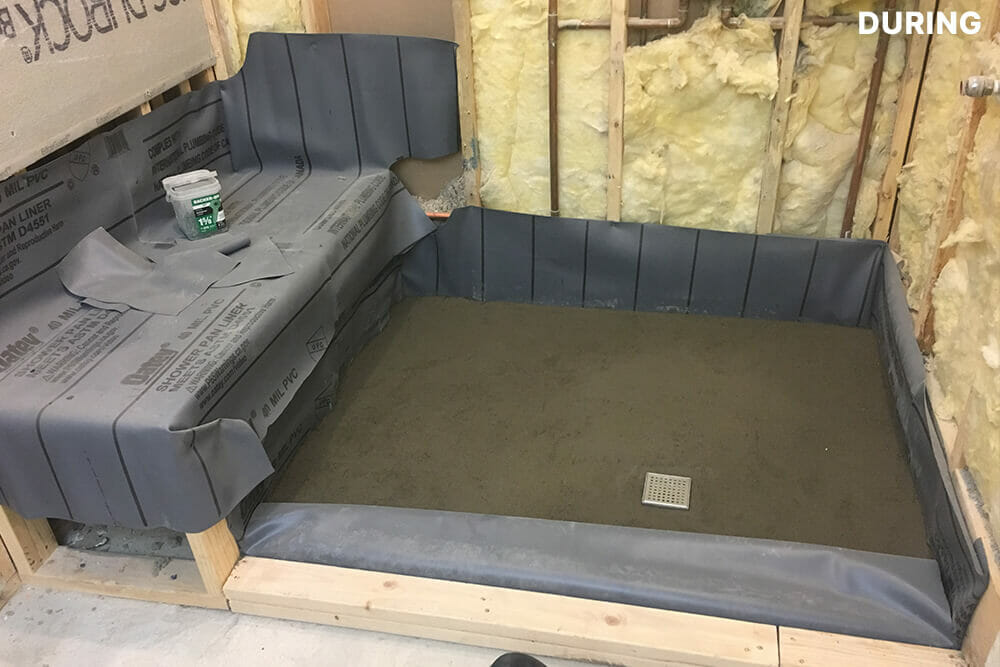
“DURING” of master bath She turned her attention to the master and hall bathrooms since they were the biggest concern. They felt outdated, with an early 2000s brown-hued vibe. (A well-designed, new bathroom is one of the top aspects that appeal to potential homebuyers.) This was not the homeowner’s first time renovating and knew a good general contractor would make all the difference. She posted her project on Sweeten and found a general contractor in her area who was in sync with her goals. Sweeten matches home renovation projects with vetted general contractors, offering advice, support, and up to $50,000 in renovation financial protection—for free. After: A more modern aesthetic to appeal to buyersSize-wise, the homeowner was in luck. The master bath had plenty of square footage and just needed some TLC to make it more attractive and functional. The hall bath would be a straightforward rip-and-replace, with no plumbing moving. After consulting with her Sweeten general contractor, the homeowner focused on sourcing and buying materials and accessories. She wanted to redesign the bathroom with similar features that other new properties in her area were featuring.
“AFTER’ of the master shower First things first: get rid of the old jet tub. Although seen as a luxury in the early 2000s, the jet tub now seemed outdated. Plus, it was awkwardly placed next to a shower stall. To help the flow and the look of the bath, a walk-in shower replaced this configuration. The trend of large-format tile perfectly suited the new oversized shower. Two niches inlaid with hexagonal tile brought a nice contrast to the stacked wall tiles. And, of course, a new master bath wouldn’t be complete without a long bench. 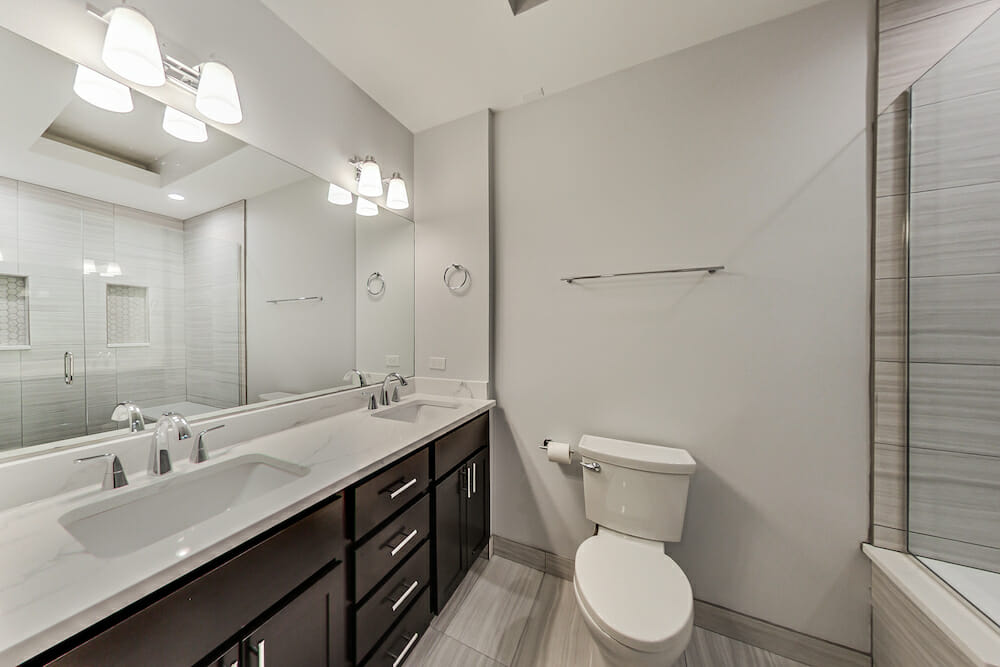
“AFTER” of the master bathroom The vanity also got a much-needed refresh. Another double sink version replaced it, but one with a more modern aesthetic. She updated the hardware and matched the finishes to the overhead sconces. The contractor installed a quartz countertop along with a new backsplash. “It looks great,” says the homeowner. “Bigger, brighter, and more modern.” 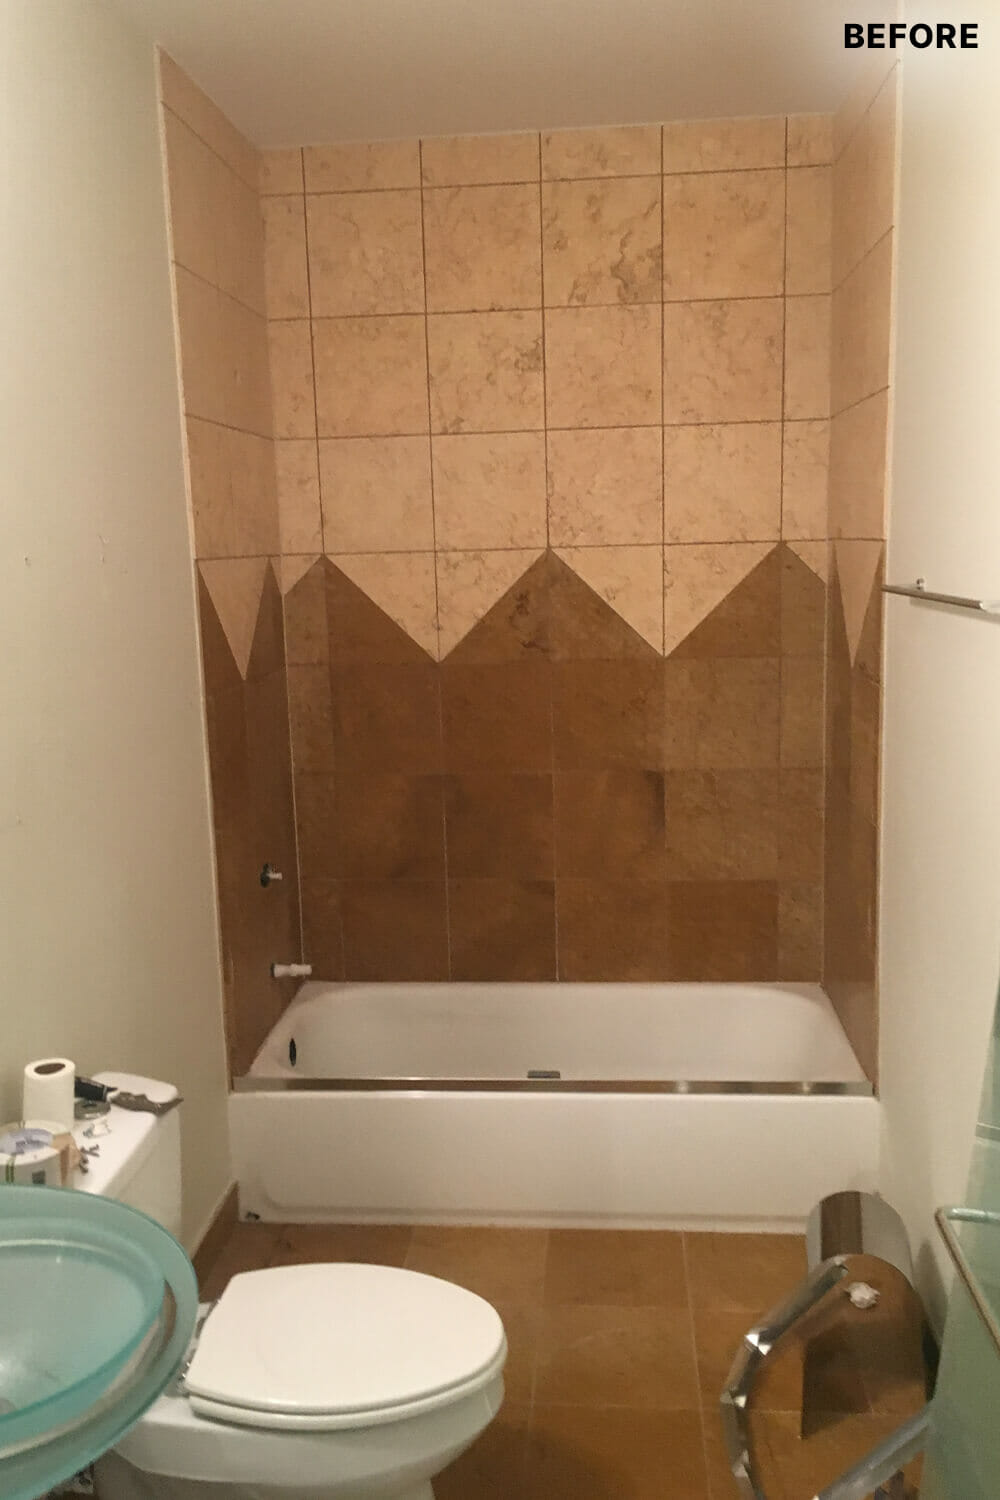
“BEFORE” of hall bathroom 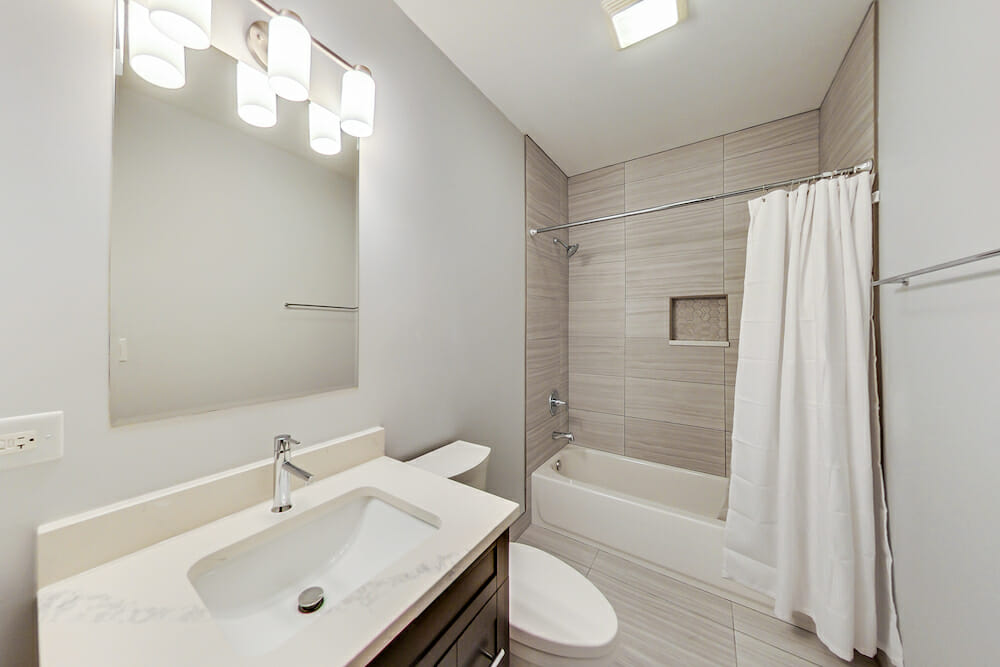
“AFTER” of hall bathroom The hallway bathroom’s rip-and-replace received all-new fixtures and materials from tile, tub, and toilet to lighting and sink vanity. All in all, the renovation took approximately five weeks, but then COVID hit Chicago, which curtailed the homeowners’ plan to sell. Luckily, the renovation still improved the resale value of her home. She’s also hopeful that once things settle down, buyers will consider the new baths a real selling point. As for the overall renovation experience? “[My contractor] was super helpful and responsive,” she says. “He really went out of his way to help make the process easier and save us money, including picking up all the materials we purchased at Home Depot to avoid delivery fees.” Tip from the Contractor: The general contractor recommends having all your materials either already selected or ordered so you don’t experience delays. Contractors work within a detailed timeframe. Make sure you have your materials on hand to help avoid delays and frustration for all involved. Materials Guide:Flooring and wall tile: Home Depot. Vanity: Studio 41. Paint: Sherwin-Williams. Countertop and backsplash: CM Stone Works Inc. -- Bathtubs, be gone: See how these 7 homeowners swapped jet tubs for walk-in showers. Make sure to align your scope with your budget. Our Chicago home remodel cost guide can help you get started. Refer your renovating friends to Sweeten and you’ll both receive a $250 Visa gift card when they sign a contract with a Sweeten general contractor. Sweeten handpicks the best general contractors to match each project’s location, budget, and scope, helping until project completion. Follow the blog for ideas and inspiration and when you’re ready to renovate, start your renovation on Sweeten. The post A Modern Two-Bath Chicago Renovation To Entice Buyers appeared first on Sweeten Blog. from Sweeten Blog https://sweeten.com/before-after/bathrooms/two-bathroom-renovation-for-resale-in-chicago/ via IFTTT Via https://vegetablenirvana.blogspot.com/2021/01/a-modern-two-bath-chicago-renovation-to.html
0 Comments
Renovate or buy a second home? A new layout in an apartment made all the difference
“After” photos by Kate Glicksberg for Sweeten
Written in partnership with Sweeten homeowner Courtney Wrestling with the idea of renovatingWe moved to Clinton Hill over ten years ago, and always loved the neighborhood with its history of housing for returning servicemen who worked in the Navy Yard. On a total whim, we went to an open house in the Clinton Hill Co-ops and made an offer on the first apartment we saw: an 800-square-foot, one-bedroom that had been converted into a junior two-bedroom.
Once we had kids, we realized our place was dark, crowded, and lacking in functional storage. Paint was chipping everywhere, our ‘80s cabinets were falling off the walls, and it was just, aesthetically, a sad place to live. With two active little boys, Charlie and Wyatt, we suddenly felt like we had outgrown the place we initially loved. I was frighteningly familiar with the Clinton Hill Co-op section of the Sweeten website. Our neighbor also used Sweeten to renovate her kitchen, and it looked fantastic. It seemed like a simple concept, but Jim and I were just completely overwhelmed with the idea of a renovation. Because our apartment really felt like it was falling down around us, we knew that we would need to change almost everything. We decided to look for a place upstate, hoping that more room and a home for weekend getaways would help alleviate the stress of our overcrowded and dark apartment. We made an offer on a house, had it approved, started to negotiate, and realized we needed to feel good in our primary residence before we took on a second space.
Finding our general contractorWe headed straight to Sweeten, were matched with three general contractors right away, and within a week picked our contractor. He was incredibly responsive and patient with us as we walked through our apartment over and over again, thinking about the best way to open our kitchen, update the bathroom, reconfigure our bedroom, shore up our pockmarked walls and ceiling, refinish our floors, and add storage everywhere.
We were absolutely giddy with the concept of overhead lighting! We were wired for several fixtures in the living room and kitchen, as well as recessed lights in the hallways and bathroom. Because our apartment had been dark and crowded for so long, we gravitated toward a simple, minimalist design with white and gray paint to brighten the space and give it a clean look. Personalizing the kitchenJim grew up with visions of a kitchen island where everyone could gather to eat and socialize–that became our only non-negotiable. It helped us focus our planning on the kitchen first. We knew we wanted custom cabinets, so our contractor brought in his cabinetmaker to meet with us and walk through the layout. Within a week, they had sent us a 3D rendering of our new kitchen, with Jim’s dream island, plus an extended butcher block counter ideal for our boys to sit and finish homework while we cook. Our contractor suggested the chalkboard paint—now a huge hit with the kids. He created a lot of extra storage under the island, including drawers for our pots and pans, plus a pantry along the extended counter. We have a dishwasher for the first time ever and love the kitchen tile.
Storage reimaginedOur Sweeten contractor had the genius idea to extend our bedroom two feet into the living room, which allowed him to build a closet (we used to store our clothes in the boys’ room). It was worth the minimal loss of space to gain more storage. We also hired a closet company to build a shoe closet for us. Since our room has two windows, we decided on an opaque glass door to maintain some privacy, but also take advantage of the natural light.
For the boys’ bedroom, our only directive was storage, storage, storage. We wanted to find a way to keep all of their things in the bedroom, instead of spilling out into our common living areas. Once again, our contractor came through on the extra storage front and found a way to build a second closet in their room, ensuring we lost very little floor space. We’re not falling all over stuff anymore! In the bathroom, we needed to keep a bathtub because we have young boys, and I insisted on a large piece of custom glass as our partial shower door. He warned me it might be difficult to reach around for the water control, but I insisted. It looks lovely, but he was right—it’s a bit of a struggle to help with bathtime. Moving out during the renovationOur biggest challenge was realizing that, because we were renovating the entire space, we would have to move out for an extended period of time. We didn’t initially budget to live somewhere else, so the added cost was a bit of a shock. After three months, we were scheduled to move back in and had left the rental, when our contractor told us he was about a week behind. Much of this delay was due to some delayed deliveries of things I had ordered. We had no place to go and had to live in the apartment while there were still tools and supplies everywhere, with no appliances or kitchen counters. It was a bit uncomfortable, but not unmanageable. In hindsight, we probably should have just booked the rental for an extra week as insurance. Working with Sweeten made us wonder what we had waited for. We were matched so quickly with a contractor, we were able to use the website to see examples of his work, we could reach out with questions and concerns. Another upside was the Sweeten blog, a huge source of inspiration! Our new apartment is exactly what we had hoped for: simple, comfortable, bright, and uncluttered. It feels like home. Thank you, Jim and Courtney for sharing your Clinton Hill full home renovation with us! Materials GuideKITCHEN RESOURCES: Floor tiles and backsplash: Tiles by Kia. Kitchen cabinets: Custom by Sweeten contractor. Upper cabinet paint in Simply White and lower cabinet paint in Gull Wing Gray: Benjamin Moore. Wayfair Basics cabinet hardware, pendant lighting: Wayfair. Countertops: Custom by Sweeten contractor. Sink and faucet: Build.com. 36″ 800 Series, #B21CL81SNS refrigerator, dishwasher, and stove: Bosch. 24″ wine fridge, #CWB1760FD: Edgestar. Mobile chandelier: West Elm. Chalkboard paint: Benjamin Moore. Vapor acrylic bar stools: CB2. BATHROOM RESOURCES: Bathroom floor and wall tiles: Tiles by Kia. Shower fixtures: Grohe. Sink, vanity, lighting, mirror: Build.com. Toilet: Toto. Acrylic storage shelf: CB2. LIVING ROOM RESOURCES: Sphere + Stem 3-light brass chandelier: West Elm. MASTER BEDROOM RESOURCES: Closets: Smart Closet Solutions. Flooring: Build.com. Böja ceiling light fixture: Ikea. Wall paint in Smoke Embers: Benjamin Moore. Sinnerlig light fixture by Ilse Crawford: Ikea. KIDS’ BEDROOM RESOURCES: Wall paint in Amherst Gray: Benjamin Moore. Closets: Smart Closet Solutions. -- Read up on the pros and cons of staying home or moving out during a renovation. Sweeten handpicks the best general contractors to match each project’s location, budget, and scope, helping until project completion. Follow the blog for renovation ideas and inspiration and when you’re ready to renovate, start your renovation on Sweeten. The post A Clinton Hill Full Home Renovation Scores Storage & Style appeared first on Sweeten Blog. from Sweeten Blog https://sweeten.com/before-after/entire-homes/family-renovation-clinton-hill-co-op/ via IFTTT Via https://vegetablenirvana.blogspot.com/2021/01/a-clinton-hill-full-home-renovation.html A step-by-step guide and timeline for a one-bedroom apartment renovation
We’ve covered the expected timelines for kitchen renovations and bath renovations, but how long does an entire apartment renovation take? Since bathrooms and kitchens are usually the most time-intensive spaces to redo, the timeline for renovating a one-bedroom apartment is not much longer. Another bonus: the more spaces there are, the more opportunity there is to implement economies of scale and to multi-task! This approach allows you to save both time and money. If you’re considering spacing out several projects (for budgetary reasons), you should consider doing them all at once. While it’s a larger sum upfront, it’ll likely be a better value for your money. For example, while you’re waiting for your cabinets to arrive, your contractor can paint the bedroom or install baseboards. And while they are waiting for the paint to dry, they can install tile in the bathroom…you get the picture. As always, size and complexity determine how long an entire apartment renovation will take. If you aren’t moving walls or changing electrical or plumbing, your apartment renovation will be on the shorter side. On average, you should allocate about two to four months for on-site work in a top-to-bottom one-bedroom apartment renovation. Sweeten matches home renovation projects with vetted general contractors, offering advice, support, and up to $50,000 in renovation financial protection— for free. Apartment Renovation Timeline: Pre-Construction PhaseWhile the attention is usually on the most visible construction phase, there is a lot to be done before then. Here are the details on each box you’ll need to check before breaking ground on the project. STEP 1: Close on your property (1-3 months)Many homeowners are in-contract or preparing to close on a property when they begin the process of planning a renovation. If this is you, don’t worry: there’s a way to get it all done. As one Sweeten post explains, you should wait until you have closed on the property, with keys in hand, before doing anything. If you’re in a hurry—wait until you’ve at least signed the contract before beginning the design process. STEP 2: Post your renovation project on Sweeten (1-3 days)First things first. Once you’re in contract, you should post your project to Sweeten and begin soliciting bids. On the Sweeten site, add the details about the space you want to renovate, your inspiration photos (optional but useful for our matchmakers), and any other information that would help Sweeten find your perfect contractor. You will receive 3-5 matches within three days, with links to check out contractors’ profiles online. Now’s your chance to take a look at testimonials from clients and photos of their past projects to see whether they might be a good fit. STEP 3: Schedule site visits and solicit bids (1-3 weeks)Once you’ve previewed the Sweeten contractors’ profiles, and have decided you’d like to set up a meeting(s), our online scheduler will give you a two-week window to mark your available dates for a site visit. Both you and the contractor(s) will receive an email confirming your available times, by which the contractor(s) will reach out to you to confirm a date. An on-site visit is the best way for a contractor to understand the scope of the project, the physical possibilities, and limitations of the space, and for the two of you to see if you hit it off! (This guide is a useful read for understanding the key info necessary to secure the most accurate bid.) After you schedule your on-site visit, check out our blog post about how to prepare for the meeting. You should expect a written bid within 5-10 business days after your visit. STEP 4: Level bids and choose a contractor (1-2 weeks)Once all the written bids have come in, it’s time to compare and contrast! This primer on leveling bids might come in handy, as well as this one about labor-only versus all-inclusive bids. If you have follow-up questions, now is the time to ask. You can also schedule time with a Sweeten project advisor to walk you through the various bids and weigh in on the selection. STEP 5: Sign the contract and finalize construction schedule (1 week)Once you’ve decided on a contractor, he or she will put together a contract for you to review. This will typically include a description of the work to be done, an estimated timeline for completion, as well as the timing of payments throughout the project. STEP 6: Obtain permits and approvals (ranges widely)Of all the steps where hiccups or delays might occur, this is it. Obtaining the correct permits and board approvals have held up many a renovation, but don’t be daunted: our experts are well-versed in navigating these processes and can advise you on how best to achieve your renovation goals with the least amount of hassle. If you’re moving plumbing or gas lines, you’ll need an architect and additional DOB permits. Sweeten homeowners have reported obtaining approvals in as little as two weeks—but it’s more common for it to take a couple months. If you live in a stand-alone house, you won’t need to worry about building board approvals, but you’ll still need the requisite city permits for any electrical or plumbing work to make sure that everything is up to code. STEP 7: Source materials (ranges widely)If you are responsible for sourcing all or some of the materials in your renovation, be sure to place the orders as soon as the design plan is finished. Certain items have long lead times, and you don’t want that one faucet to hold up the entire renovation. If time is a concern, look at what’s currently in stock and ready to ship. Speak with your contractor about timing the product delivery to coincide with time of installation. STEP 8: Tell your neighbors you’re renovating (15 minutes)Be a good neighbor and warn yours that a renovation is beginning imminently. Tell them what to expect and how long the project is slated to last. It’s always easier to stomach the disruption when you know there’s an end in sight! It doesn’t hurt to bring some sweets, a bottle of wine, or a gift card for a local coffee shop. When the reno is over, invite them over! Apartment Renovation Timeline: Construction PhaseWhile most of the steps under “Construction” are your contractor’s responsibility, it’s important to understand what should be happening when. The most important steps you’ll be in charge of here are making scheduled payments to your contractor (as outlined in your contract), and keeping your schedule open for several hours a week to answer questions about details or changes that come up over the course of construction.
STEP 9: Time for demolition (2-5 days)Out with the old! Now that you’re done with the paperwork, it’s time for your contractor to pick up that sledgehammer. Be sure to protect the items that are staying with tarp or plastic, and get to work tearing out everything else. Depending on how large your apartment is, and how extensive the renovation, this shouldn’t take more than two to five days. STEP 10: Reroute plumbing and electrical (2-4 days)In a 2017 national survey conducted by Sweeten, 62% of respondents named finding hidden problems in their home as a top renovation fear. Now that you’ve stripped the space down to the studs, it’ll be easy to get new plumbing or electrical where it needs to go. Consider whether any plans should be altered now, since you’re able to see what’s behind the walls. STEP 11: City inspections and sign-offs (1-4 days)If you needed city permits for electrical and/or plumbing work, you’ll need inspections and a sign-off before closing the walls. (Check out what the city has to say about plumbing permits here, and electrical permits here.) While a master plumber can typically sign off on pipework for water lines in the case of a no-show by the city inspector, an inspector must examine and approve any work on gas lines. You are not allowed to close up the walls and move onto the next phase of the project until this inspection happens. With electrical work, inspectors generally are scheduled for visits once the project is 100 percent complete, and they will check the electrical panel, junction boxes, and outlets. (Note that sometimes, because of city bureaucracy and delays, your electrical inspection may be rescheduled two or three times.) Check with your contractor or architect about what your project requires. STEP 12: Floor installation (5-12 days)To prevent having to redo the floors if you decide to reconfigure your space in the future, make sure that the flooring is consistent throughout, even if some of it will be hidden. After the floors are in, you’ll add new baseboards. STEP 13: Installation completion (5-20 days)Install the kitchen, usually in this order: cabinets, appliances, fixtures and lighting, counters, backsplash, and cabinet hardware. Install the bathroom, including the tub, vanity and sink, toilet, and any built-in shelving. Tiling, lighting, and hardware usually come last. In the hallways and bedroom, if you are doing basic painting and touch-ups, the work will be fairly minimal compared to the kitchen and bath. If you are adding custom, built-in shelving or paneling, plan to add a few extra days. Possible delays: aspects of this may vary, depending on site conditions and the arrival time of the materials. STEP 14: Clean-up (1 day)Typically, contracts allow that spaces should be left in “broom-swept” condition. However, you may want to hire post-construction cleaning specialists to make sure that your new floor is clean enough to eat off. For a full apartment, plan on requesting at least two cleaners to work at the same time so that it can be finished in one working day. Apartment Renovation Timeline: Post-Construction PhaseThe finish line is in sight! But don’t forget these last—but important—steps. STEP 15: Final walk-through with the contractor (1-2 hours)Review the work with your contractor: try all the drawers and doors, look closely at the edges and finishes, and make sure everything is working the way it should. If there are any problems, point it out and add them to the punch list. The contractor will either fix it on the spot (if it’s minor) or set up another time to return. Sweeten’s founder + CEO, Jean Brownhill, recommends keeping notepads in each space, and not speaking to your contractor for two weeks during this time. Instead, take notes of what needs fixing as you live in your new home. STEP 16: Punch list items (1-10 days)Depending on what the items are, this step could take anywhere from a day to several weeks. It depends on the items left: are you straightening a cabinet door, or waiting on installing an out-of-stock item? When it’s on the long side, though, it’s usually due to back-ordered items. Otherwise, your contractor should be able to return and fix everything in a few days. STEP 17: The final payment (10 minutes)You’ve (hopefully)! made installments throughout the renovation. When the last item on your punch list is complete, it’s time to pay the remaining percentage to your contractor! Ready to renovate your apartment?This timeline provides a detailed look at the various aspects of renovating and a range of how long each step should take. While some factors may be outside of both your and the contractor’s control, the key is isolating the steps that you think might be obstacles in advance, and allotting more time to get them done. -- Apartment owners: you can have the laundry space of your dreams. Take it from these Sweeten renovators! If you’re wondering how much your apartment renovation will cost, check out our guide on renovation costs per square foot. Refer your renovating friends to Sweeten and you’ll both receive a $250 Visa gift card when they sign a contract with a Sweeten general contractor. Sweeten handpicks the best general contractors to match each project’s location, budget, and scope, helping until project completion. Follow the blog for renovation ideas and inspiration and when you’re ready to renovate, start your renovation on Sweeten. The post How Long Does an Apartment Renovation Take? appeared first on Sweeten Blog. from Sweeten Blog https://sweeten.com/renovation-101/how-long-does-an-apartment-reno-take/ via IFTTT Via https://vegetablenirvana.blogspot.com/2021/01/how-long-does-apartment-renovation-take.html You’re no stranger to extreme heat! Sweeten shares top tips to keep a house cool (and save money) during the summer
Phoenix is a favorite place to live because of the area’s favorable weather. Precipitation is low, the sun is strong, and temperatures are high. But sometimes, the temperatures run a bit too high for comfort. Each year, on average, Phoenix’s temperature exceeds 100 degrees on 92 days. Knowing this, Sweeten wrote a homeowner’s guide on how to keep your house cool in those blazing months! Sweeten matches home renovation projects with vetted general contractors, offering advice, support, and up to $50,000 in renovation financial protection— for free. Choose the best HVAC systemAir-conditioning is a fact of life in Phoenix and the entire Valley of the Sun metro area. Passive cooling methods are crucial for maintaining a cooler home in Phoenix. But it is an inescapable fact that your home needs A/C. Choose the best possible A/C within your budget:
Install insulated ductworkYou wouldn’t want a water pipe riddled with holes. You would barely get any water out of it. In the same sense, the HVAC ductwork in your attic is riddled with holes when it’s uninsulated. Cool air expensively generated by your air conditioner can be lost in your attic. The cool air begins at the A/C. It runs through your hot attic in basic sheet metal ducts. The cool air warms up. By the time the air reaches the rooms, it is warmer than it should be. There are many insulated ductwork options you can discuss with your contractor. Sheet metal ducts with fibrous glass insulation liner or wrap are a common choice. Or fibrous glass insulation boards can be added to ducts and plenums. Buy “cooler” lighting and appliancesLights can give off an enormous amount of heat. One halogen recessed light can raise the temperature of a 64-square-foot space by 15 degrees F in about one hour. Multiplied many times over, an array of these lights can warm up a house. Use cooler LED lights. Fluorescent lights can be used in laundry rooms or work areas. Also, shop for efficient appliances. Refrigerators, dishwashers, clothes washers, and dryers all produce heat. Purchase better-designed appliances that give off less heat. Choose a “cool” roofIf you have ever tried to walk on a dark roof in the summer, you will know how hot they can get. A hot roof will transmit heat into the attic. Insulation in the attic will slow some of the heat, but some heat will still enter the home. “Cool roof” is a general term for any roof with qualities that keep heat out of your house. At a minimum, a cool roof can be a light-colored roof. But a white- or light-colored roof can still absorb up to 70-percent of solar radiation. Look instead for specially coated shingles that contain glass and aluminum particles. Even traditional terra cotta roof tiles are considered to be a cool roofing material. Check out cool roof ratings from the non-profit Cool Roof Rating Council (CRRC). The basic ratings are similar to the familiar EnergyStar ratings for appliances. Install high vents or a whole-house fanDesert temperatures that soar during the day drop equally during the night. Phoenix’s night-time temperatures are often half that of daytime temperatures. Use this to your advantage with night-flushing. Night-flushing means to open up your house as much as possible during the night to flush out built-up heat. Vents installed high up on the walls can help with this. Whole-house fans pull air through open windows and send it out through the roof. This also ventilates the attic. You don’t necessarily need to install new ductwork, either. Speak to a contractor about modifying existing HVAC ductwork for a whole-house fan. Landscaping for a cooler homeThe City of Phoenix has an ongoing effort to cool the city—and you can do it at home, too. Phoenix’s Tree and Shade Master Plan aims to shade at least 25-percent of the city. Speak to your contractor about adding large shade trees like eucalyptus, elm, pine, ash, or pecan. Even trees with less foliage like olives, palms, and citrus can keep a home cooler. Paint the home in light colorsThere is a reason for all of those different shades of beige on homes around Phoenix: it’s cooler. Upwards of 90-percent of the sun’s radiant energy can be absorbed by dark paint colors. Conversely, lighter colors do an excellent job of repelling radiant energy. If beige isn’t your thing, you’ll find a wide range of other light colors that block the heat. Light-gray, cream, blue, ivory, and of course, white, are perfect for holding back the heat. Take these steps to help keep your house cool while being more efficient for the planet and your wallet. Happy (green) renovating! -- Remodeling isn’t just for new homes: See Sweeten’s guide to renovating for resale. (You’ll thank us when you sell!) Sweeten handpicks the best general contractors to match each project’s location, budget, scope, and style. Follow the blog, Sweeten Stories, for renovation ideas and inspiration and when you’re ready to renovate, start your renovation with Sweeten. The post Phoenix Homeowners: Here’s How to Keep Your House Cool appeared first on Sweeten Blog. from Sweeten Blog https://sweeten.com/renovation-101/phoenix-homeowners-heres-how-to-keep-your-house-cool/ via IFTTT Via https://vegetablenirvana.blogspot.com/2021/01/phoenix-homeowners-heres-how-to-keep.html By Mike Holmes
I’ve got a lot of smart home devices in my house. To me, a digital smart lock for the exterior door makes sense. A smart lock essentially replaces the need for keys (and spare keys!) You can lock and unlock your doors from anywhere. It’s no secret that I love my smart locks — and I’ve heard from a lot of concerned homeowners about security concerns, but, believe me, there are some good ones on that market that are secure from hacking. As long as they’ve got a good deadbolt to go with it, you’ll have a pretty safe door. Here are 8 reasons you should consider a smart lock: 8. Perfect For Rental Properties You can control access right from your phone and provide temporary access to any guests who need it, that can be revoked once they have checked out. You don’t need to make a special trip to hand over a physical key, or worry about your key being copied. 7. Smart Locks Help During Your Reno Some builders install smart locks during construction. I think this is a fantastic idea that allows them to track down which trades and suppliers are actually showing up on time. Same goes for homeowners. If you have moved out of your home during an extensive renovation, you can monitor on your phone and see when your contractors are coming and going. There was a family I helped during Holmes+Holmes who had a contractor show up in their bedroom at 10 pm using a traditional key they had given him. With four daughters in the house, that is a scary experience for parents. Read more on: 8 Reasons Why You Should Get A Smart Lock Related Article: Various Types of Door Locks Check out to Roswell Garage Door Repair 's blog to learn more on how to get your perfect garage door for your property. |
Other Blogs:
Vegetable Nirvana's Blog Tumblr Weebly WordPress Other Profiles: Gravatar Diigo Evernote GetPocket OneNote IFTTT About.me Instapaper Disqus Nimbusweb.me ArchivesCategories |


 (Above) Design by Phoenix-based
  RSS Feed
