A couple gut-renovated their whole house on a $250k budget—and created a place for gathering![]()
Written in partnership with homeowners Liz and Michael. “After” photos by Jill Weller. Mixed motifs (on purpose)We made this 1,684-square-foot single-level home in Culver City, California, our own with a mix of styles: bohemian-eclectic (lots of plants and textures), California modern (including a light and airy color palette), and even touches of the 1970s (our “conversation pit” in front of the fireplace). The result is a fierce representation of “us.” ![]() We are Liz Anderson, a marketing director, Michael Anderson, a head of production, Callie Anderson, our dog, and Buddy the Cat. After we purchased our home, the plan was to renovate right away. We paused the project for a couple of years—a great decision because we were able to learn more about what we needed.
Previous
Next
![]() ![]() Little house in the big cityWe wanted to recreate the home, originally built in 1952, and use every square foot with purpose. Homes from the 1950s tend to be sectioned off, with tiny kitchens, dining areas, and living spaces. We wanted to move the kitchen and integrate these three areas in our home to create a more open and welcoming space. The home also had an addition added by the previous owner—a hair salon including counters and a salon sink—which is home to the new kitchen. We wanted to use all of the space. We planned to update a bathroom, too. ![]() ![]() Contractor dilemmaEven when we were ready and knew what we wanted to do, the idea of finding a contractor was overwhelming. Discovering Sweeten and the company’s directory of contractors was a great resource to start narrowing it down. Once we hired our Sweeten contractor, she stayed in contact with us regularly, and that helped us keep on schedule. She also shopped with us as we picked out finishes and materials, weighing in with her expertise. We were able to find and utilize different resources whenever the situation called for it. ![]() Blueprint for an open-concept homeOur goals for the renovation evolved and grew throughout the process. Initially, we were inspired by the mid-century look, and we felt it would work based on our house’s architecture style and age. However, we didn’t want to be limited by just a time frame. We were most excited about what the house would become: a place to gather. With that in mind, one of the main pieces we wanted to highlight was the bar; it is not only functional but a showpiece that catches the eye right when you come in. We also had a vision for our “reading nook.” The spot, formerly unused, is today occupied daily, offering us a space to relax with a good book. ![]() ![]() Personalized design ideas—including flooringFor the house’s big-ticket items—cabinets, countertops—we chose a neutral palette, so we leaned in hard with finishes. We incorporated unique wallpaper, tiles, different rugs, and fabrics. Those patterns and textures bring personality to the space. It was—and still is—controversial, but we covered our original hardwood floors with high-quality vinyl flooring. It looks incredible, and the floors are nearly indestructible and totally waterproof. That’s a big plus when you have a pool out back. ![]() When we designed storage, we didn’t just try to hide things away. Instead, we created spaces that openly feature and display our records, books, and collectibles. Our tip here is, don’t feel like you need to hide all of your belongings away. To freshen things up, a big focal point of our design was the incorporation of greenery. Decorating with lots of plants makes the space feel fresh and welcoming wherever you look. Because of recurring drought, our yard converted to a more water-wise environmentally-friendly situation. The yard is designed to have a clean look from plant placement to rock-lined borders. The only thing left to do is add a little more underground drainage for the unseasonable rainstorms. ![]() ![]() Permitting worriesAs a first-timer renovator, my biggest question was, how do we do all the permitting? It was a challenge. Crews were delayed as well as the permits, the latter being the biggest issue. In the end, we finished on-time and on budget because of our contractor’s expertise.
Renovation tipsFor other renovators, we have a few pieces of advice. First, ask all the questions to all the people. Everyone includes: your contractor, the plumber, the workers, the government code person. All of them. Our plumber had a great idea for a piping solve that saved us money. ![]() ![]() Next, do not live in the house through your renovation. We lived in our home, washing dishes in the bathtub and cooking outside on the grill. DON’T DO IT. It was cold, and we spent many nights sitting on the floor of a crowded bedroom eating a still-frozen microwave burrito and questioning our life choices. Did we mention not to live in your house while you renovate? ![]() ![]() Homeowners deliver on their dream homeIt was a fantastic help to have Sweeten’s large asset bank at our fingertips to gain inspiration, find contacts, and overall keep the project moving. Did we come in under budget? No. (If someone has, please call us!) We did stay within our budget. We talked about the areas, materials, and decor we wanted to spend big on with our Sweeten contractor, and agreed on places we could save. That allowed for flexibility when unexpected expenses showed up. The cost of our top-to-bottom renovation? $250,000. ![]() ![]() ![]() Every day as the job went on, Buddy the Cat came out in the evening to find walls missing or added. He and Callie, our dog, thought we were magicians. So did our friends, seeing a yellow 1950s “super small” house—in the words of nearly everyone who crossed the threshold—turn into a stylish, “WOW! Look at all this space” stunner. It turned out amazing. Thank you, Liz and Michael, for sharing your home with us! -- Sweeten handpicks the best general contractors to match each project’s location, budget, scope, and style. Follow the blog, Sweeten Stories, for renovation ideas and inspiration and when you’re ready to renovate, start your renovation with Sweeten. Renovation MaterialsKITCHEN RESOURCES:
DINING ROOM RESOURCES:
BATHROOM RESOURCES:
LIVING ARE RESOURCES:
HOUSE EXTERIOR RESOURCE:
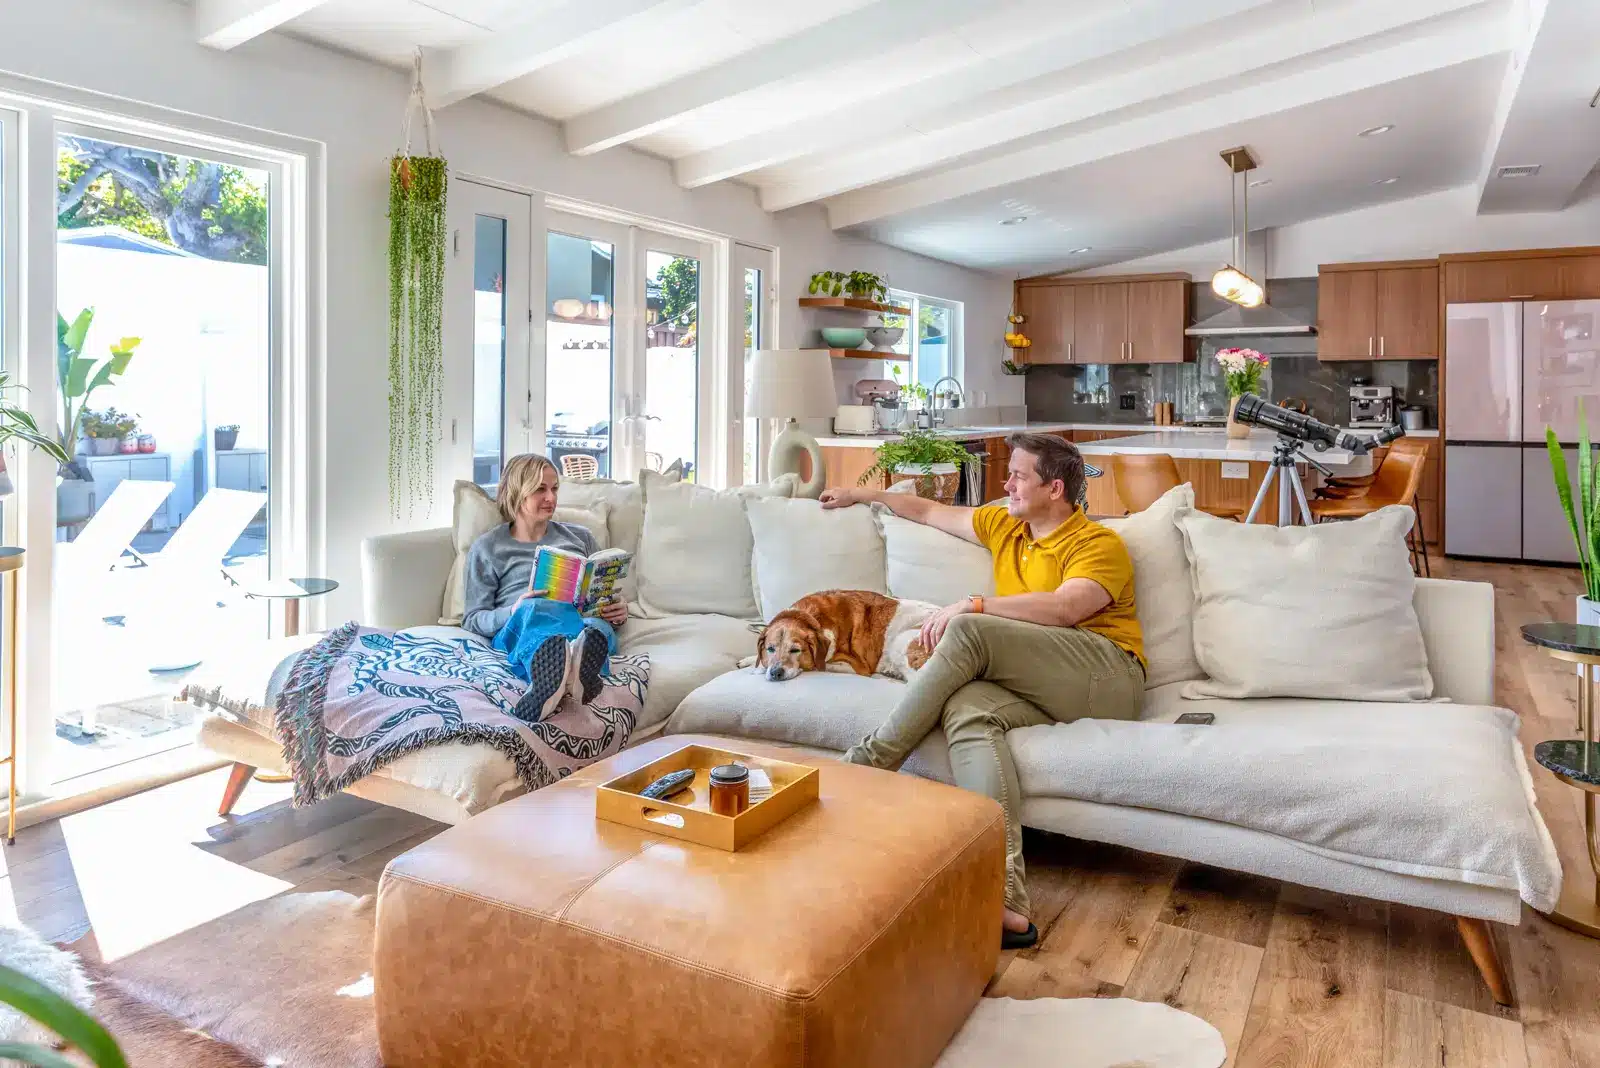
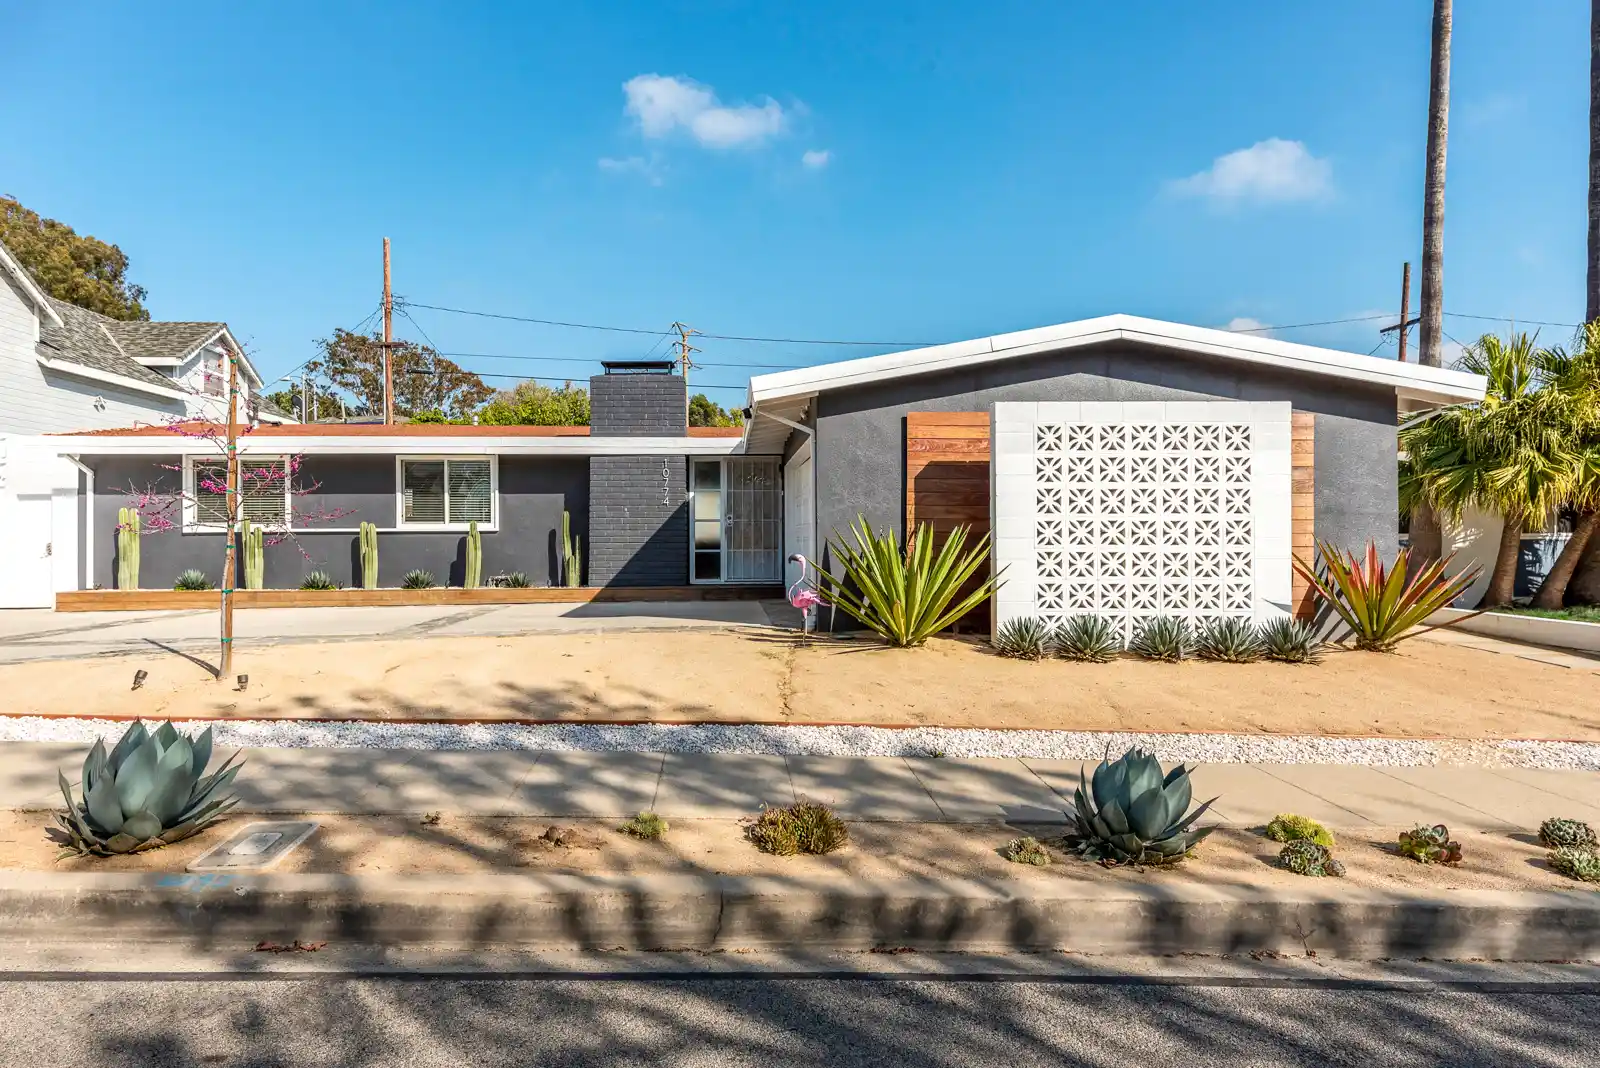
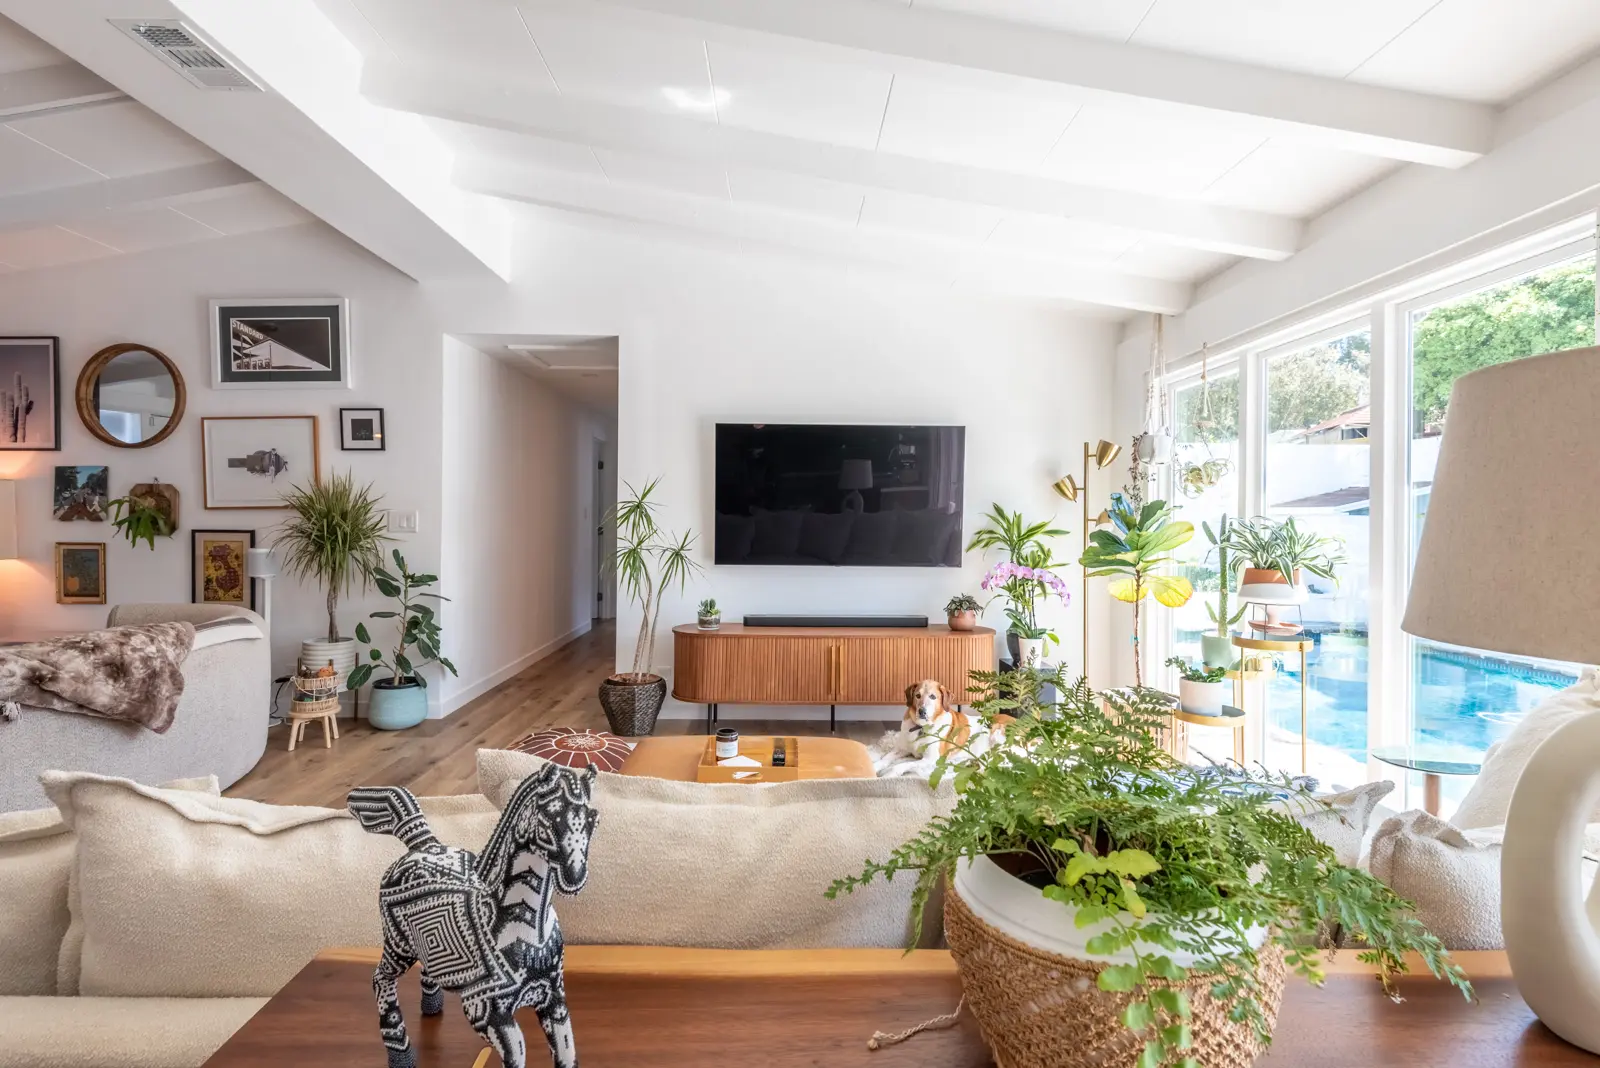
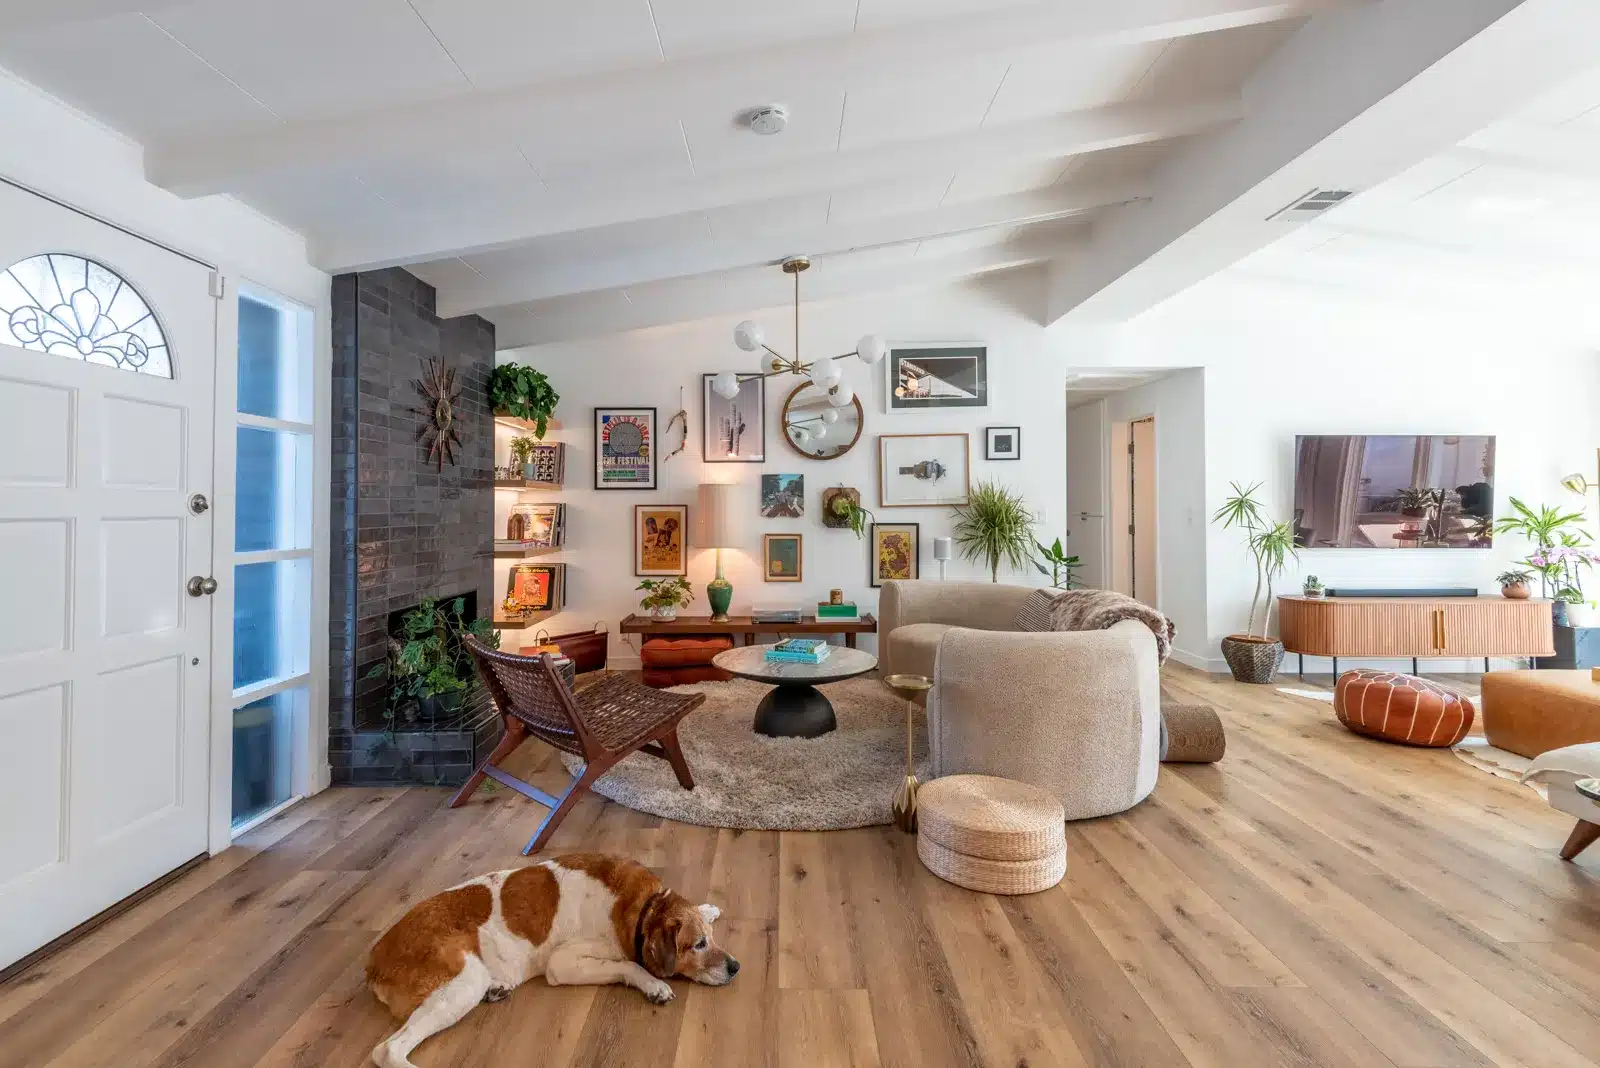
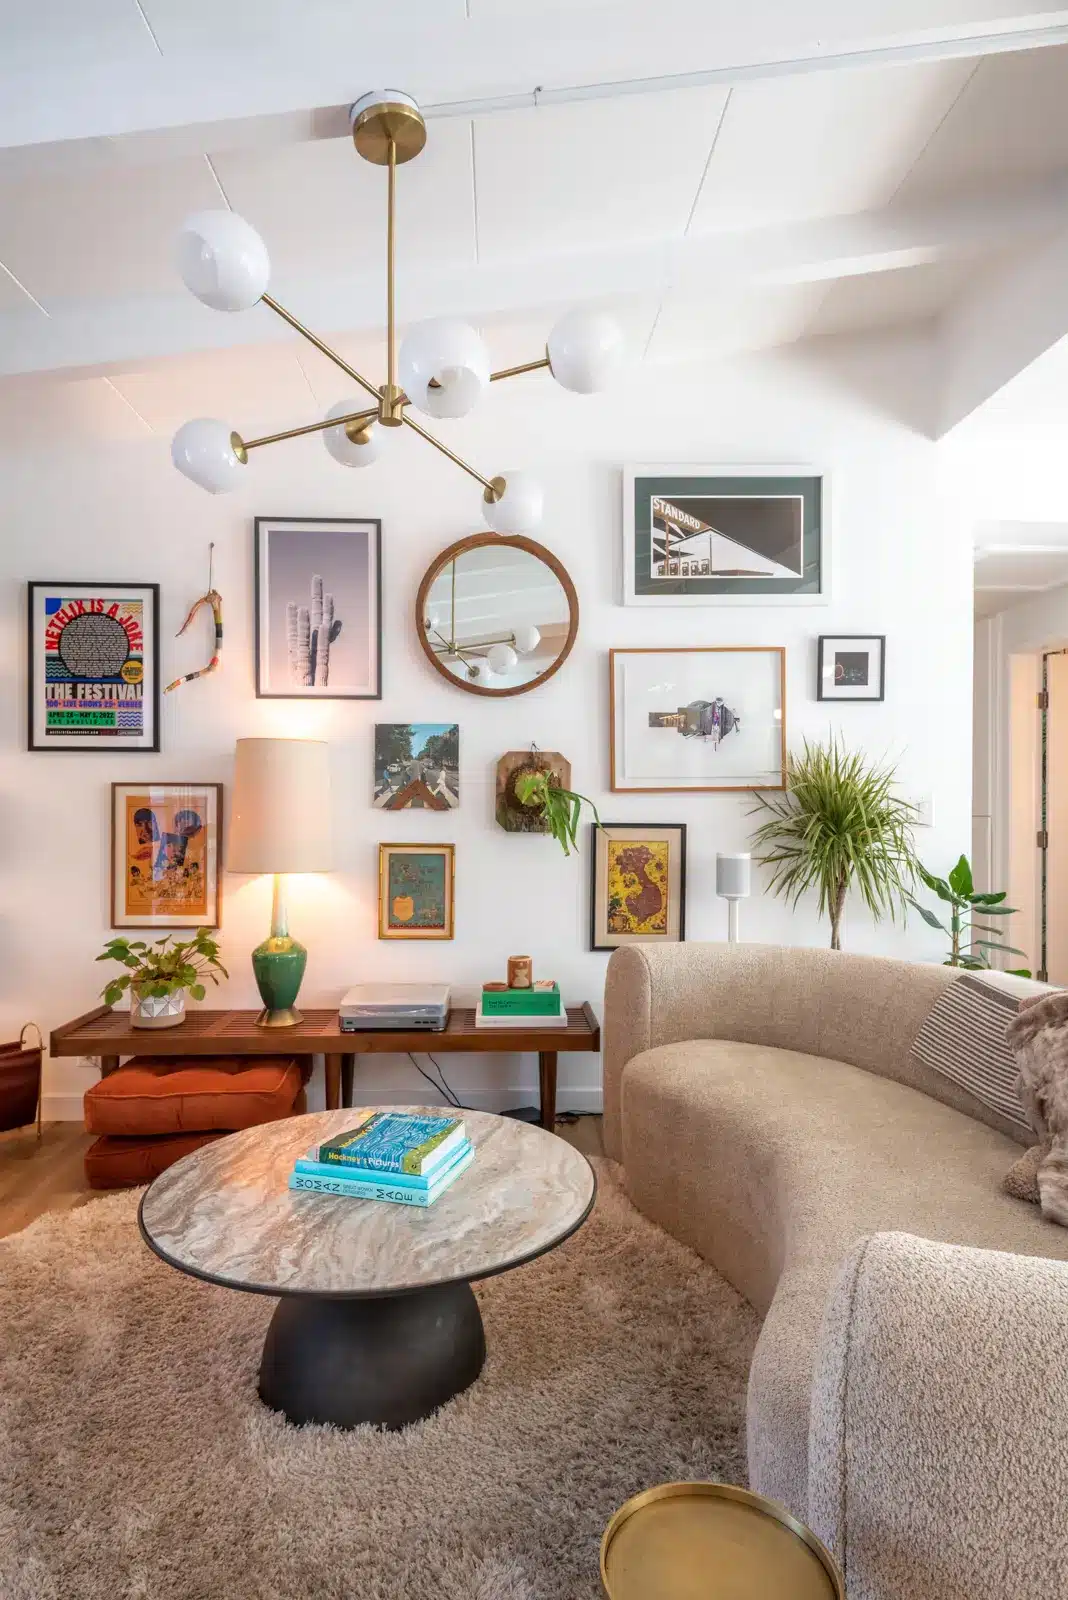
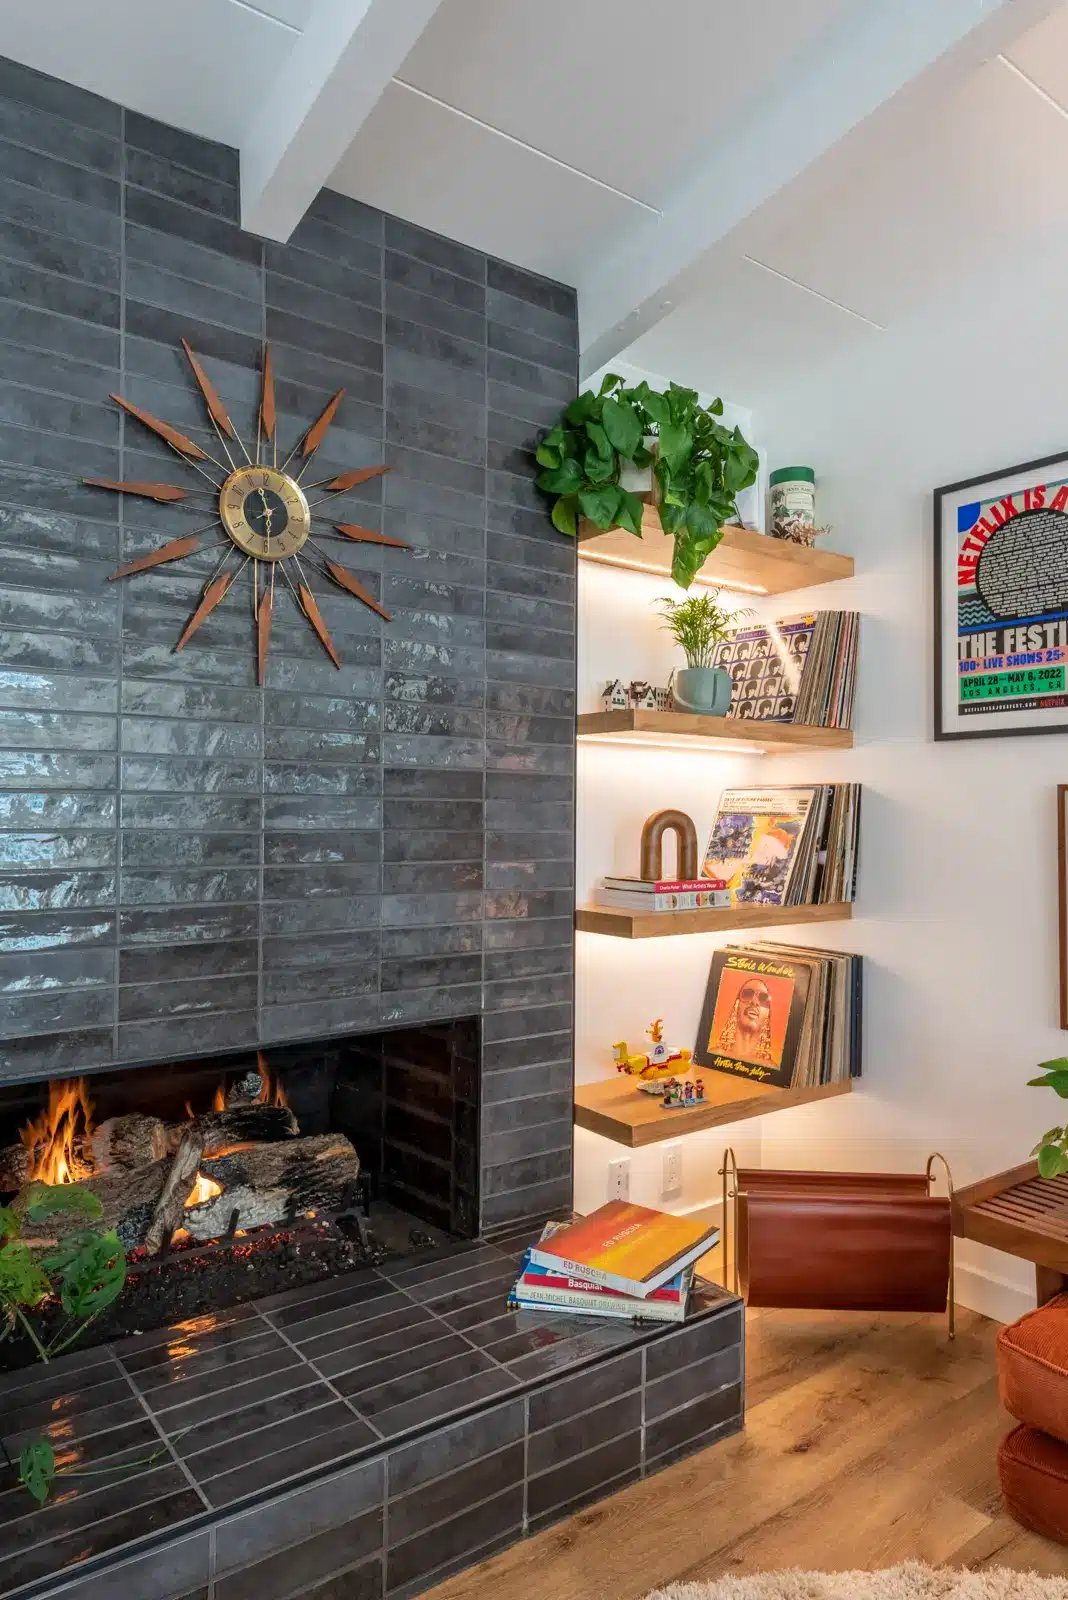
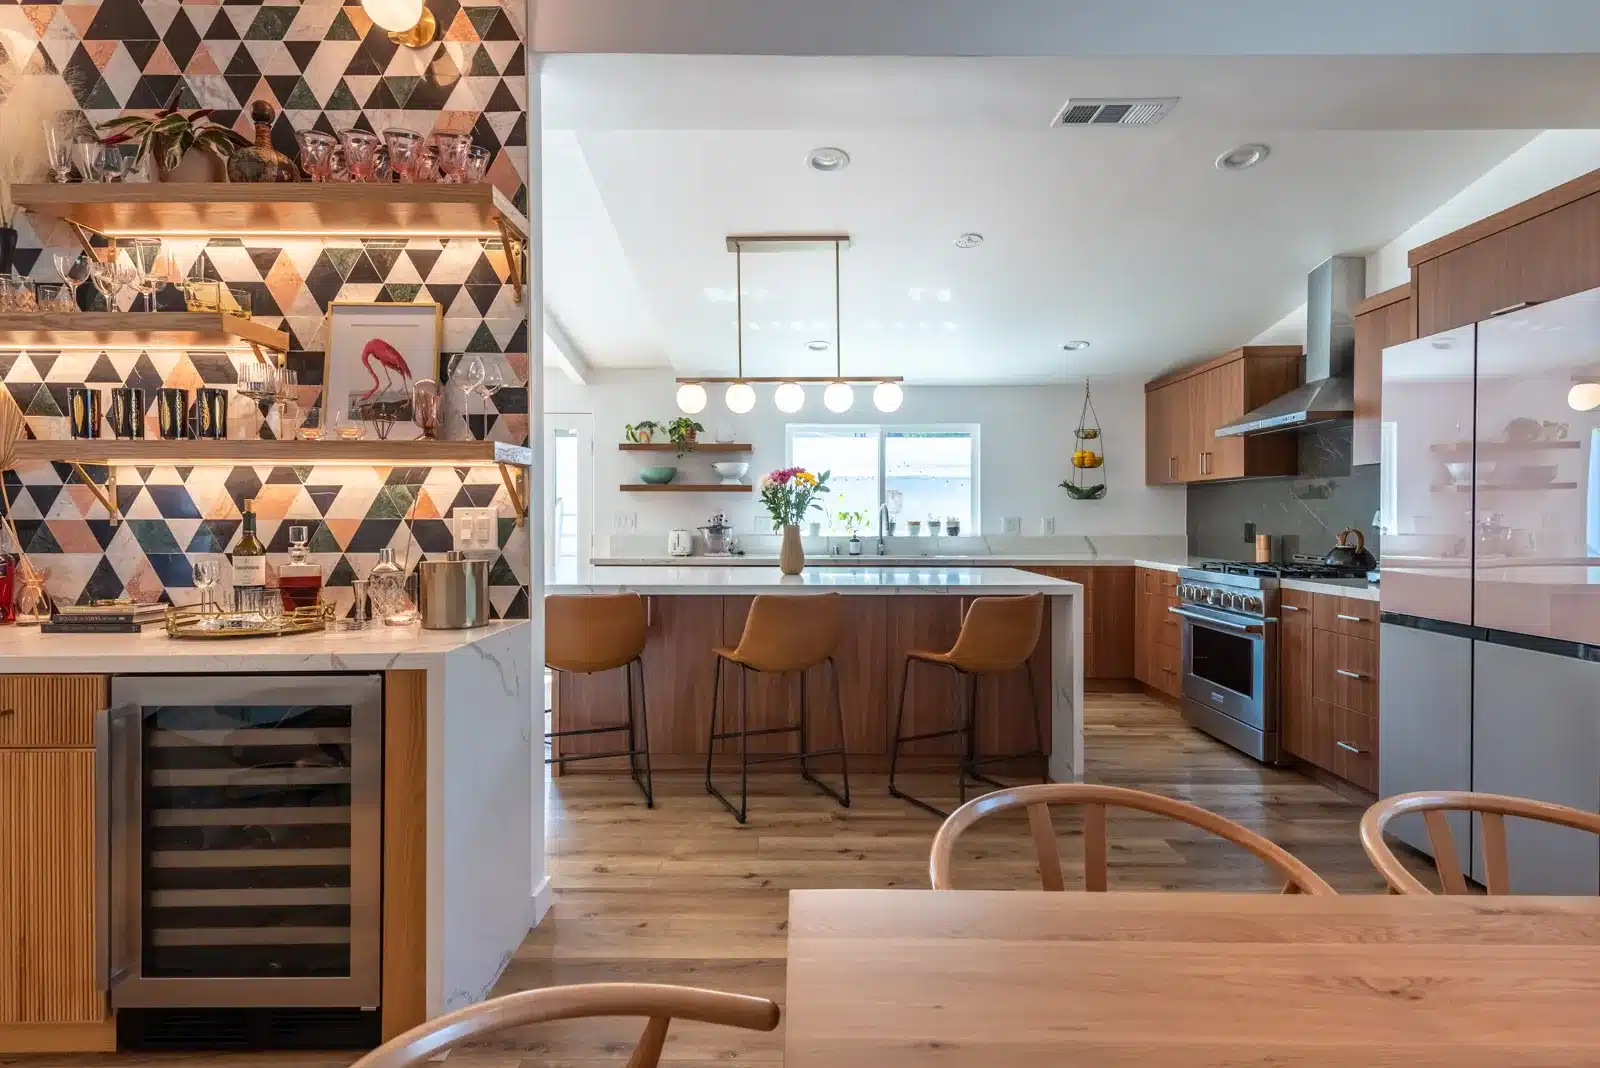
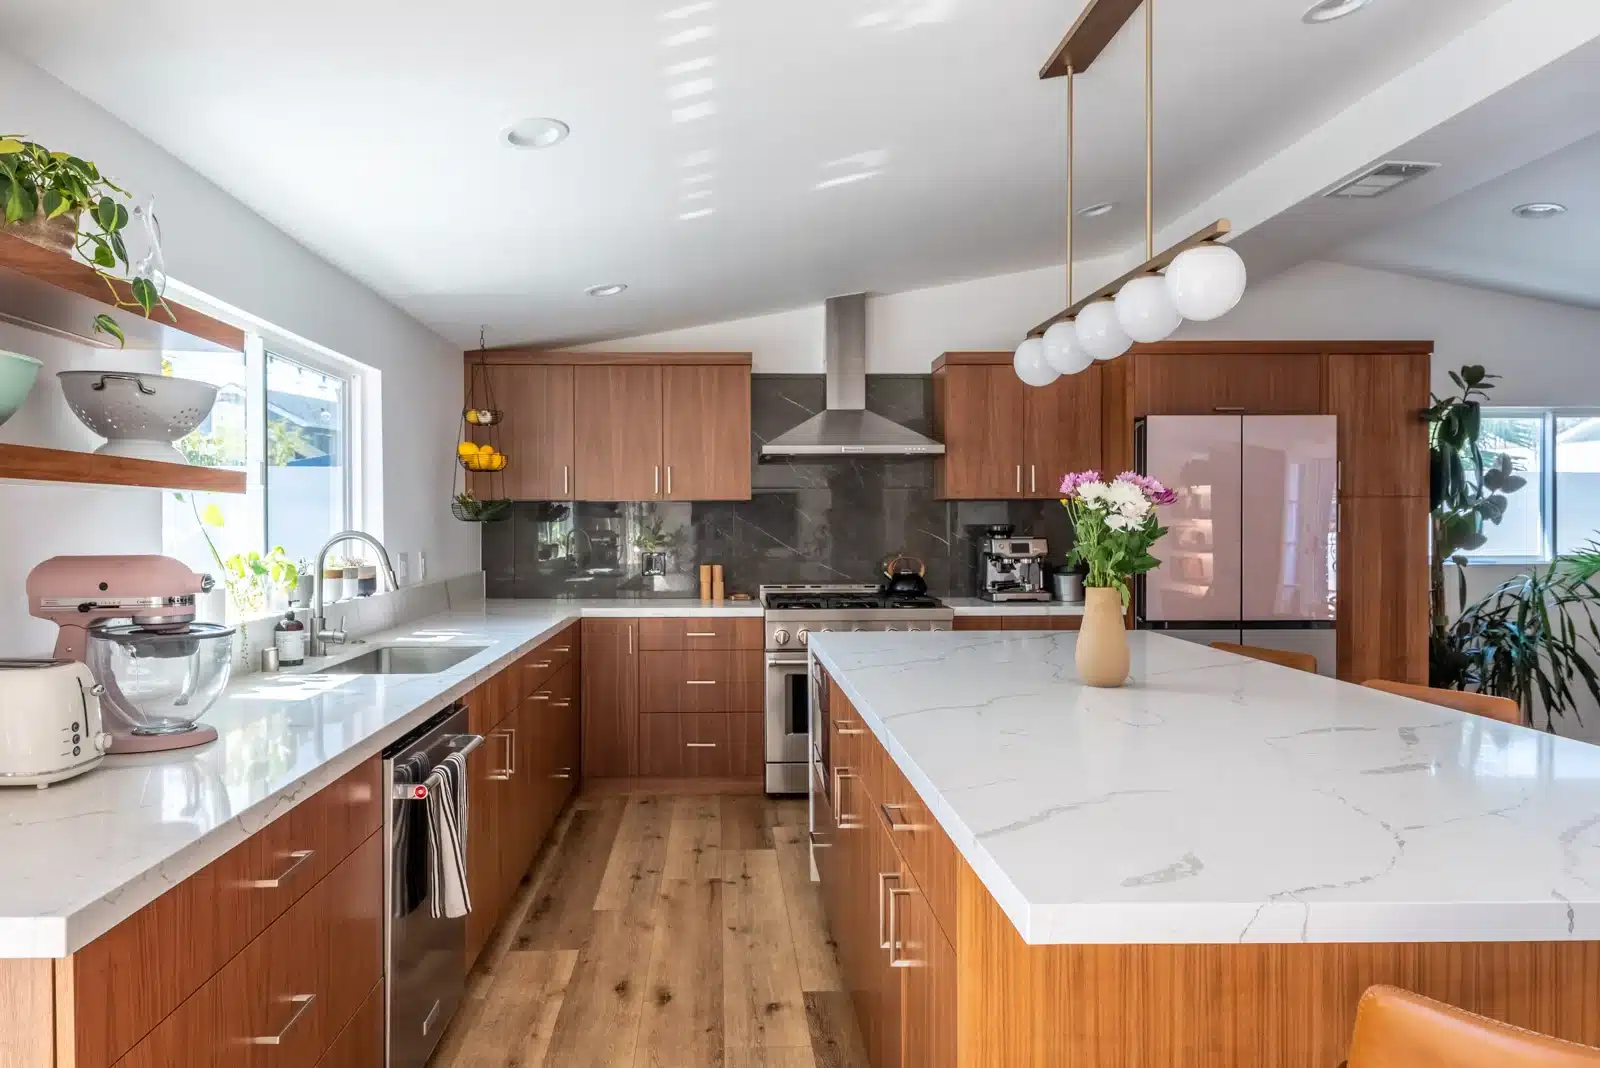
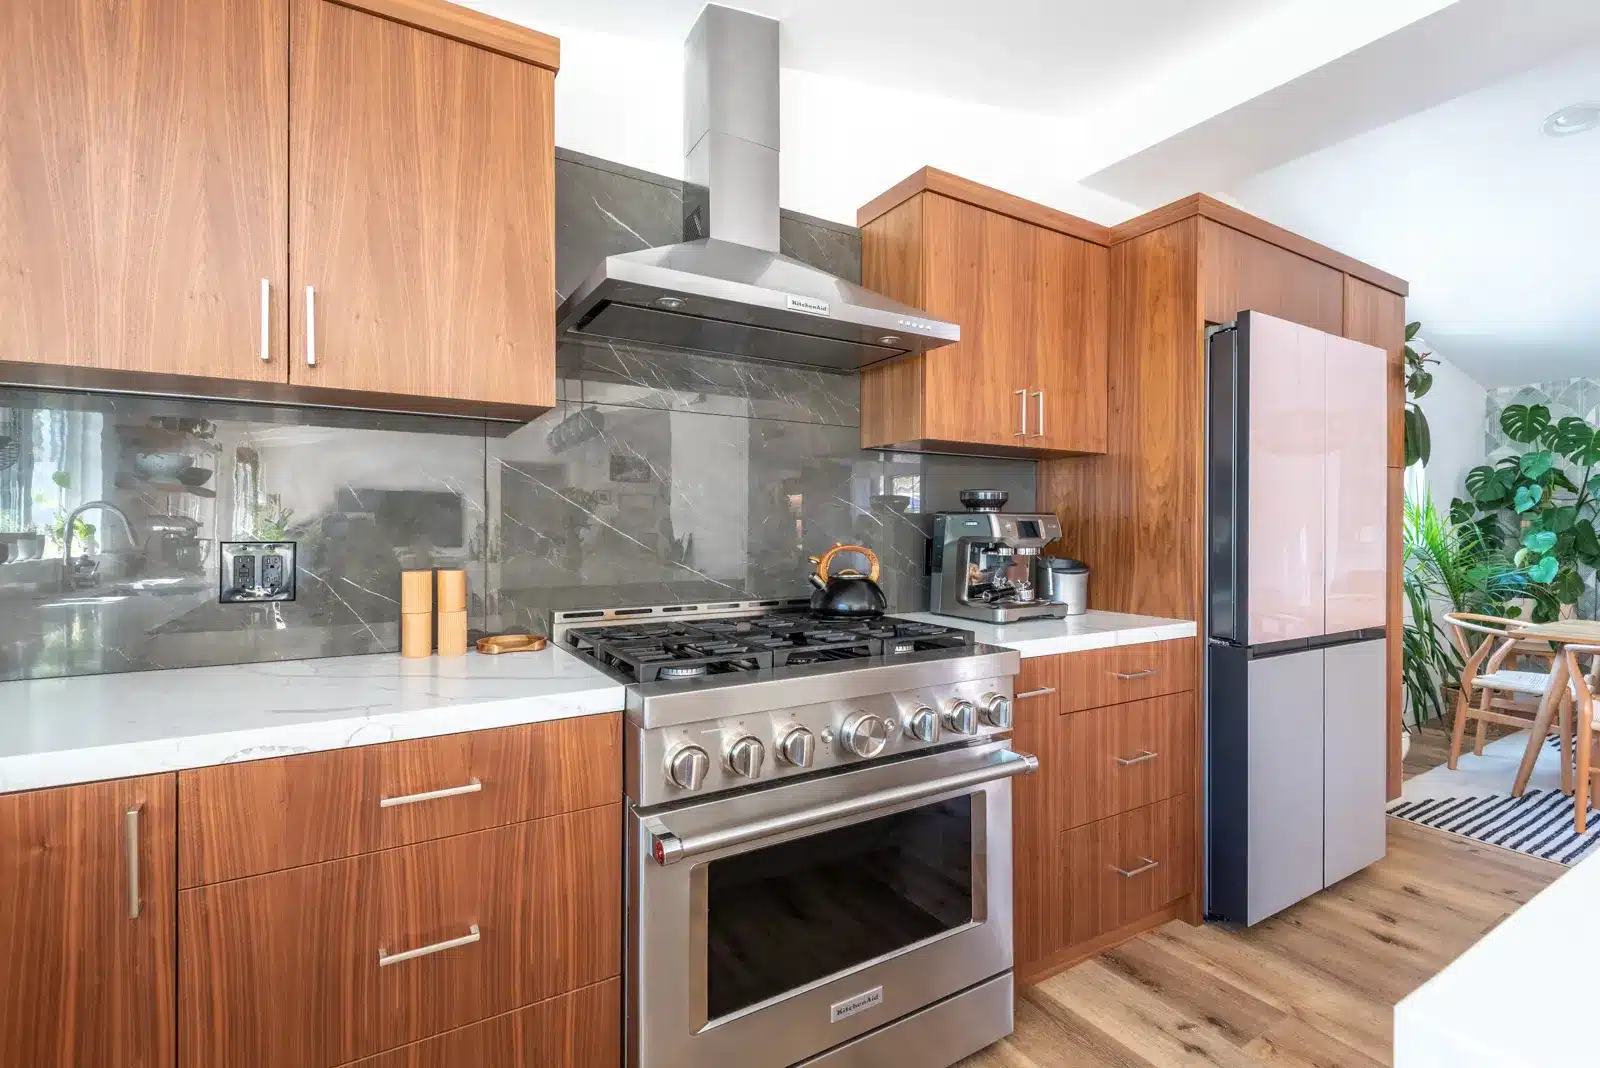
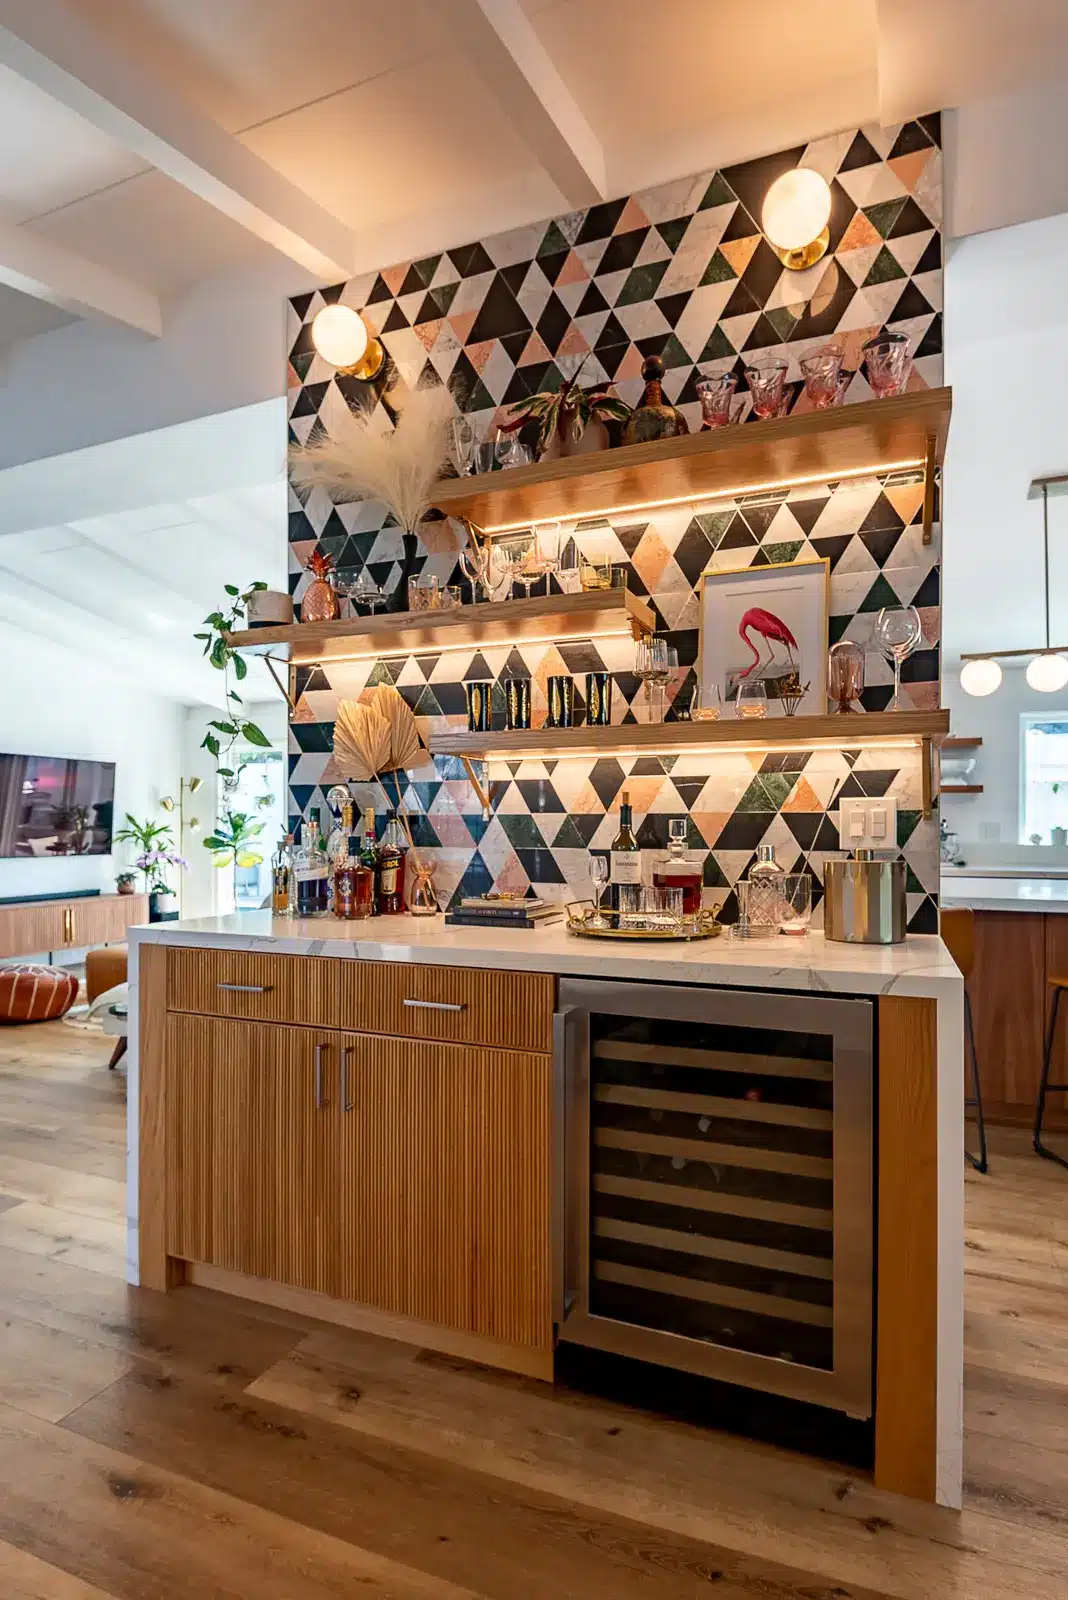
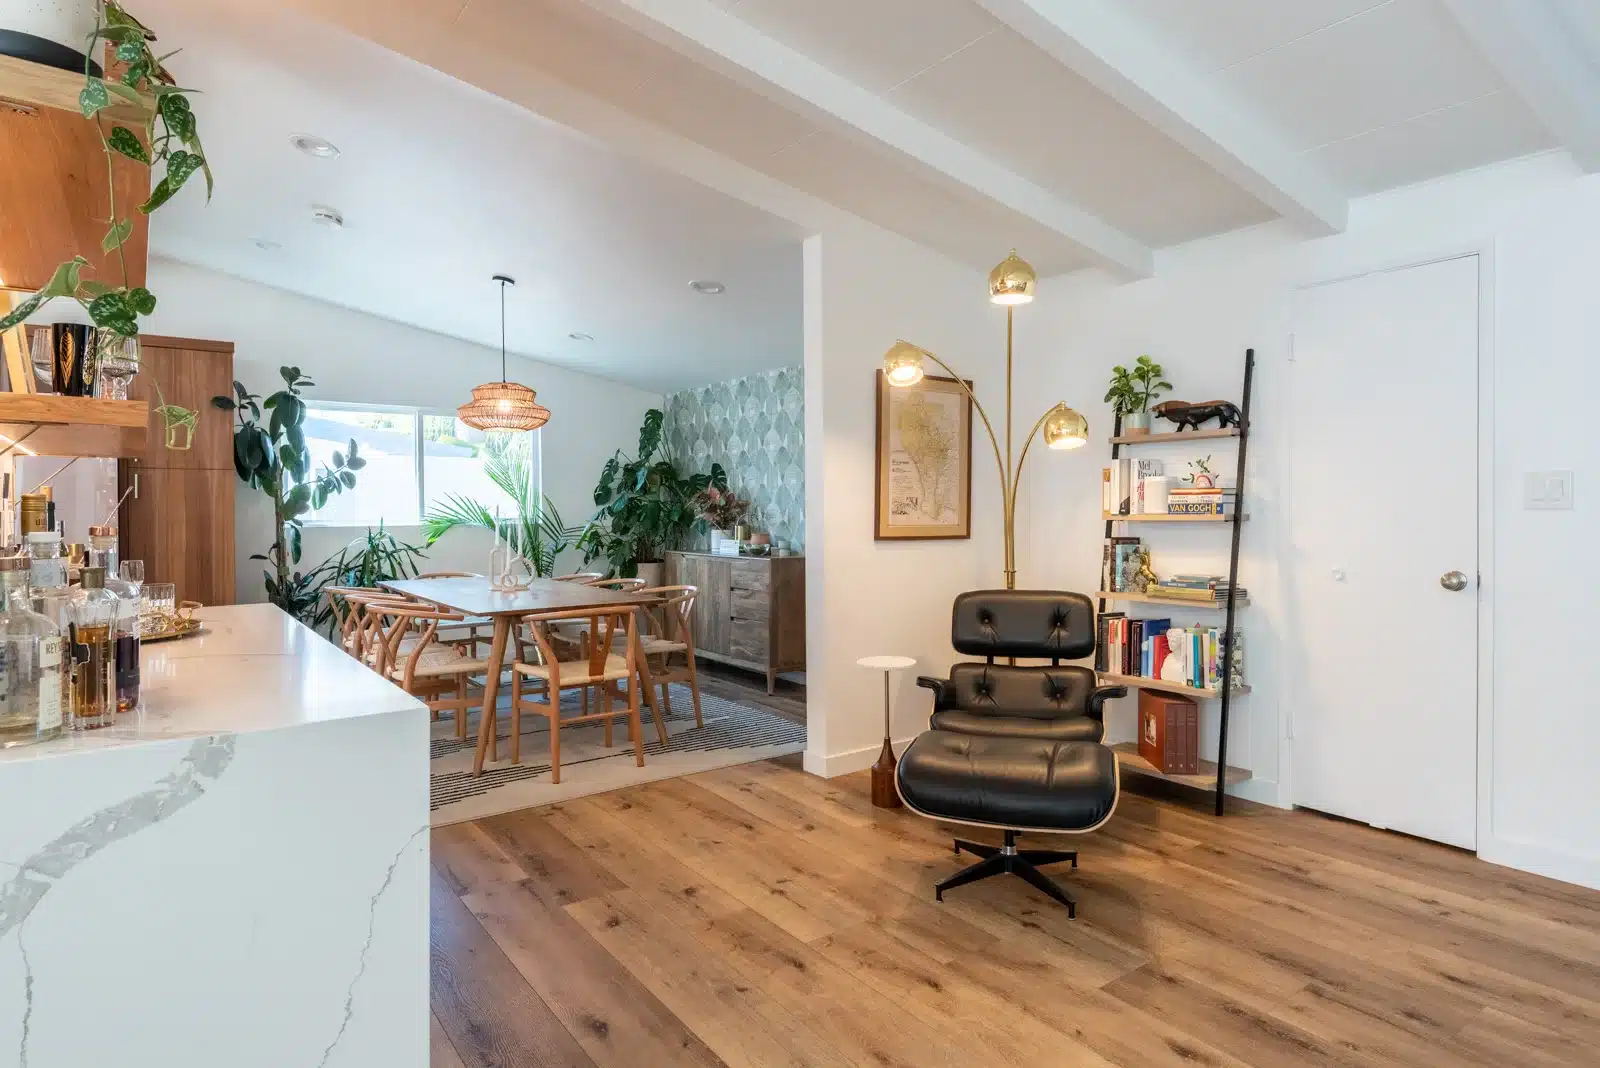
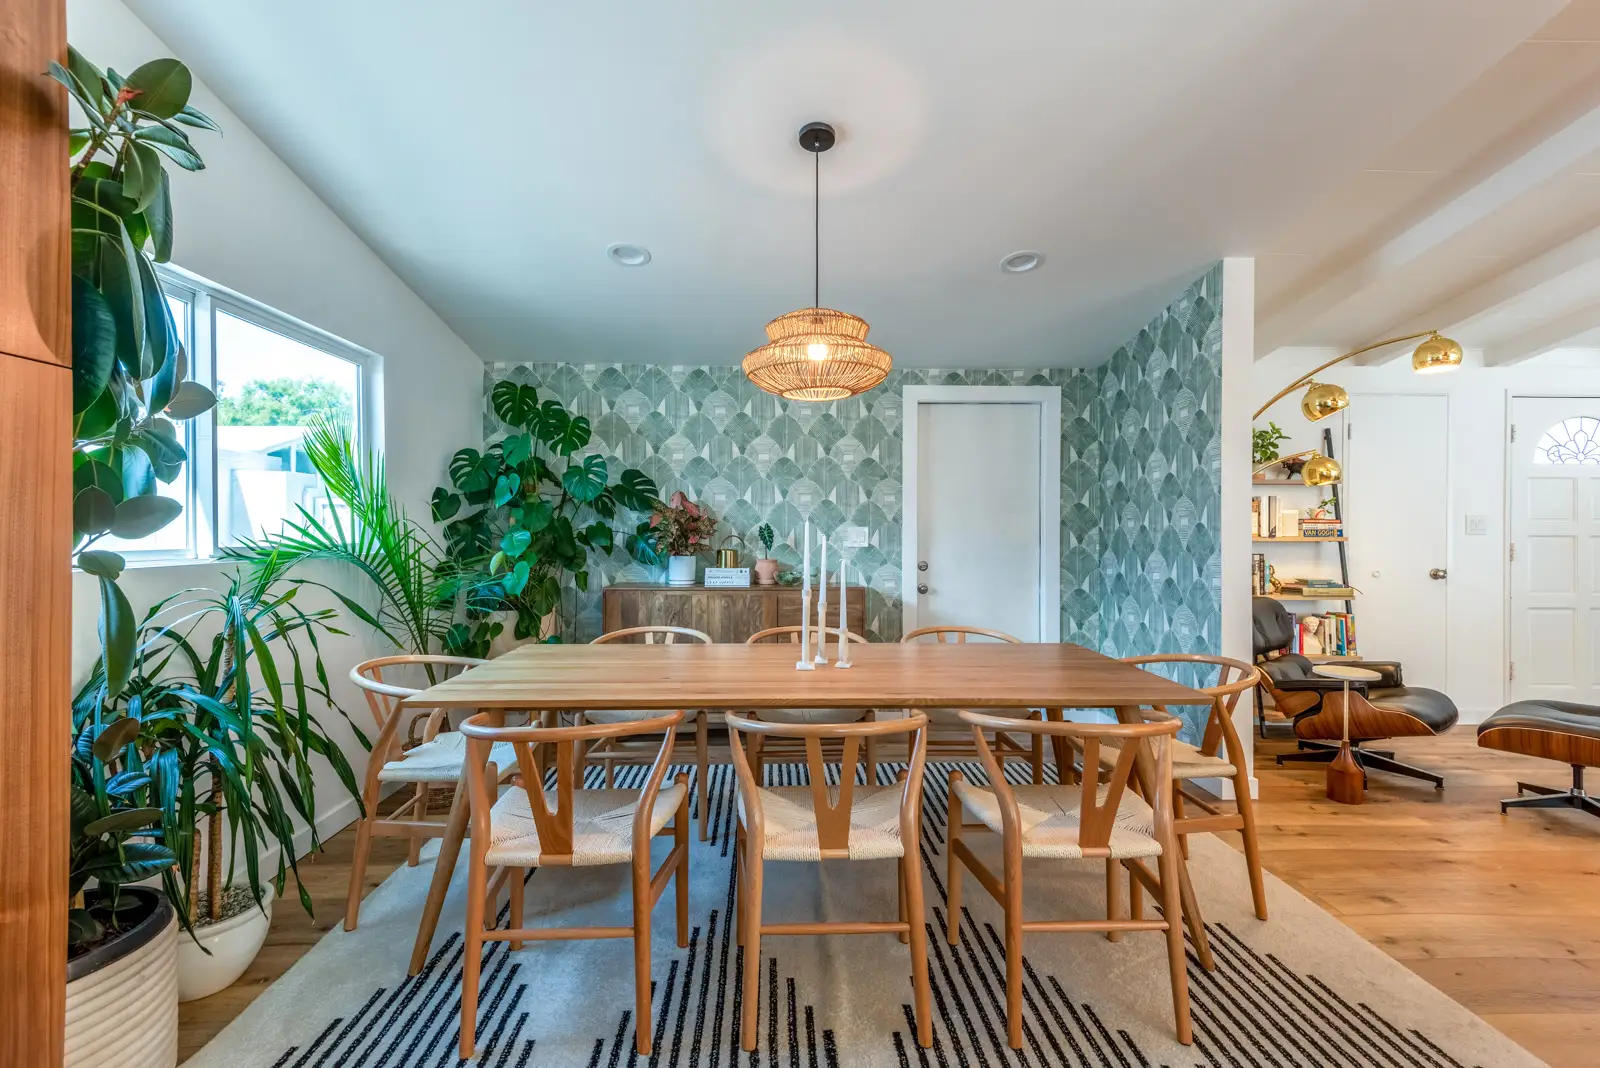
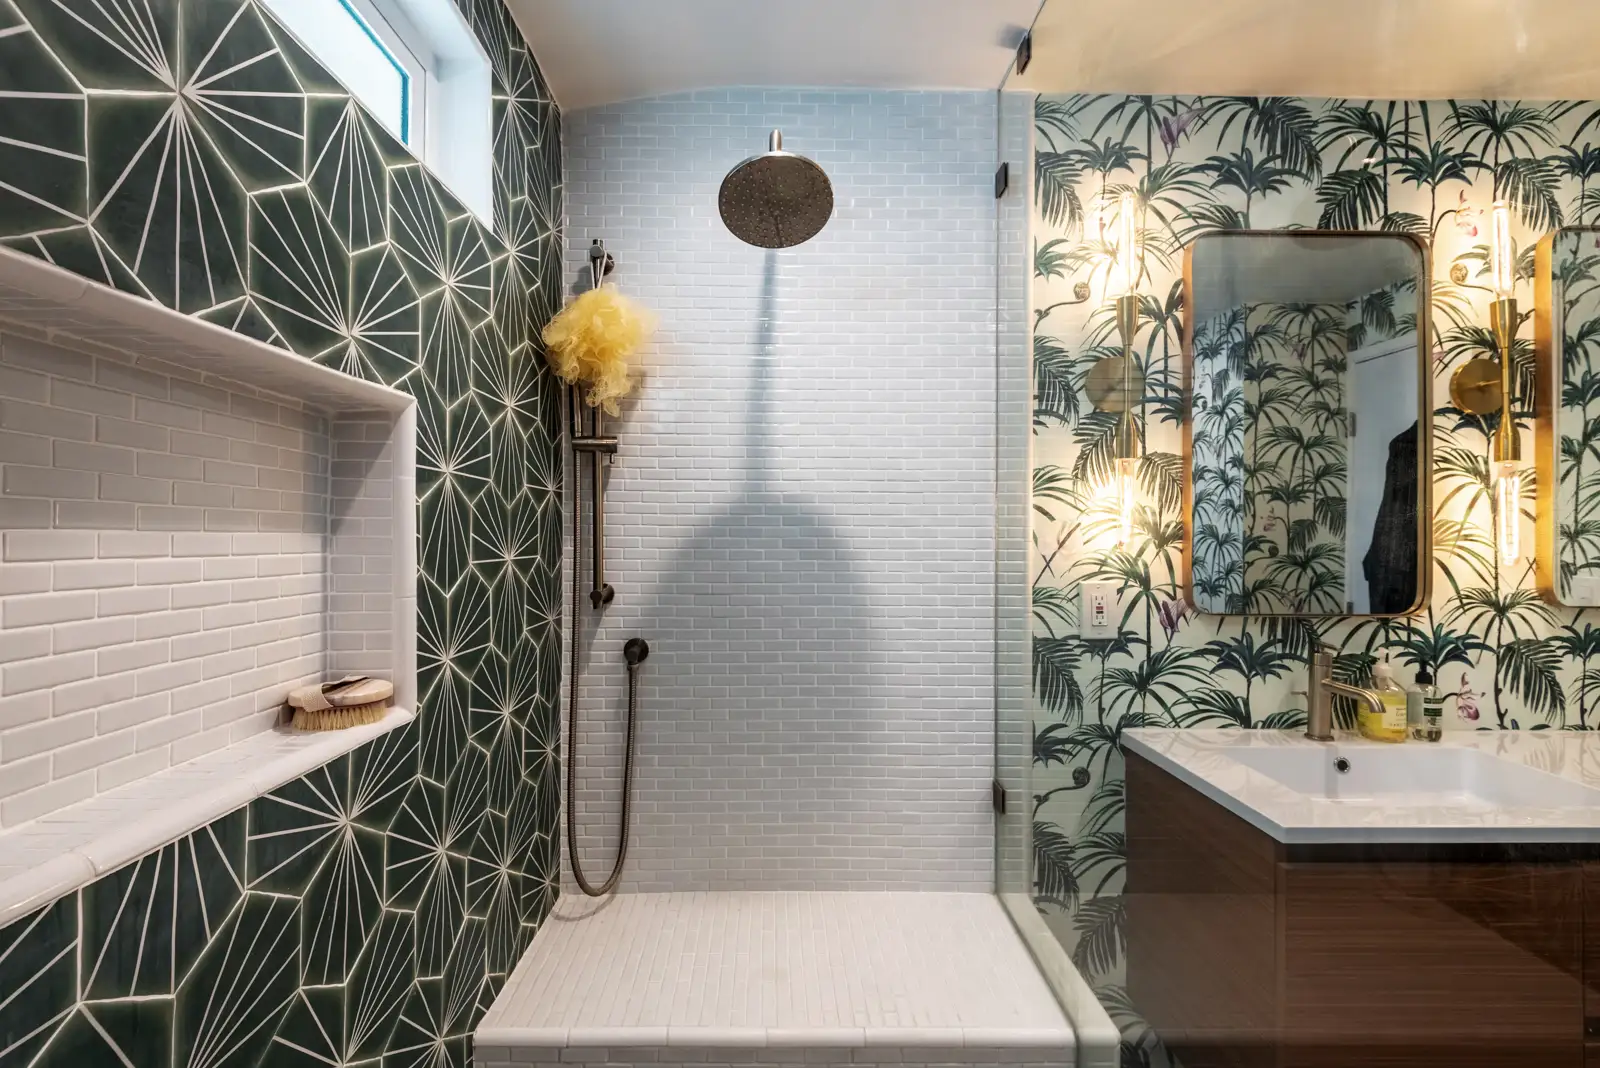
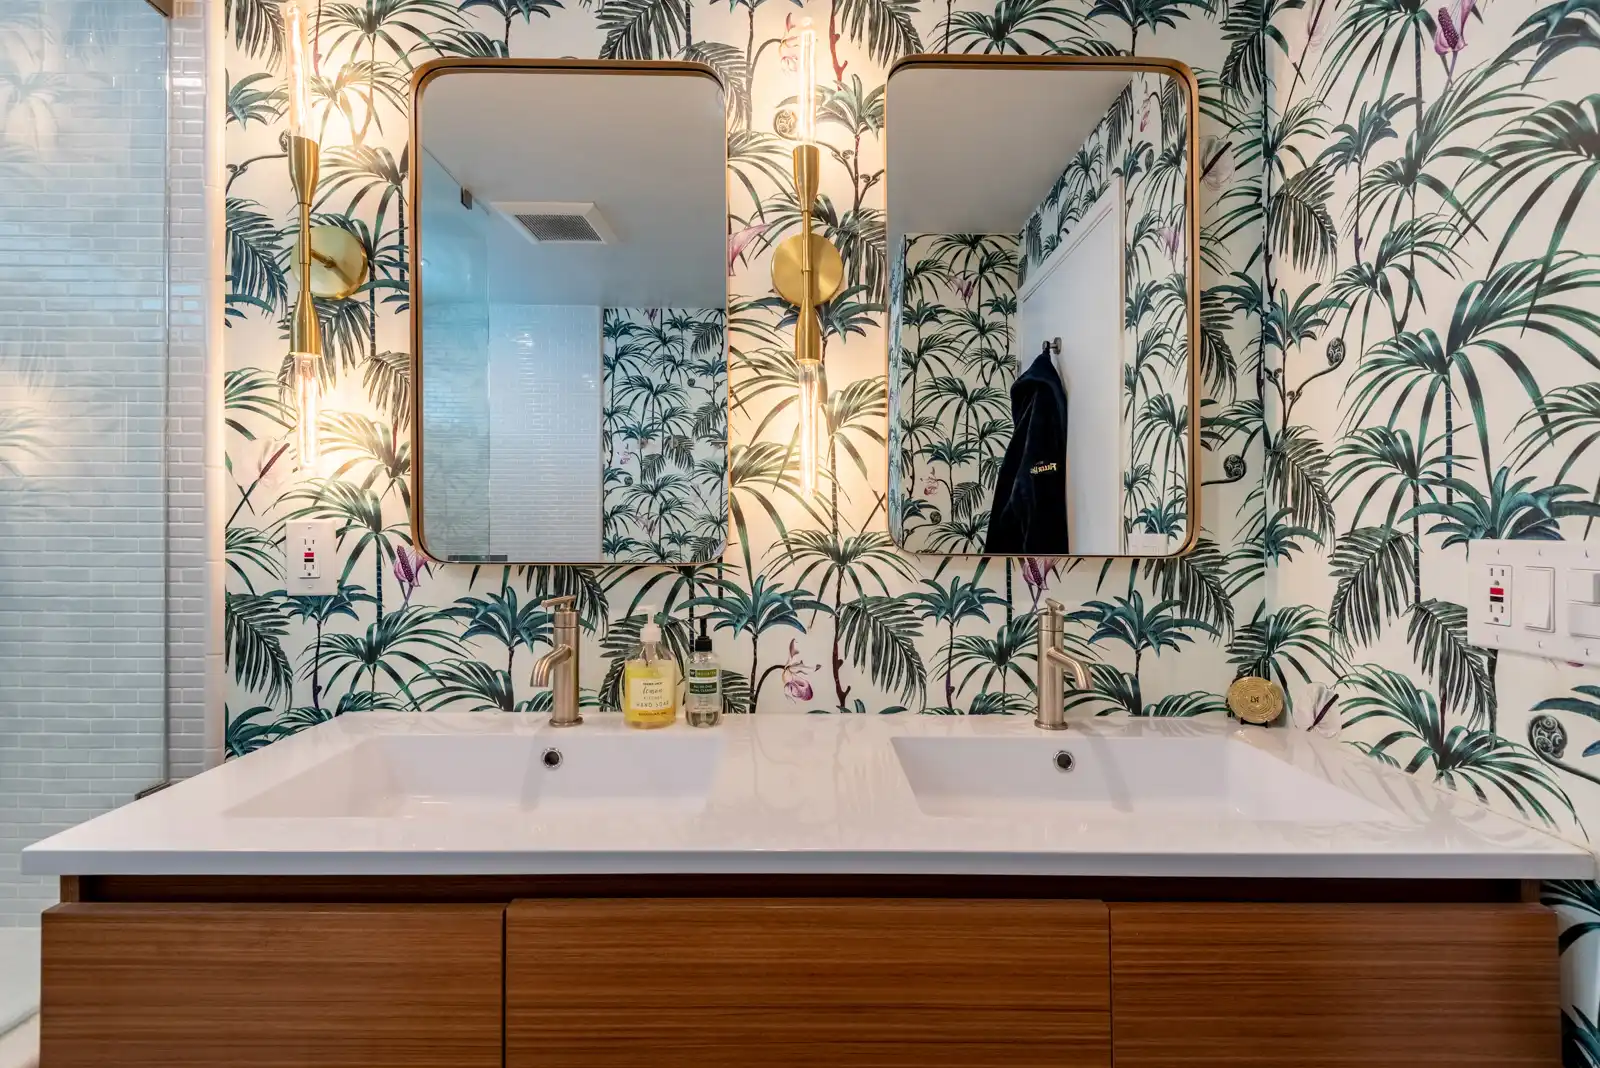
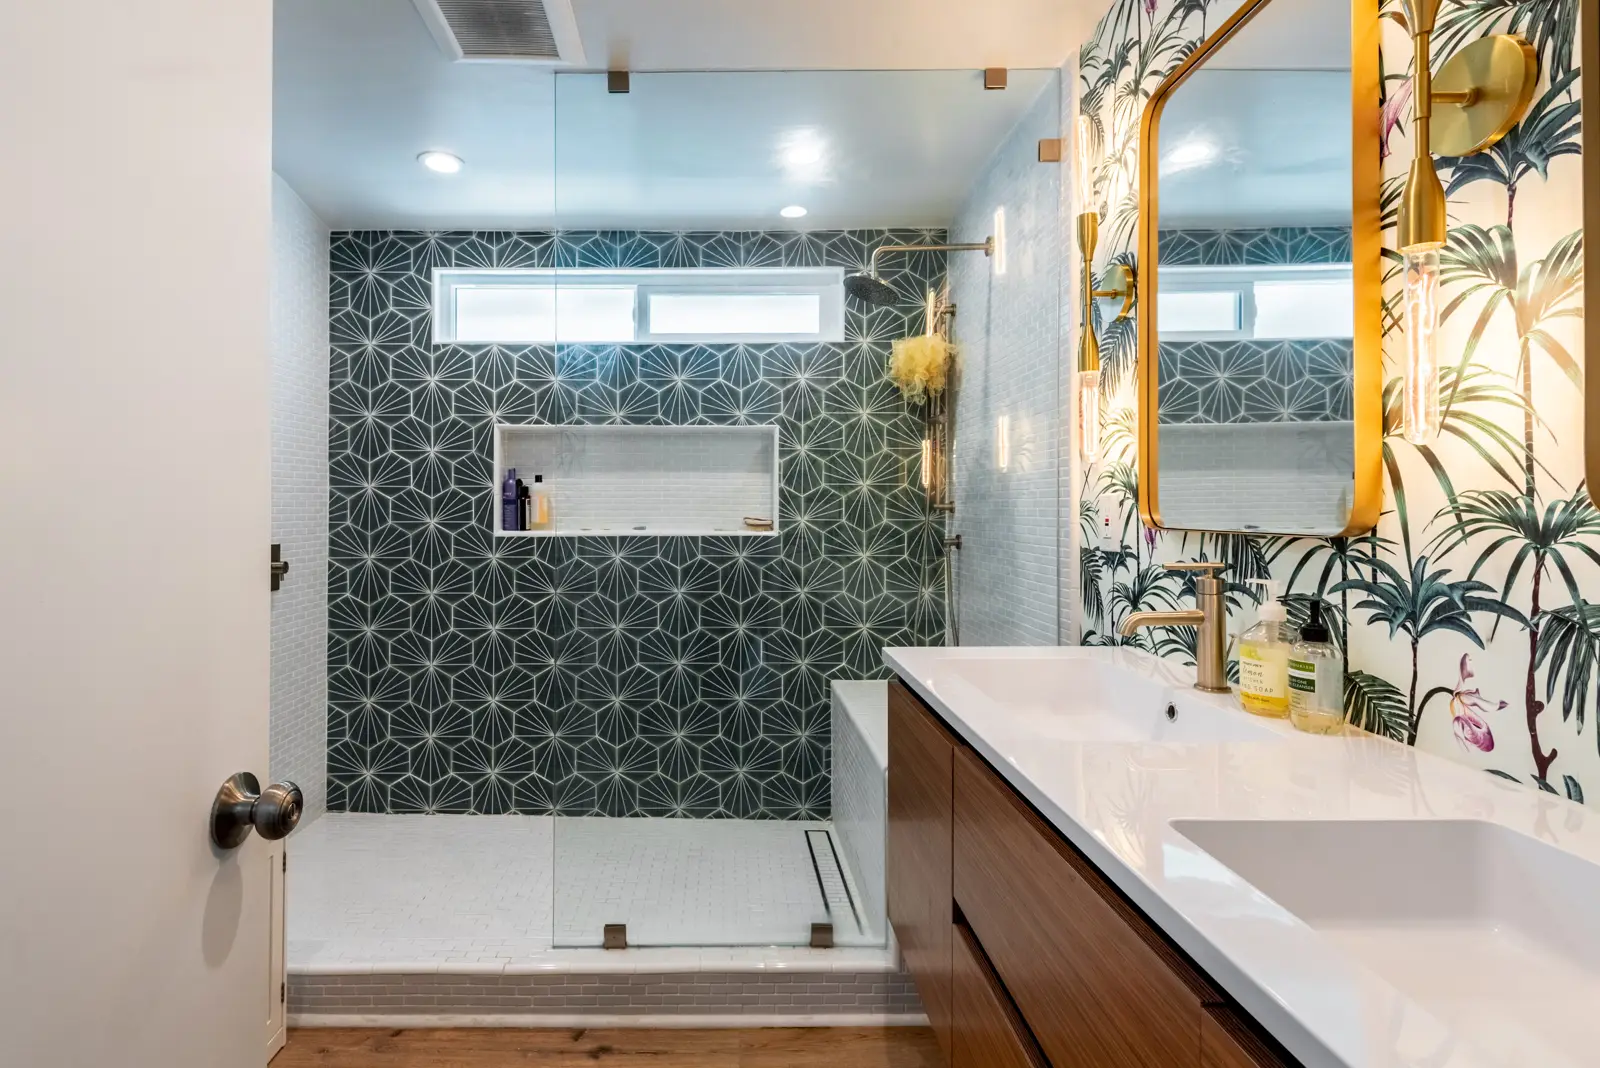
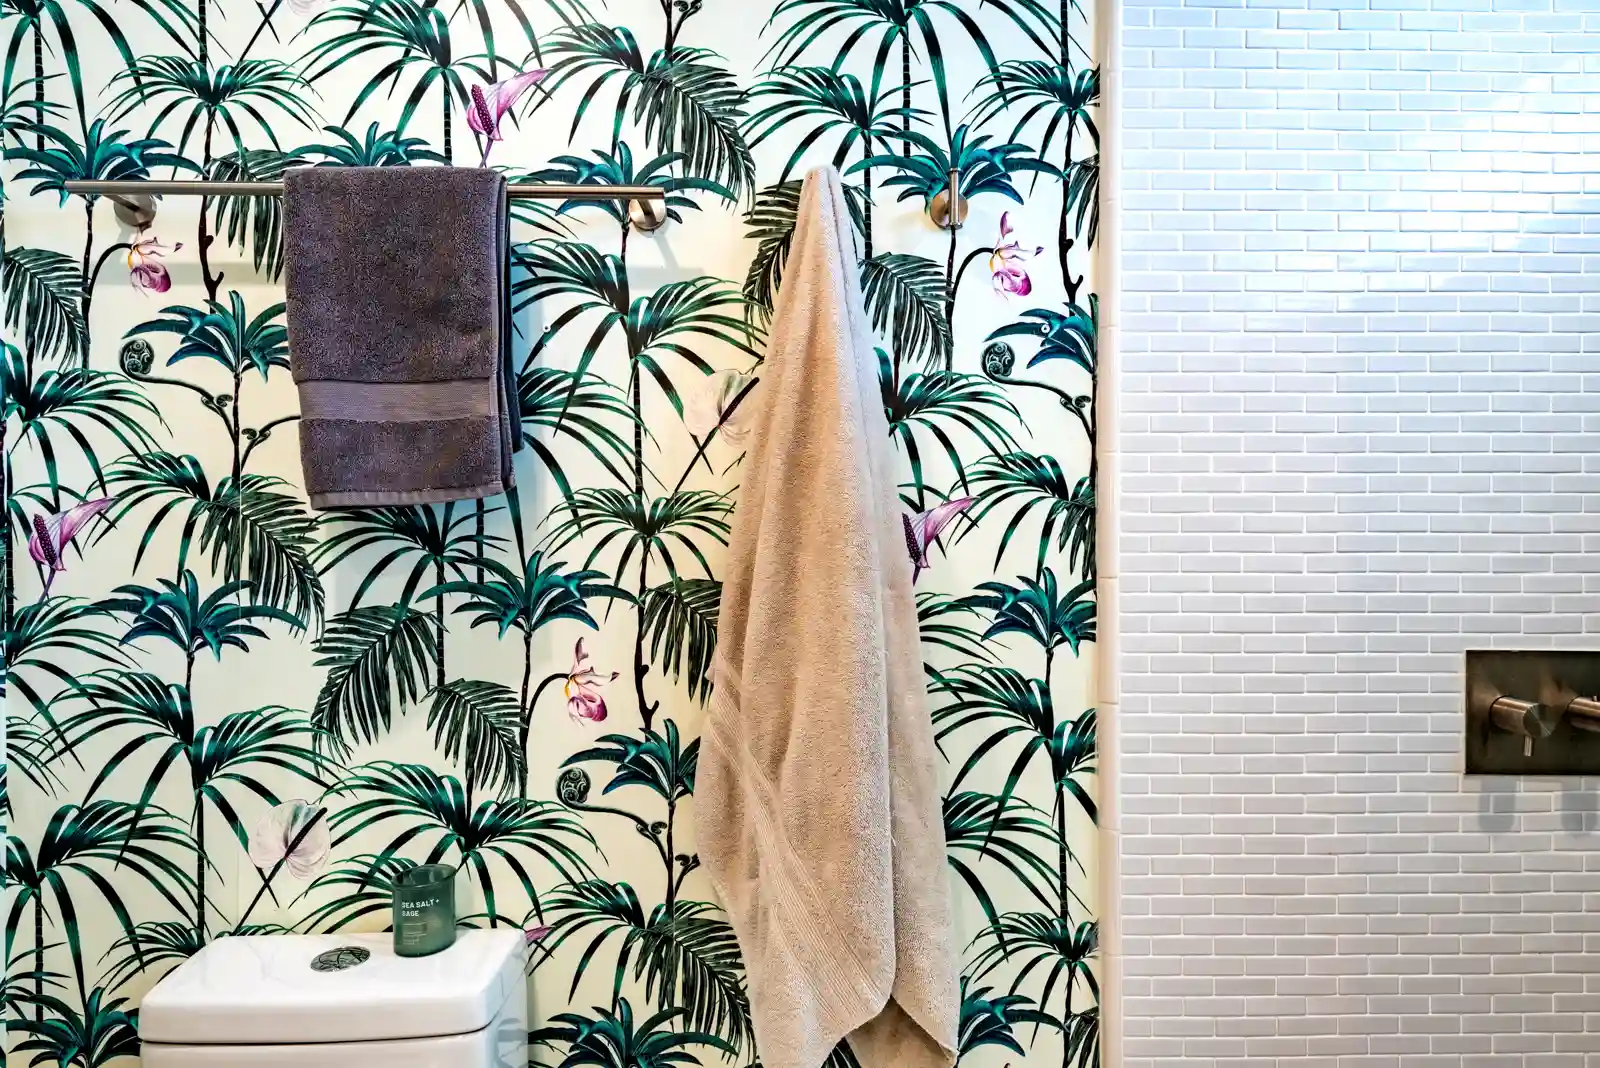
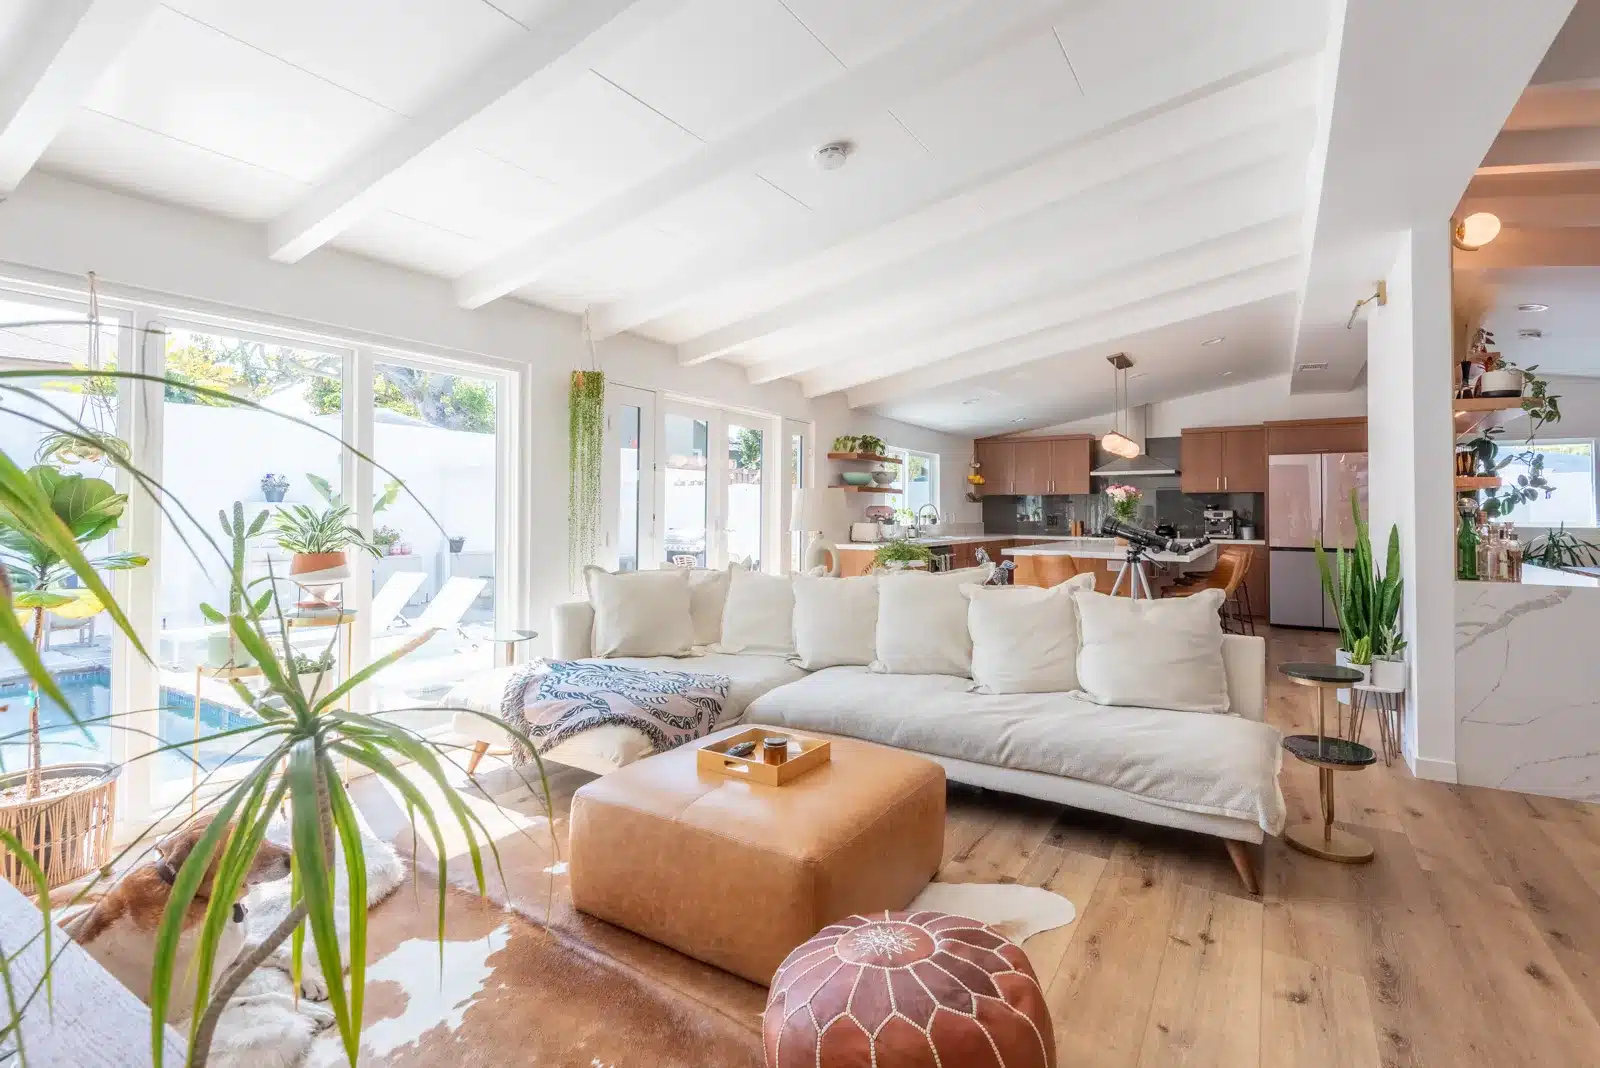
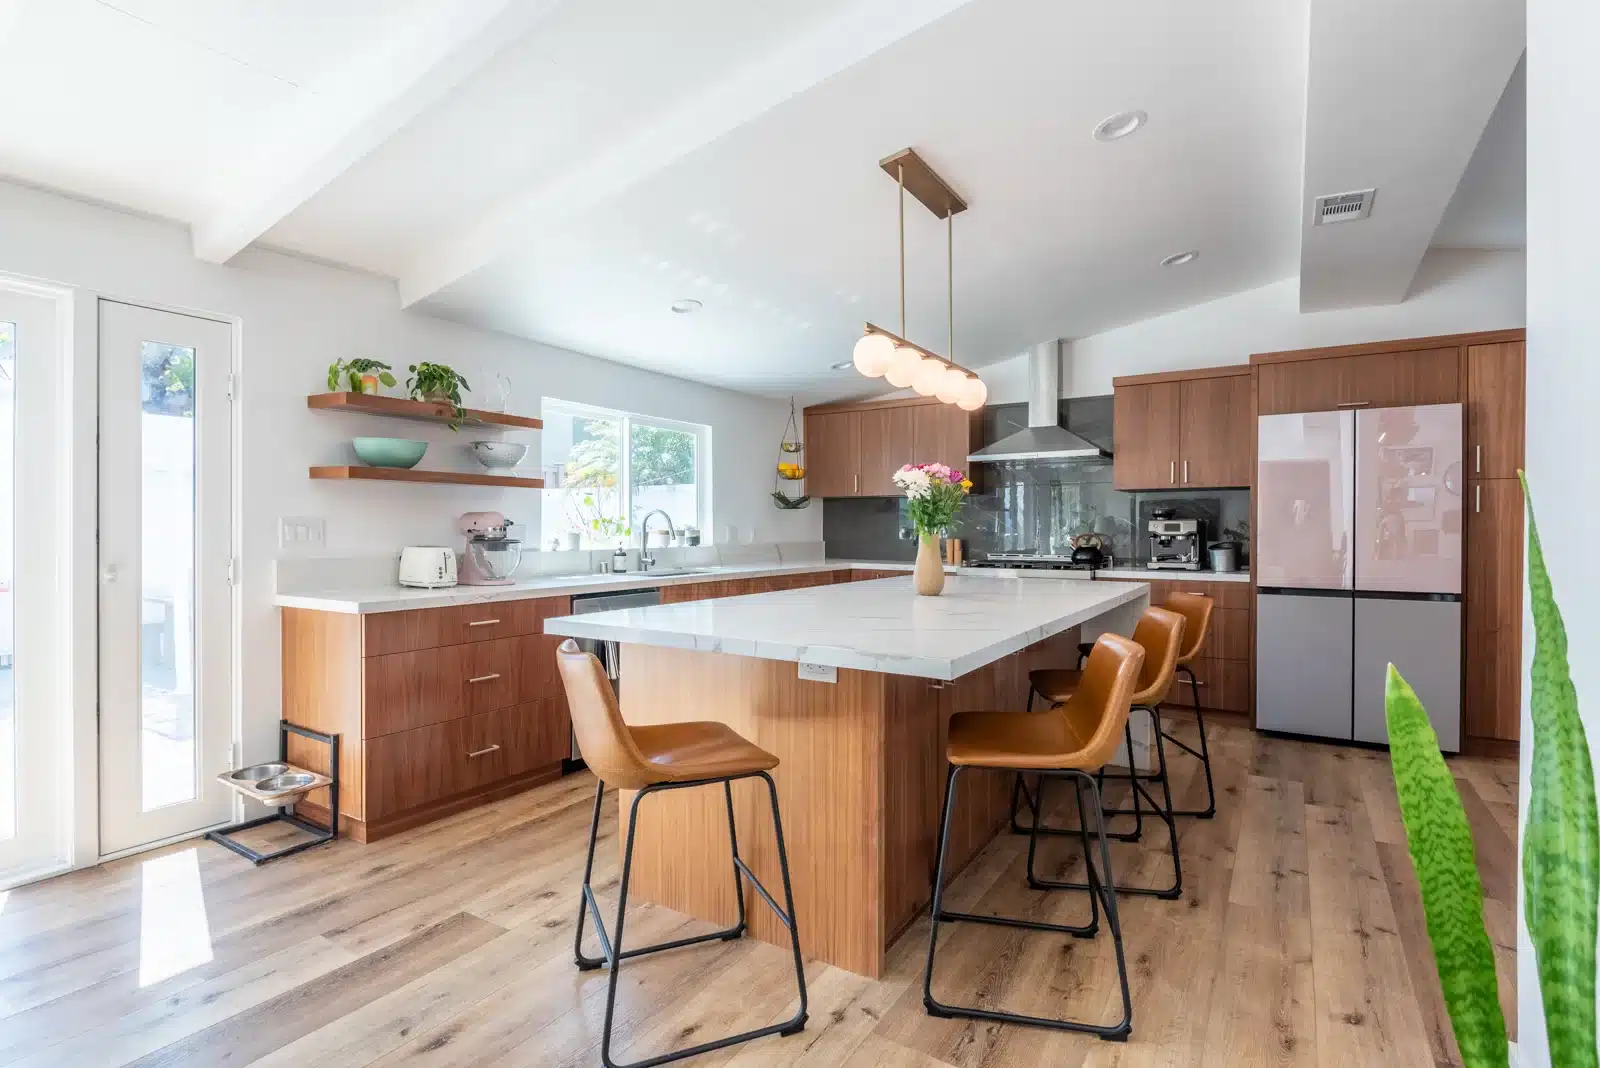
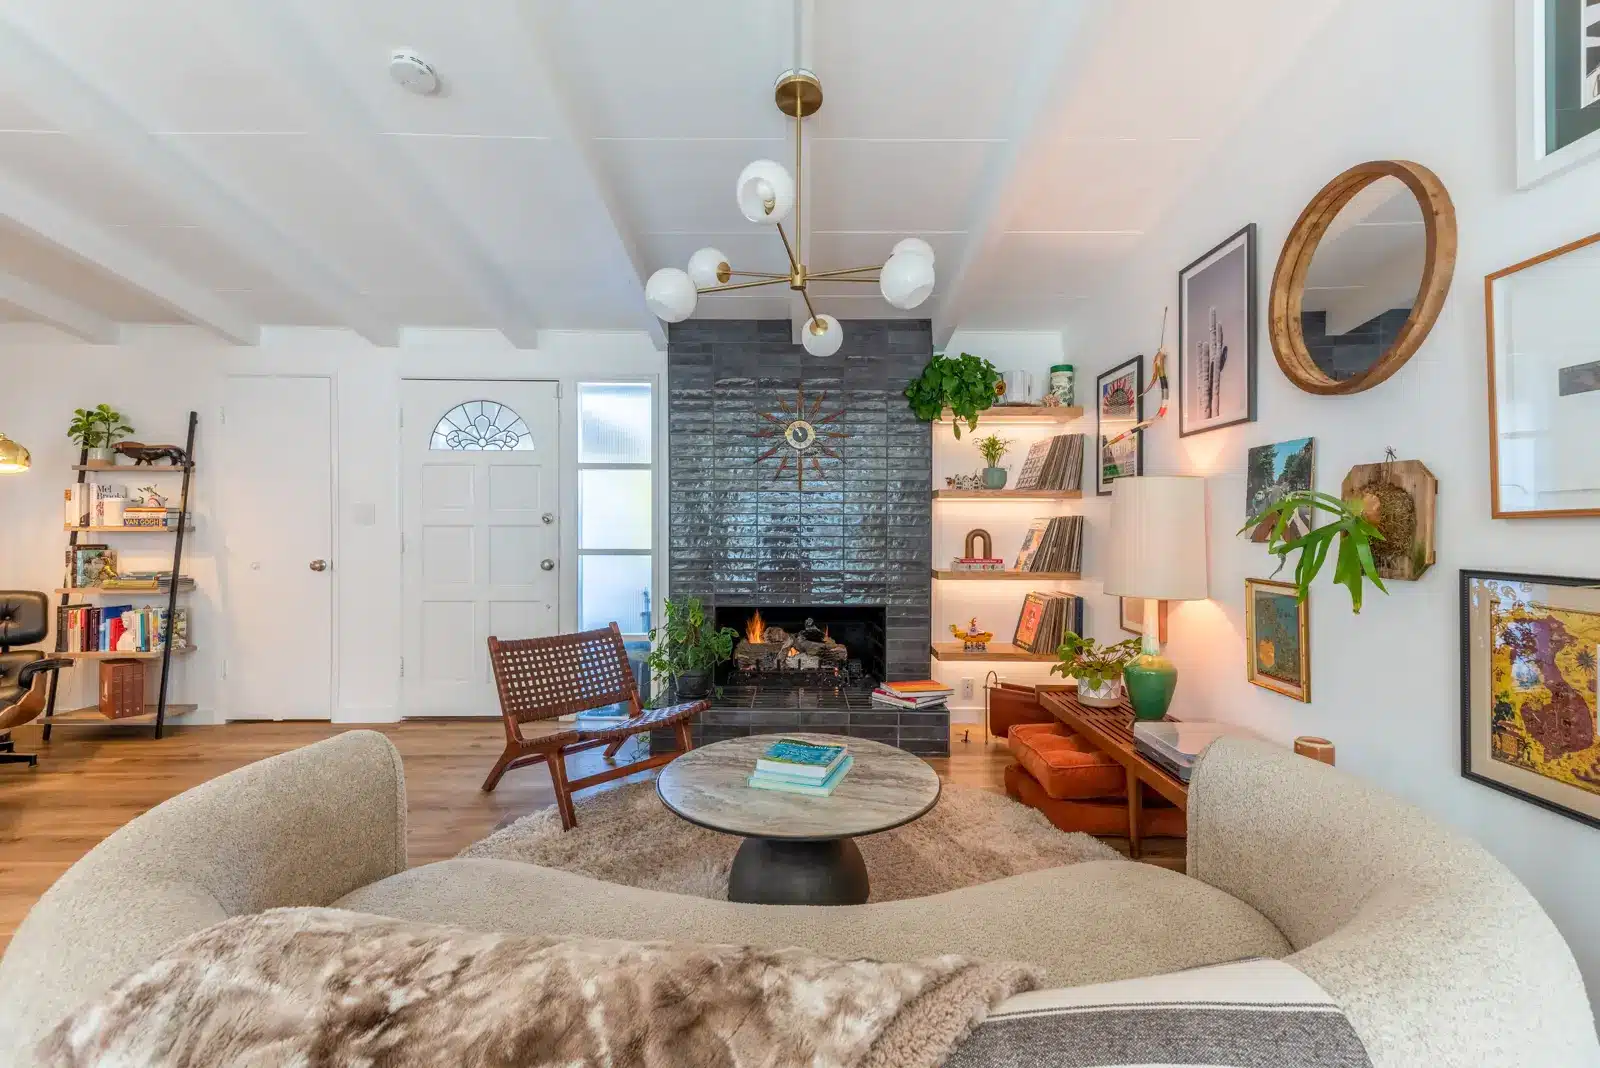
The post A California Modern-Eclectic Home Remodel in Culver City appeared first on Sweeten. from Sweeten https://sweeten.com/sweeten-renovations/entire-home-renovations/home-remodel-in-culver-city/ via IFTTT Via https://vegetablenirvana.blogspot.com/2023/05/a-california-modern-eclectic-home.html
0 Comments
From Chicago’s 2-flats or 3-flats to lofts and townhouses, here’s an overview to get started on an apartment remodel![]() Chicagoans from Rogers Park to Woodlawn are actively updating and remodeling their apartments. As the third largest city in the US, Chicago issues about 3,000 permits every month. Here‘s our primer on how to remodel an apartment in Chicago with advice for a successful project. Apartment types in ChicagoTwo-flat and three-flat apartmentsChicago is famous for its two-flat and three-flat apartments, which include separate units on separate floors. Investing in a Chicago multi-flat can be a financial advantage thanks to its practicality. You can reside in one apartment while renting out the others to generate supplementary income. Remodeling multi-unit structures can be a bit more involved than standalone houses since you have close neighbors to consider. A note about electrical and plumbing in two-flat and three-flats: plumbing pipes are often shared in a Chicago flat, so contact the Department of Buildings Water Plan Desk before starting any non-emergency repairs. Your apartment may also share main electrical service with a neighbor, so contact the Electrical Bureau of Chicago to schedule an inspection before removing any wiring. CondosFor the average first-time home buyer, purchasing a condo is often a more affordable choice than a single-family home. In Chicago, potential homeowners can consider condos as a way to enter the market without overspending. Remodeling your condo can be a great investment. For a Sweeten homeowner in Bucktown, renovating her two bathrooms in a 1,500-square-foot condo would increase the resale value. She planned to sell so the tub/shower was converted to a walk-in shower in the primary bathroom, while the second bathroom was a direct rip-and-replace (the layout remained exactly the same). Chicago condos usually have a standardized process within the homeowner’s agreement addressing repairs and remodeling. Most condo associations charge a yearly fee for exterior repairs and maintenance, partly in an effort to maintain a consistent curb appeal. As a result, any remodeling you do will likely be limited to the interior or the rear of the home. Contact the chairperson of your homeowner’s association for more information and plan approval. Be careful changing any landscaping as well, as you could accidentally cause a drainage issue that affects your neighbor. One Sweeten couple, however, did have a say in the front door design of their condo. We helped them find the perfect contractor to renovate their full-floor unit in a three-flat historic greystone building in Lakeview East. By rearranging the positions of several doors, they gained larger rooms and a brand new entrance. Their two bathrooms and living room also received a refresh. Industrial loftsChicago is full of industrial warehouses, many converted from industrial to living spaces. Sweeten homeowners, Leah and Brian wanted a refresh of their 1900s warehouse loft in Logan Square. A modernized kitchen and refinished wood floors gave the home the update they wanted. Their existing shower/tub combination was redesigned to become an enlarged walk-in shower. Further, radiant heat was installed under the bathroom floor tiles. “Just taking a shower every day, it’s an oh-wow for me,” said Leah. Remodeling a loft in Chicago rewards you with the hippest place around, but educate yourself on the local zoning before starting a remodel. Developers will apply for rezoning as needed when converting a building from industrial space to living space. However, if you will be addressing the change of use yourself be advised you might need a zoning variance from the Metropolitan Planning Council. Everything from traffic to noise can affect how an area is zoned, so make sure your improvements fit the zoning in effect for your lot. A visit to the new color-coded City of Chicago Zoning Map can help you. Hurdles to know when remodeling in the Chicago areaChicago has unique challenges when it comes to remodeling apartments. Therefore, it’s important to work with a contractor who has experience working in your area and can navigate the challenges effectively. AccessibilityIf the apartment is located in a high-rise building, accessibility can be an issue. Large items, such as appliances or seamless slab countertop materials, may need to be hoisted up through windows. This adds to the cost and complexity of the project. Permitting processThe permitting process in Chicago can take several weeks or even months depending on the complexity of the scope. In Chicago, the Department of Water Management approves plumbing permits and the Department of Buildings issues electrical permits. Buildings that are designated as historical landmarks may require a landmark permit for certain types of apartment remodeling projects. Some examples include modifying load-bearing walls, adding or removing plumbing or electrical, and changes made to the HVAC system. Building ageMany buildings in Chicago are older and may not be up to current building code in their infrastructure (plumbing/electrical/HVAC system). This is usually discovered after a contractor begins demolition and has the opportunity to see behind the apartment’s walls. WeatherChicago weather can delay an apartment remodel in several ways. In the winter, heavy snow and ice can make it difficult to access the job site or to transport materials and equipment. Cold temperatures can also slow down the drying and curing time of materials, such as paint or concrete, which can lengthen the overall timeline of the project. In the summer, high humidity and heat can also affect the curing time of certain materials. Additionally, severe thunderstorms and high winds can cause delays. It’s important factor in potential weather delays for the duration of the renovation with your contractor. Should I replace the pipes behind the walls?Some older Chicago apartments may still contain original water supply and drain pipes from decades ago. Although you may not be required to replace the pipes if they are still functioning, it is best practice to avoid issues down the road. Is kitchen and bathroom ventilation important?Proper ventilation is required in kitchens and bathrooms to help dissipate humidity. Make sure your bathroom or kitchen remodel includes the appropriate ventilation, like an openable window or exhaust fan. For information on sizing your ventilation, the Department of Buildings offers an easy-to-use guide. Preparing for your remodeling projectWho applies for the remodeling permit?If you apply for the permit as the homeowner, you will take responsibility for the completion of the project, adherence to building codes, and be responsible for workplace safety. If you hire a general contractor, they will be responsible so they will apply for the permit on your behalf. Building permits are issued by the Chicago Department Of Buildings. First, you will submit information about the scope of your apartment remodel, and then the CBO will issue the appropriate permit. For major remodels, hiring a general contractor is in your best interest. Most homeowners hire a general contractor for their expertise, knowledge of local code, and workforce. We can help connect you with a select group of top Sweeten contractors in your Chicago neighborhood. Easy Permit ProgramMany remodeling projects are simple rip-and-replace projects, so the CBO now has an Easy Permit Program. The program limits the amount of work that can be performed, but allows you to skip the plans approval process. Regular building permitIf your apartment remodel involves new square footage, mechanical systems, or more than 1,000 sq. ft. of drywall you will need a regular permit. Before you apply, gather a few documents like your deed and a plat map of your neighborhood. You’ll save time and effort in the long run and avoid paperwork mistakes by having the documents handy. Cost factorsCommon cost factors that affect a Chicago apartment remodel include the scope, size, and finish level of your project. In most instances, any services you need for your remodel will be calculated using the square footage of the project. Size can also impact your budget if your project will require extensive demolition or repair. Additionally, the level of finish you opt for, whether budget-friendly or high-end, will have a significant impact on the final cost. If you choose to upgrade using existing plumbing, additional changes may not be necessary. However, for more extensive projects, such as those that involve opening walls or submitting permits, you may require the services of electricians and plumbers. Who do I hire for my remodel?You will find several options for building your remodel. Depending on the scope, size, and complexity of your project you may need an architect or designer in addition to a contractor. The architect/designer/general contractor model involves an architect providing drawings for permits or board approval as well as more detailed working drawings. The contractor executes the plans. Design-build firms provide the same services as an architect and contractor, except both services are provided by the same company. If there are no significant changes to the layout, demolishing walls, or altering gas/electrical/plumbing systems that require DOB approval, hiring a contractor would be the best option. The first step to hiring your general contractor in Chicago is to connect with a few local firms for site visits and to receive estimates. When you post your remodeling project on Sweeten, you’ll receive a select group of highly-qualified contractors who are licensed and insured. They will also be familiar with working in your area and have experience in your specific scope of work. -- Sweeten handpicks the best general contractors to match each project’s location, budget, scope, and style. Follow the blog, Sweeten Stories, for renovation ideas and inspiration and when you’re ready to renovate, start your renovation with Sweeten. 
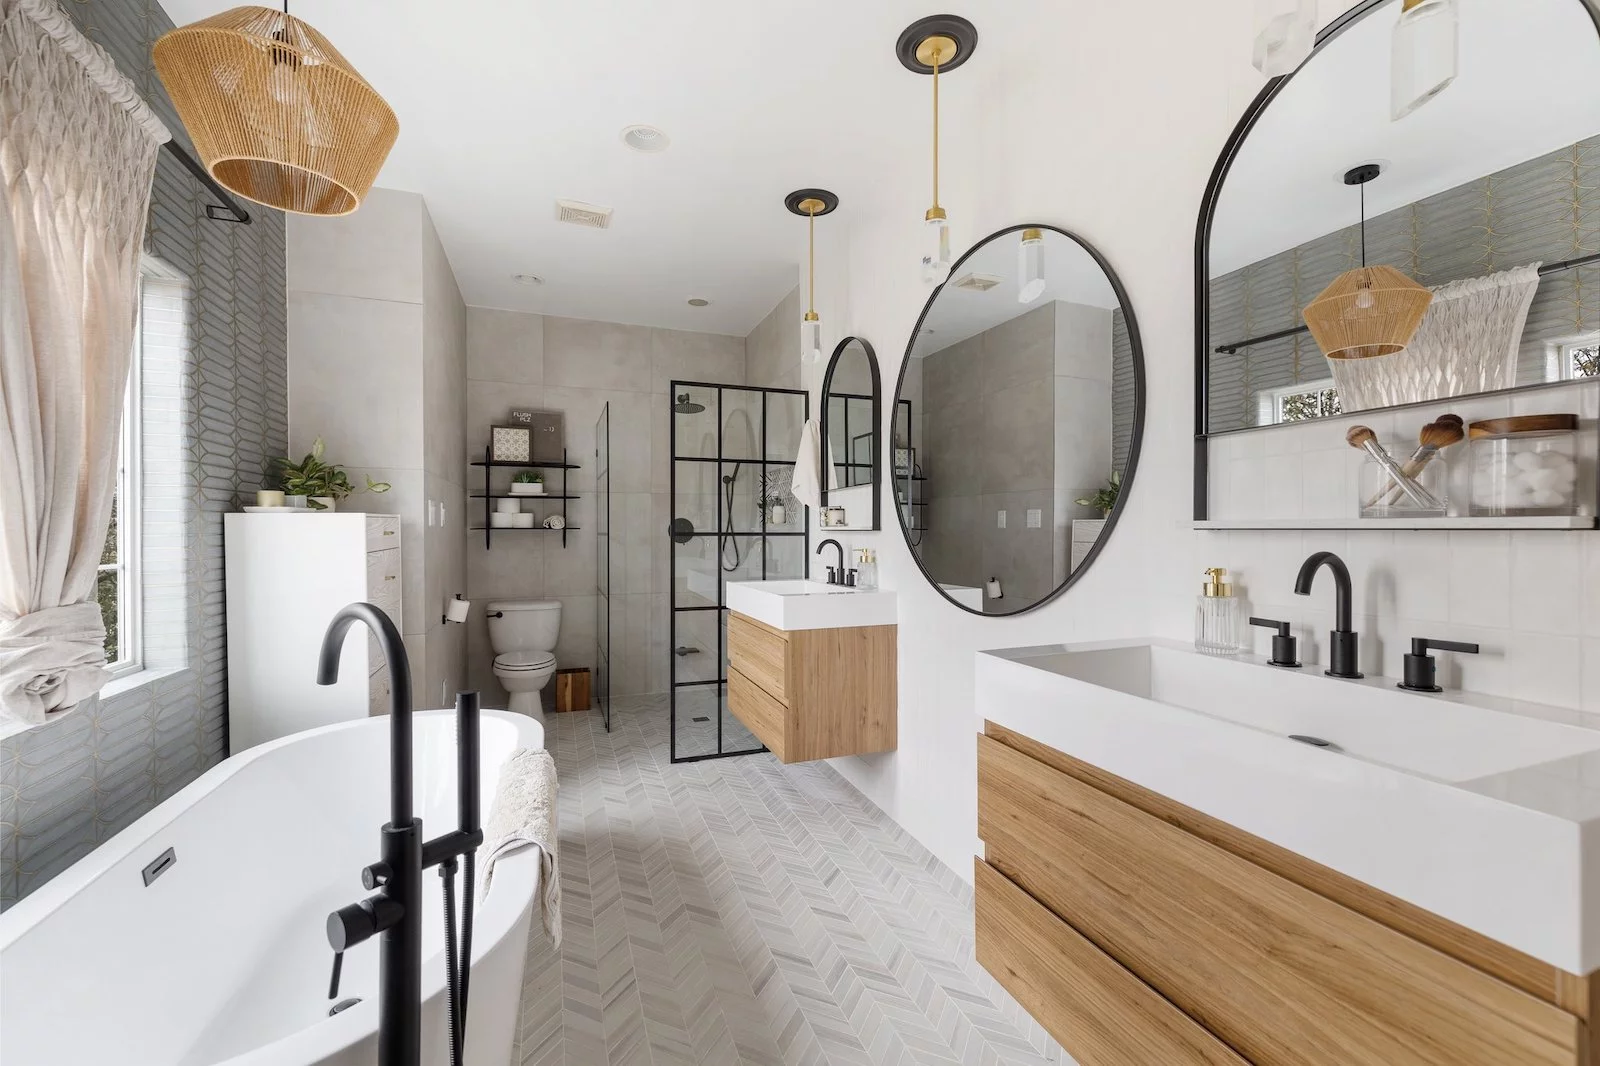
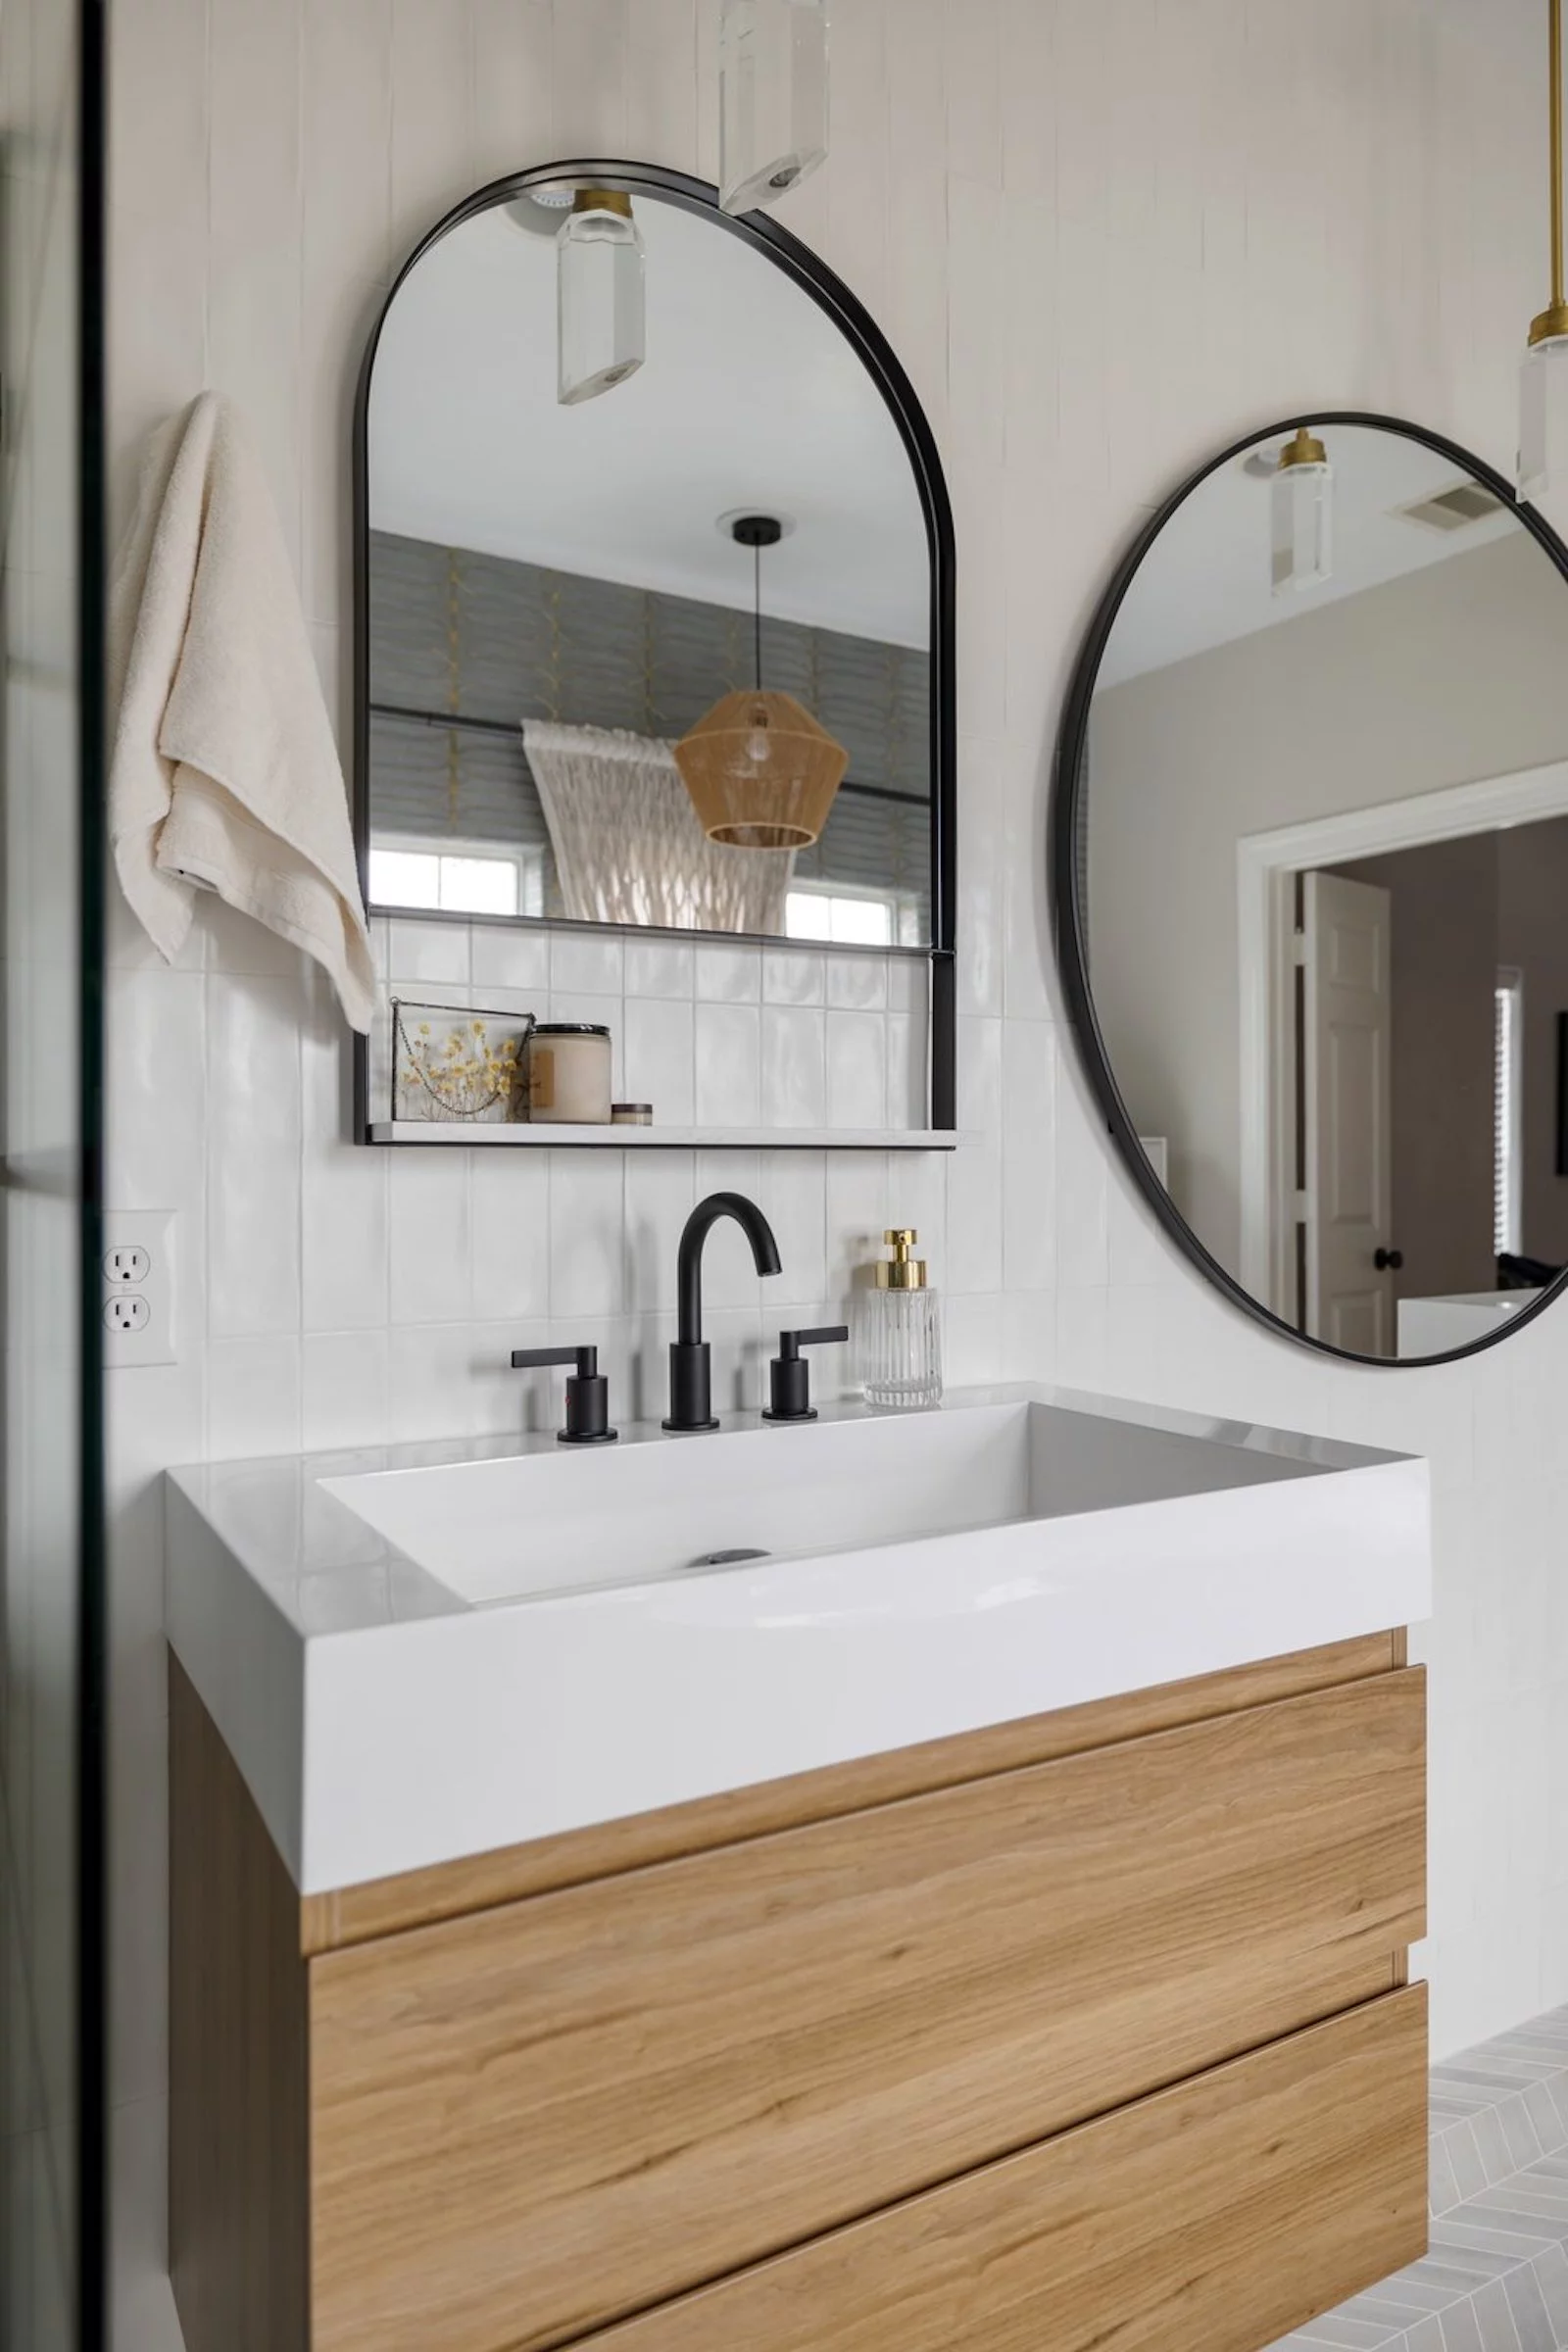
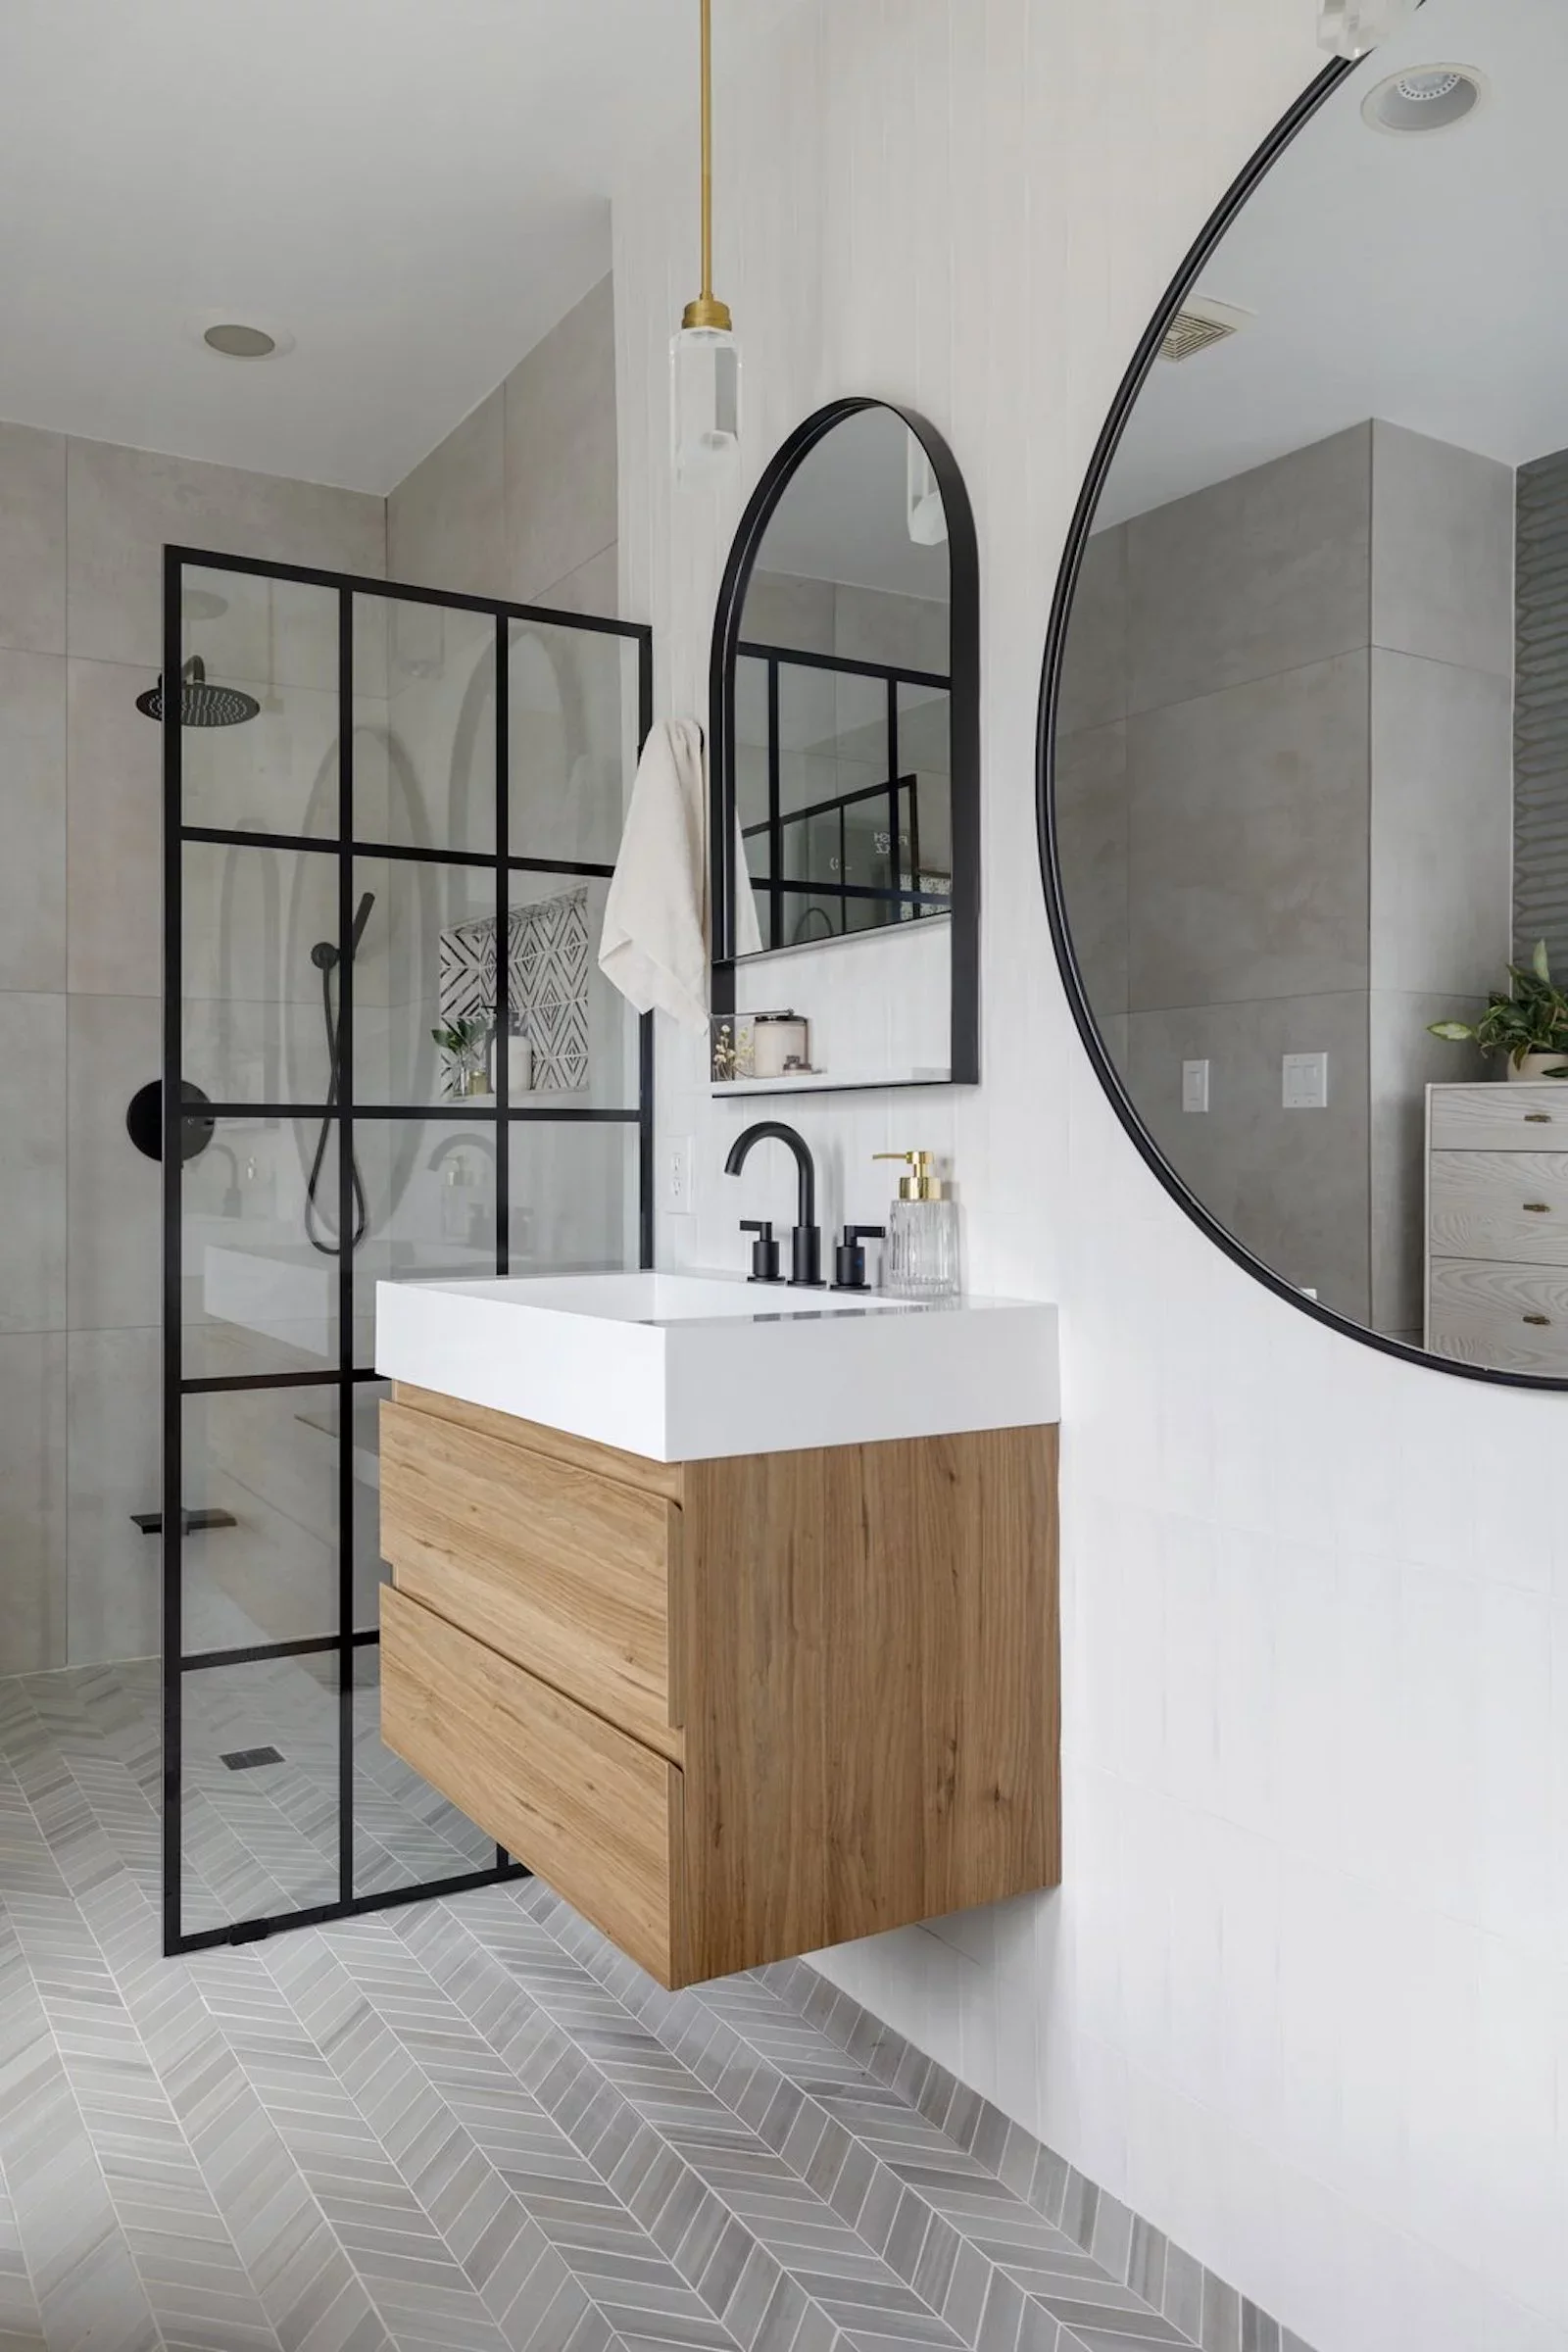
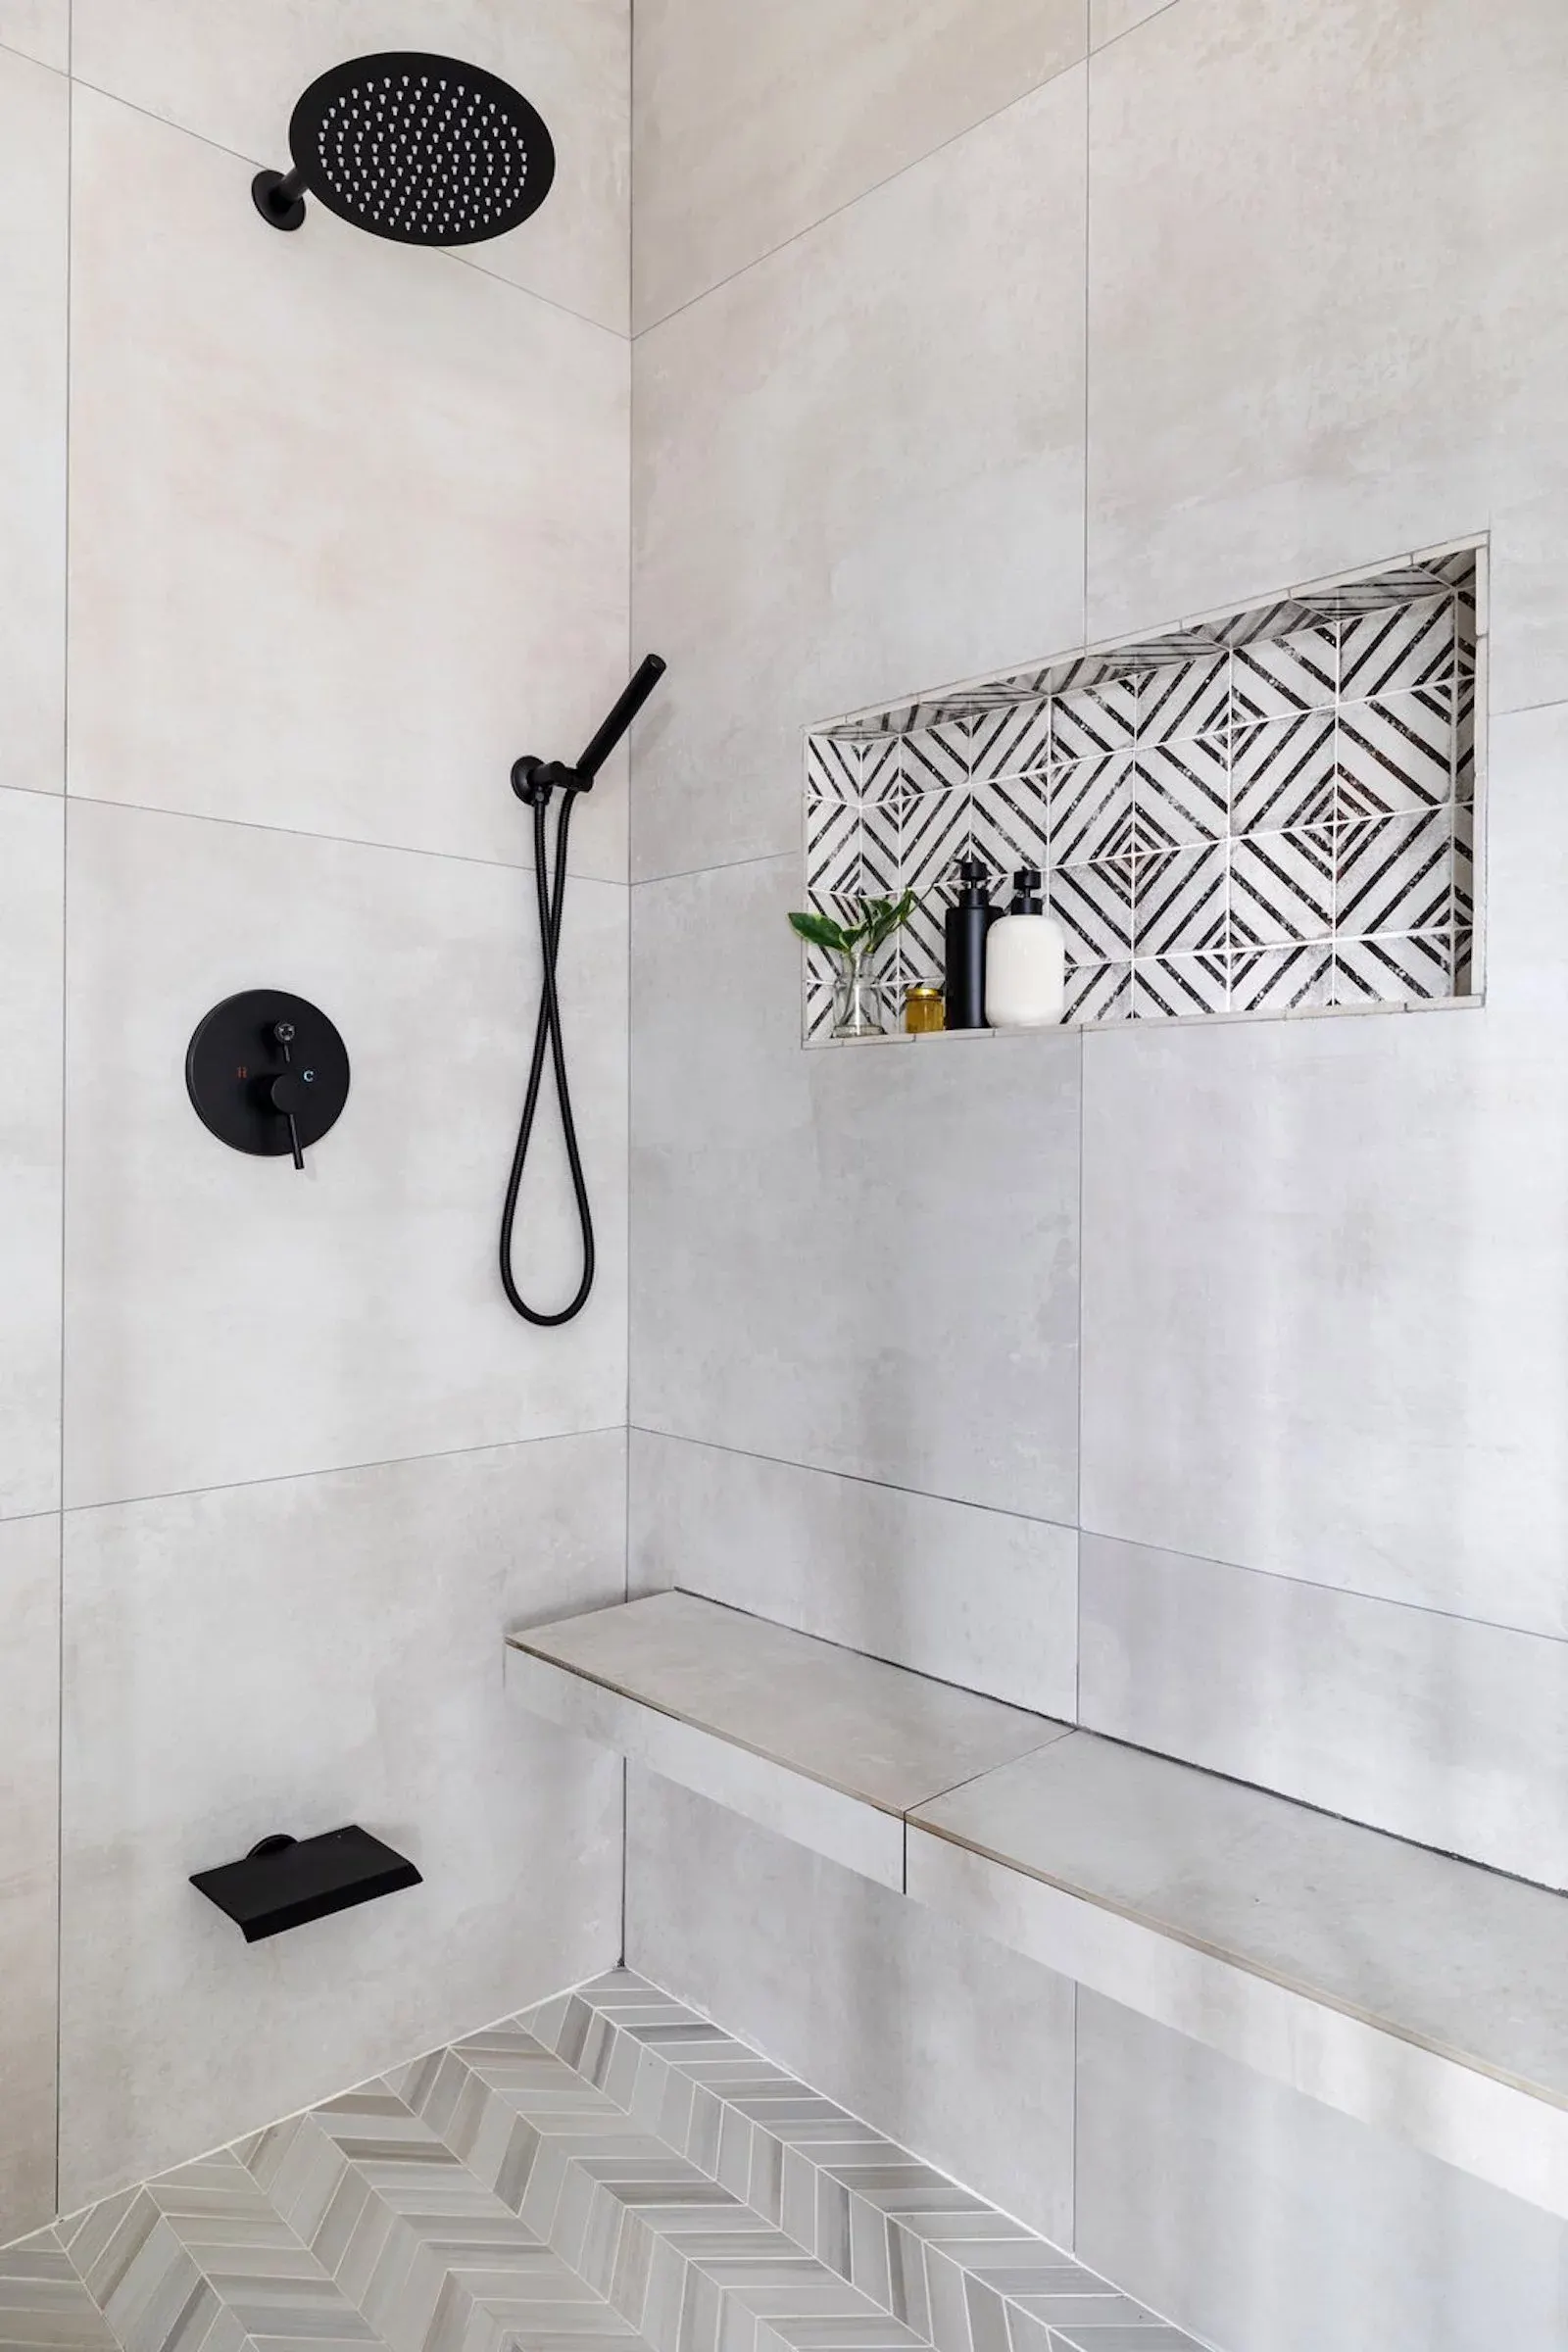
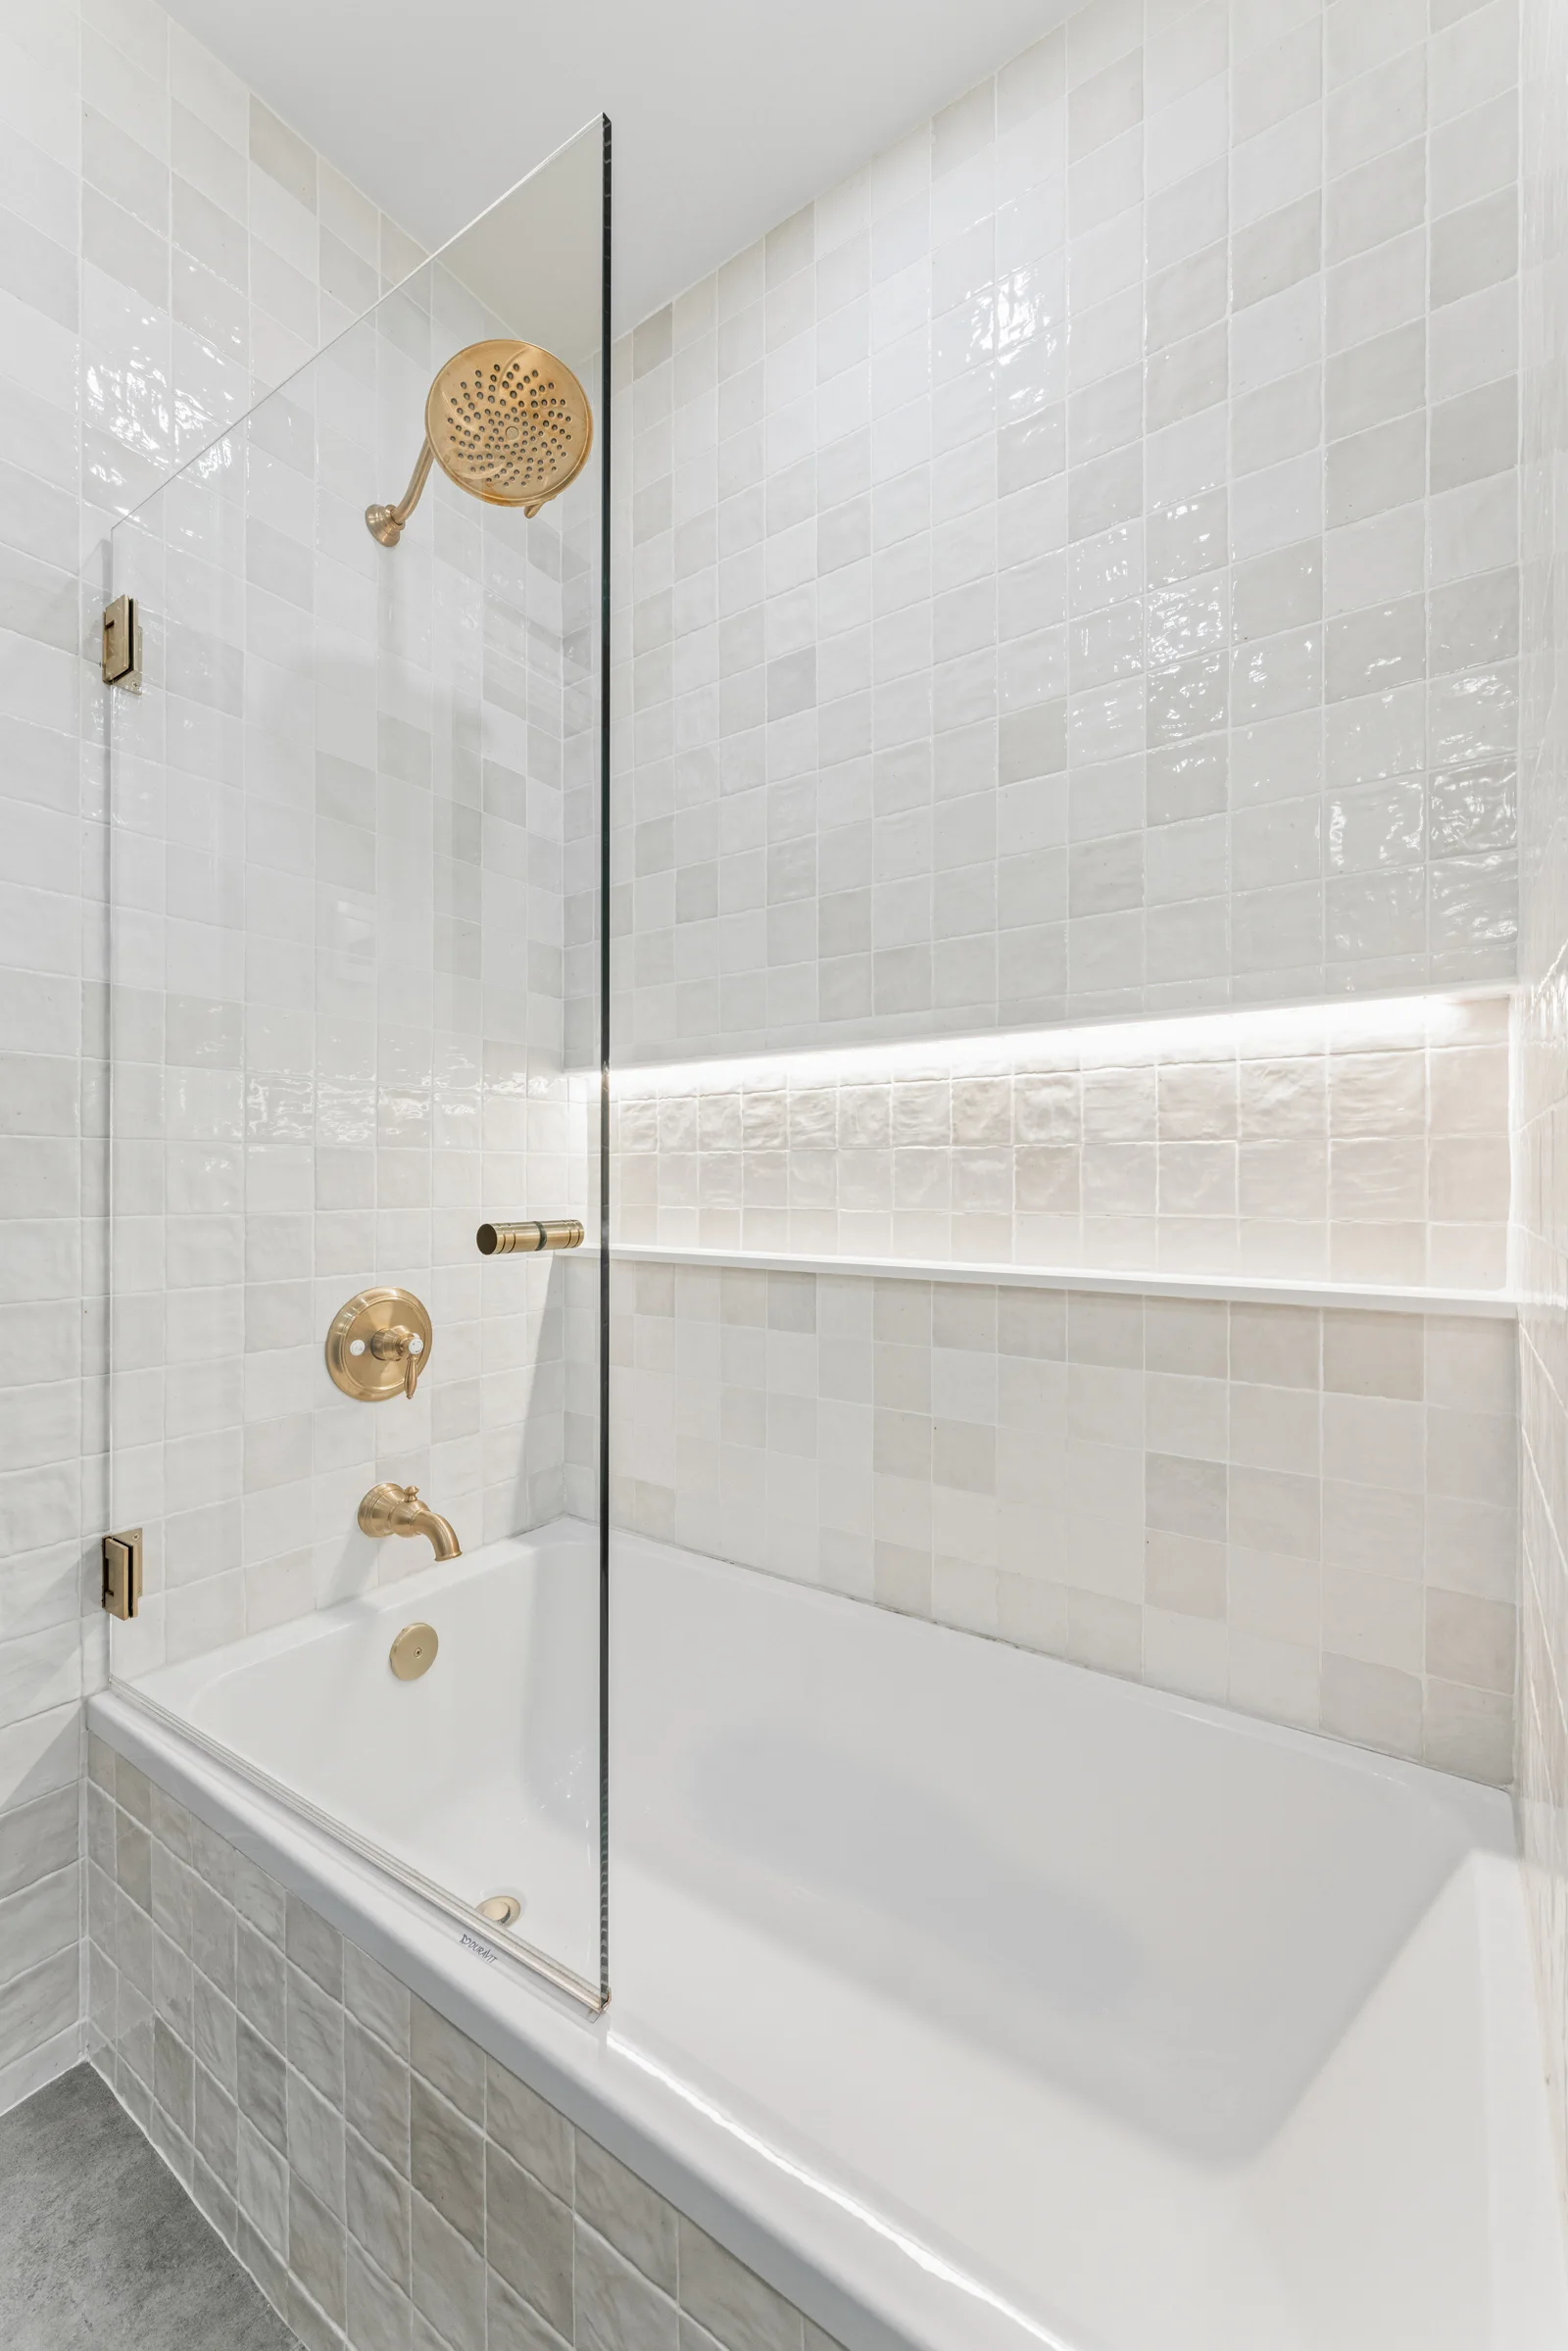
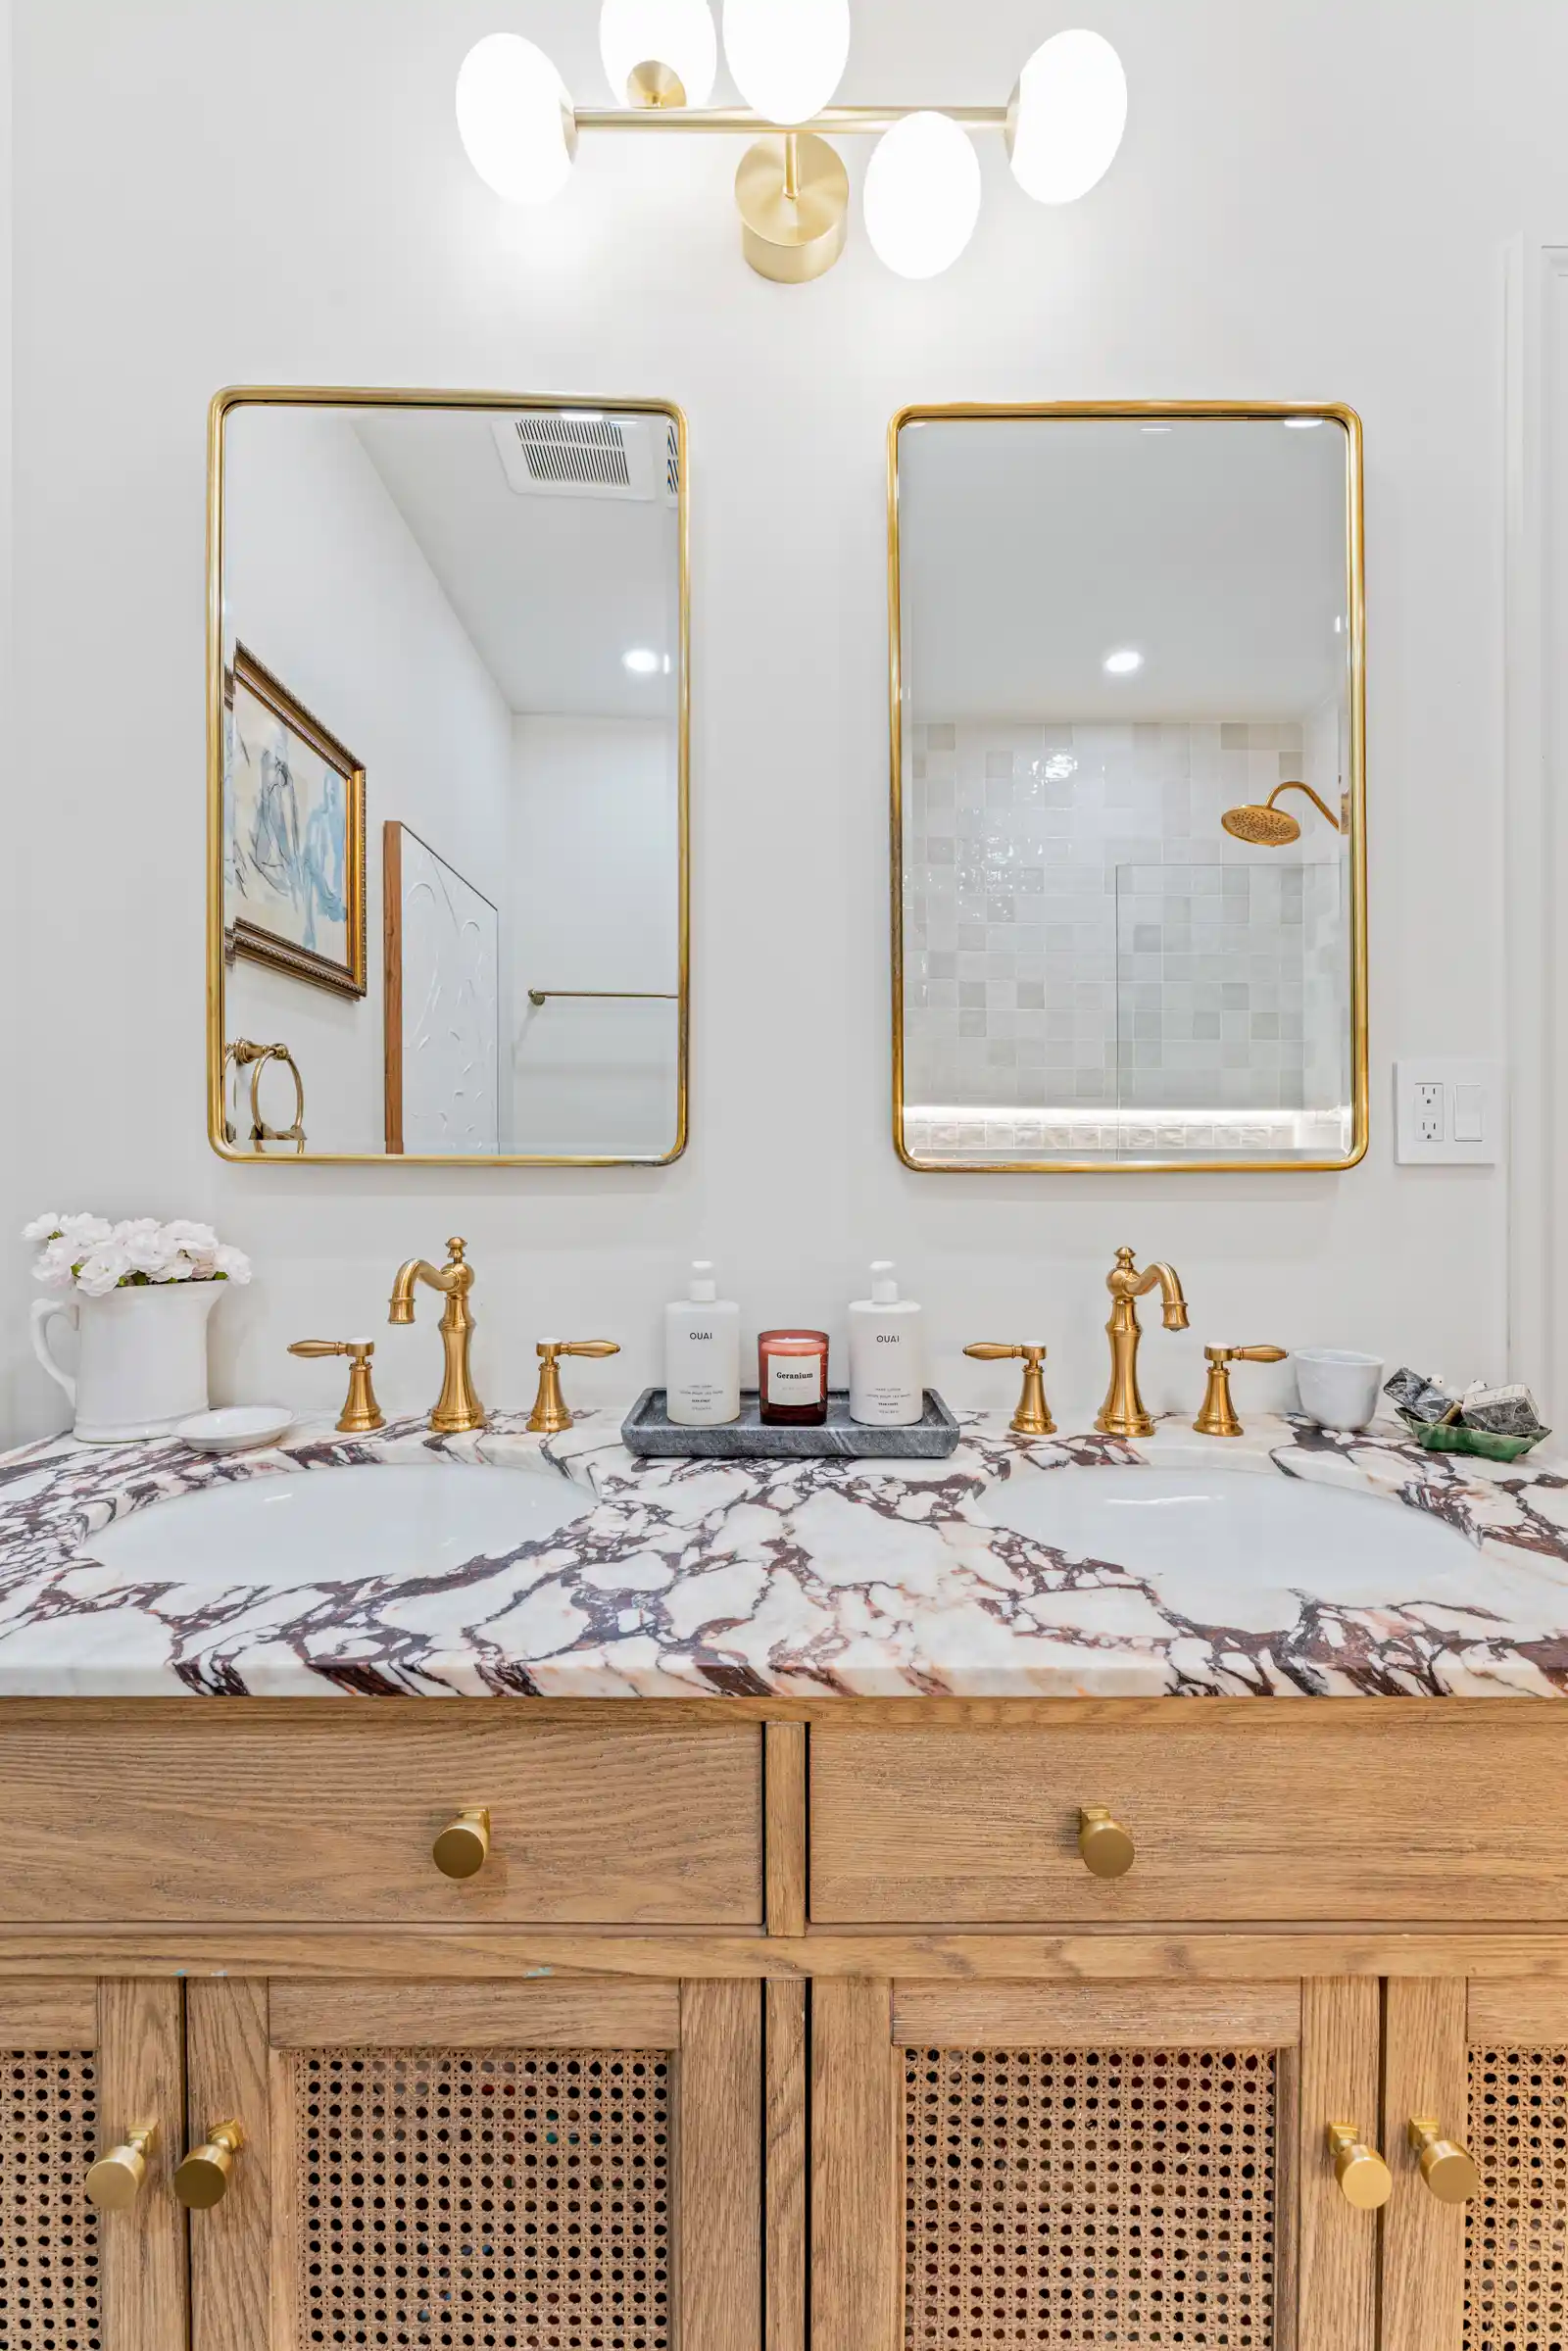
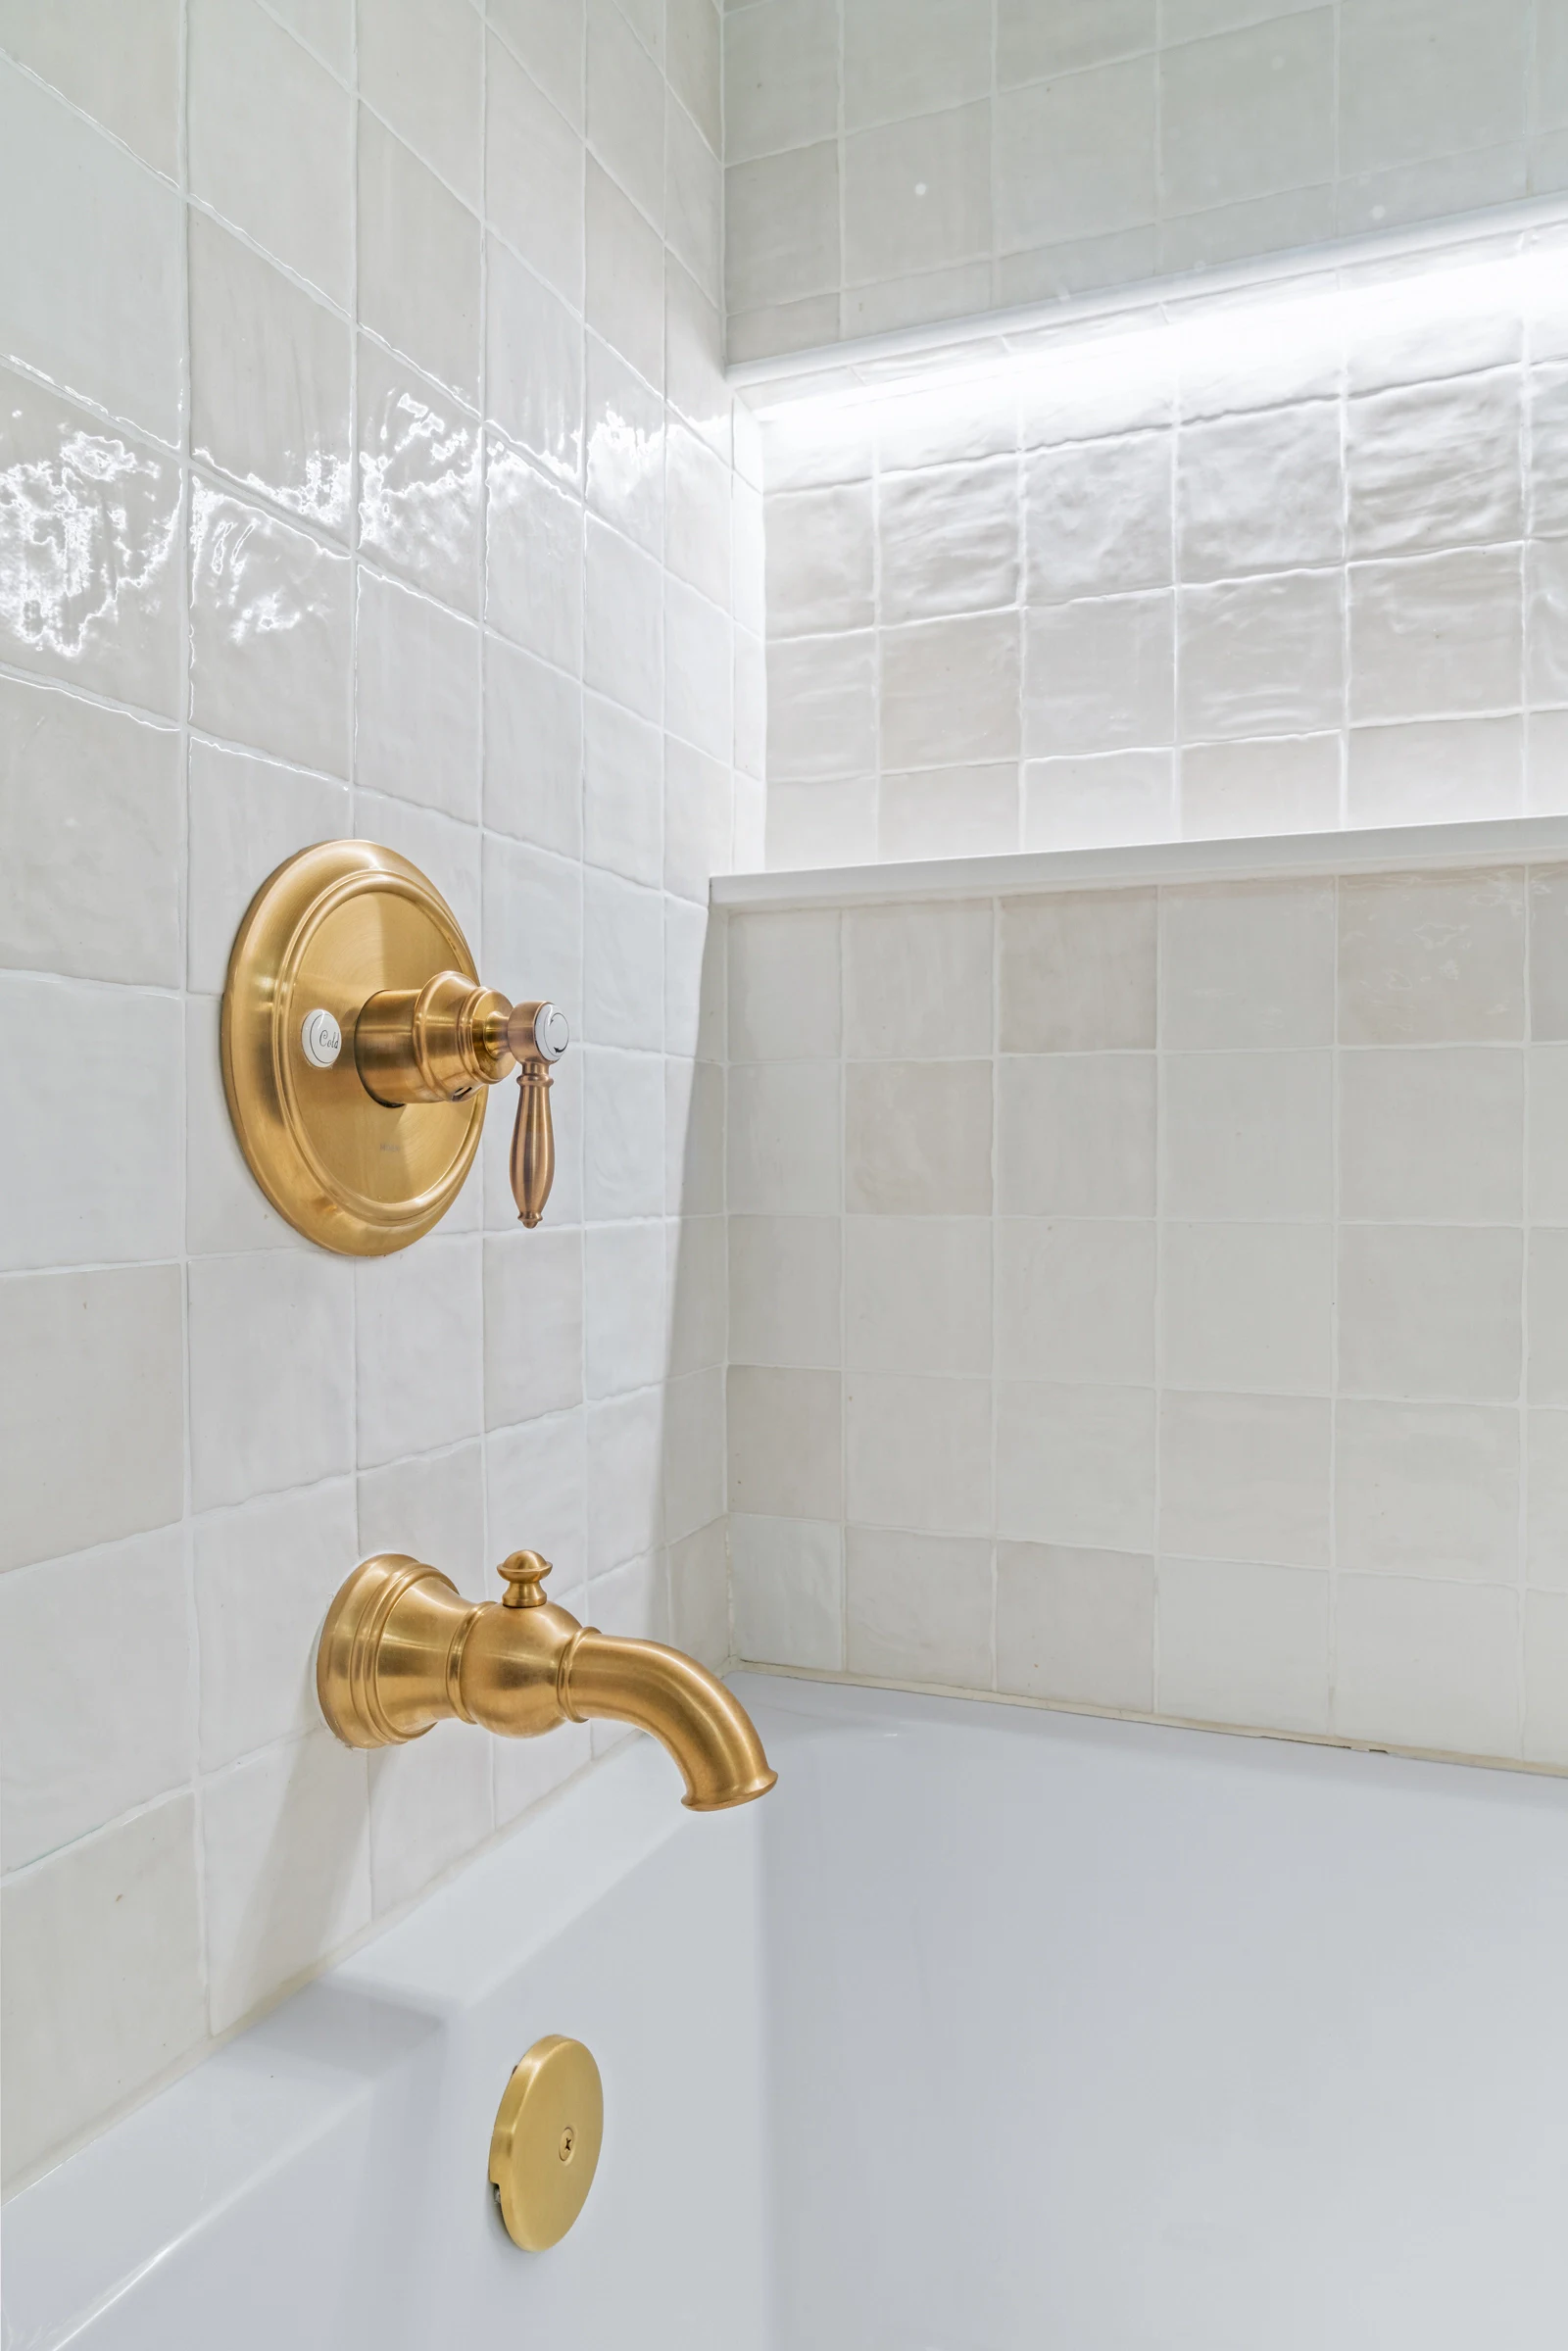
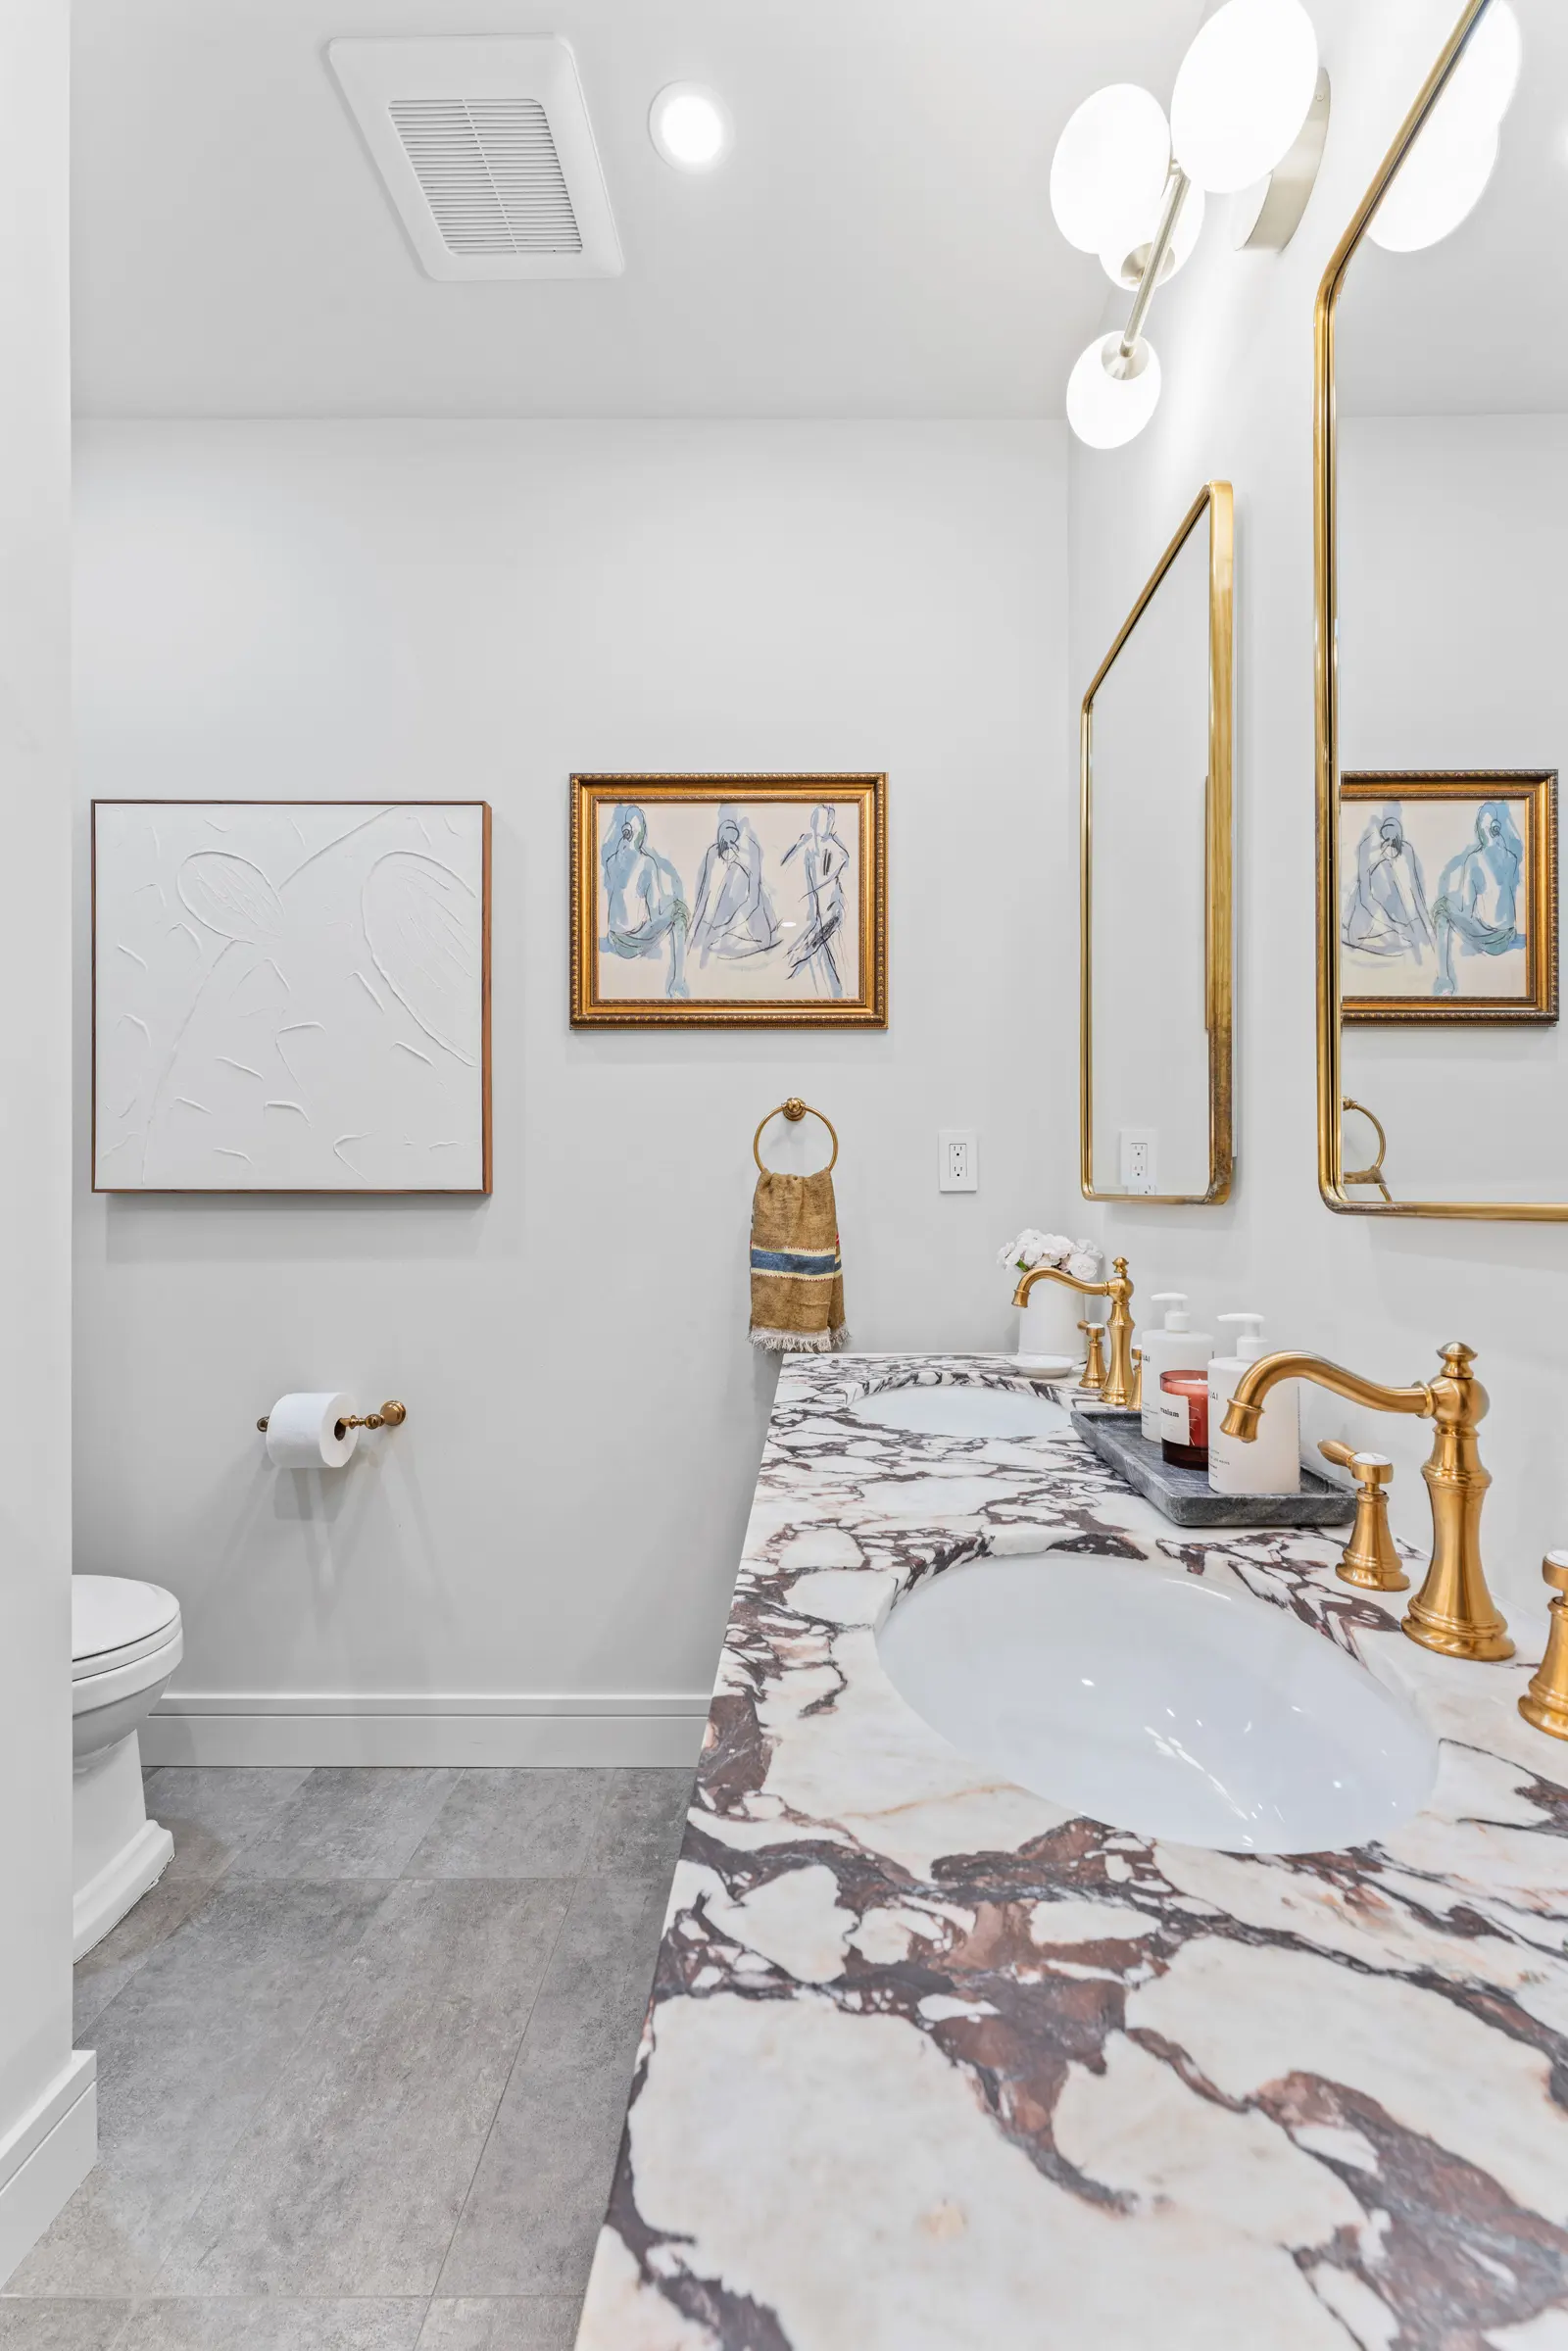
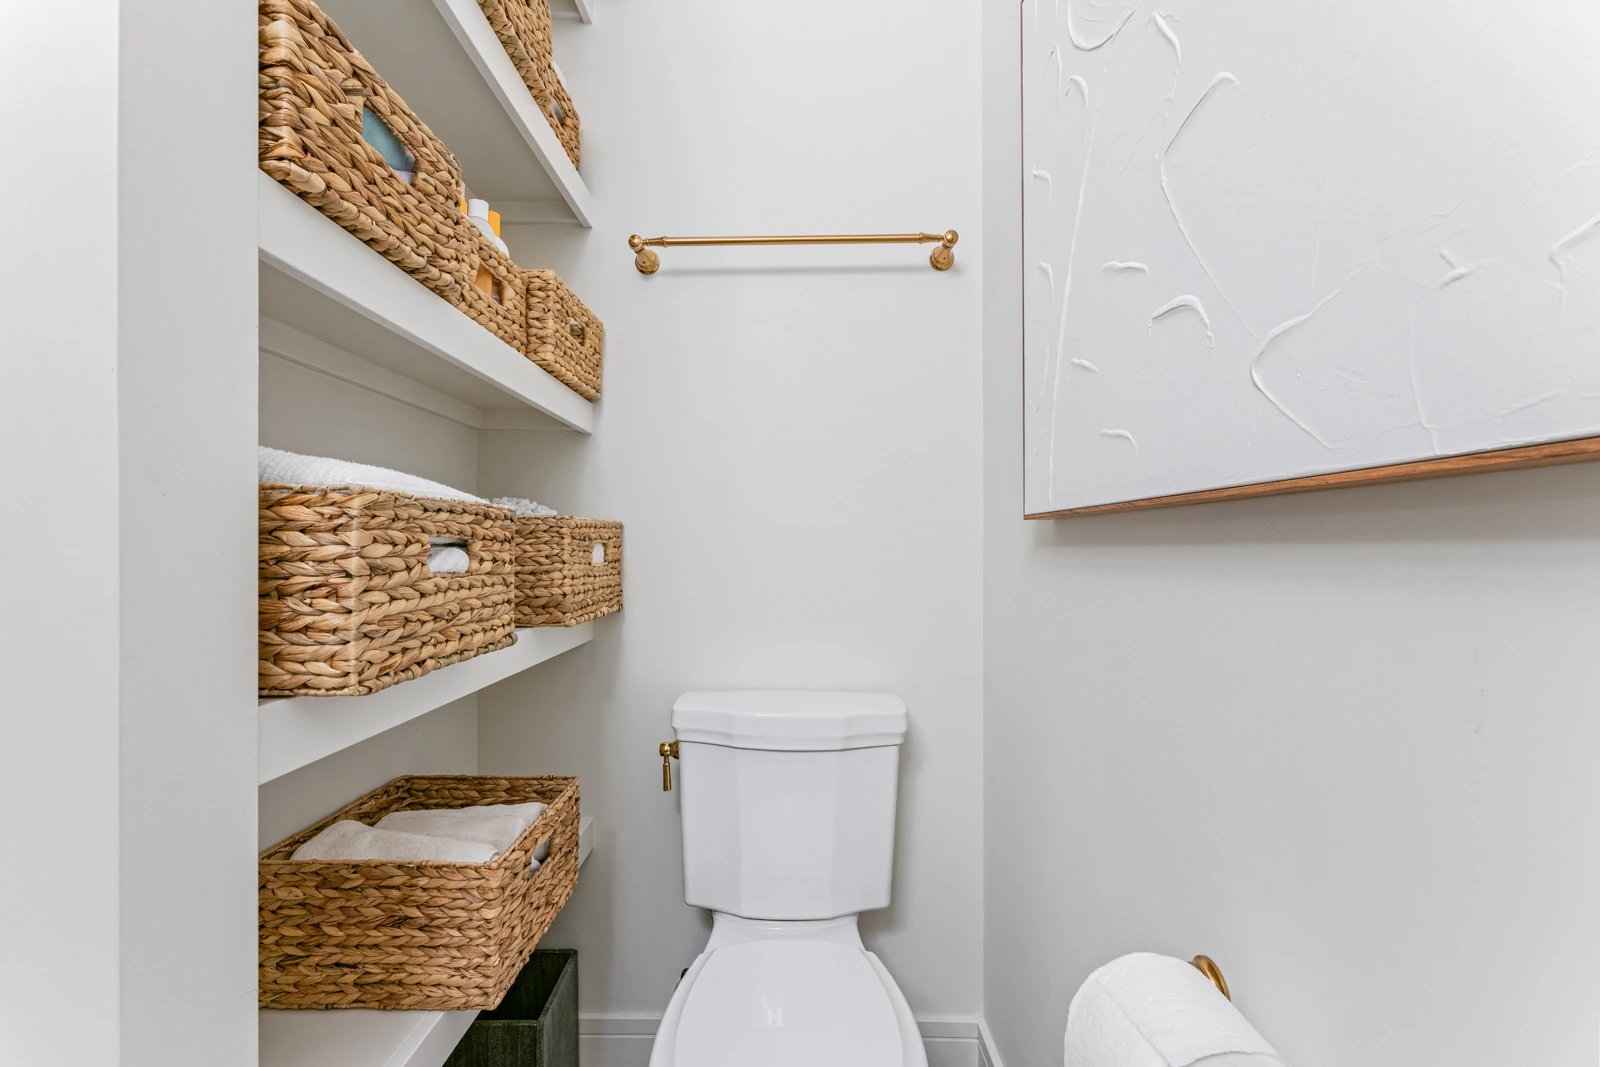
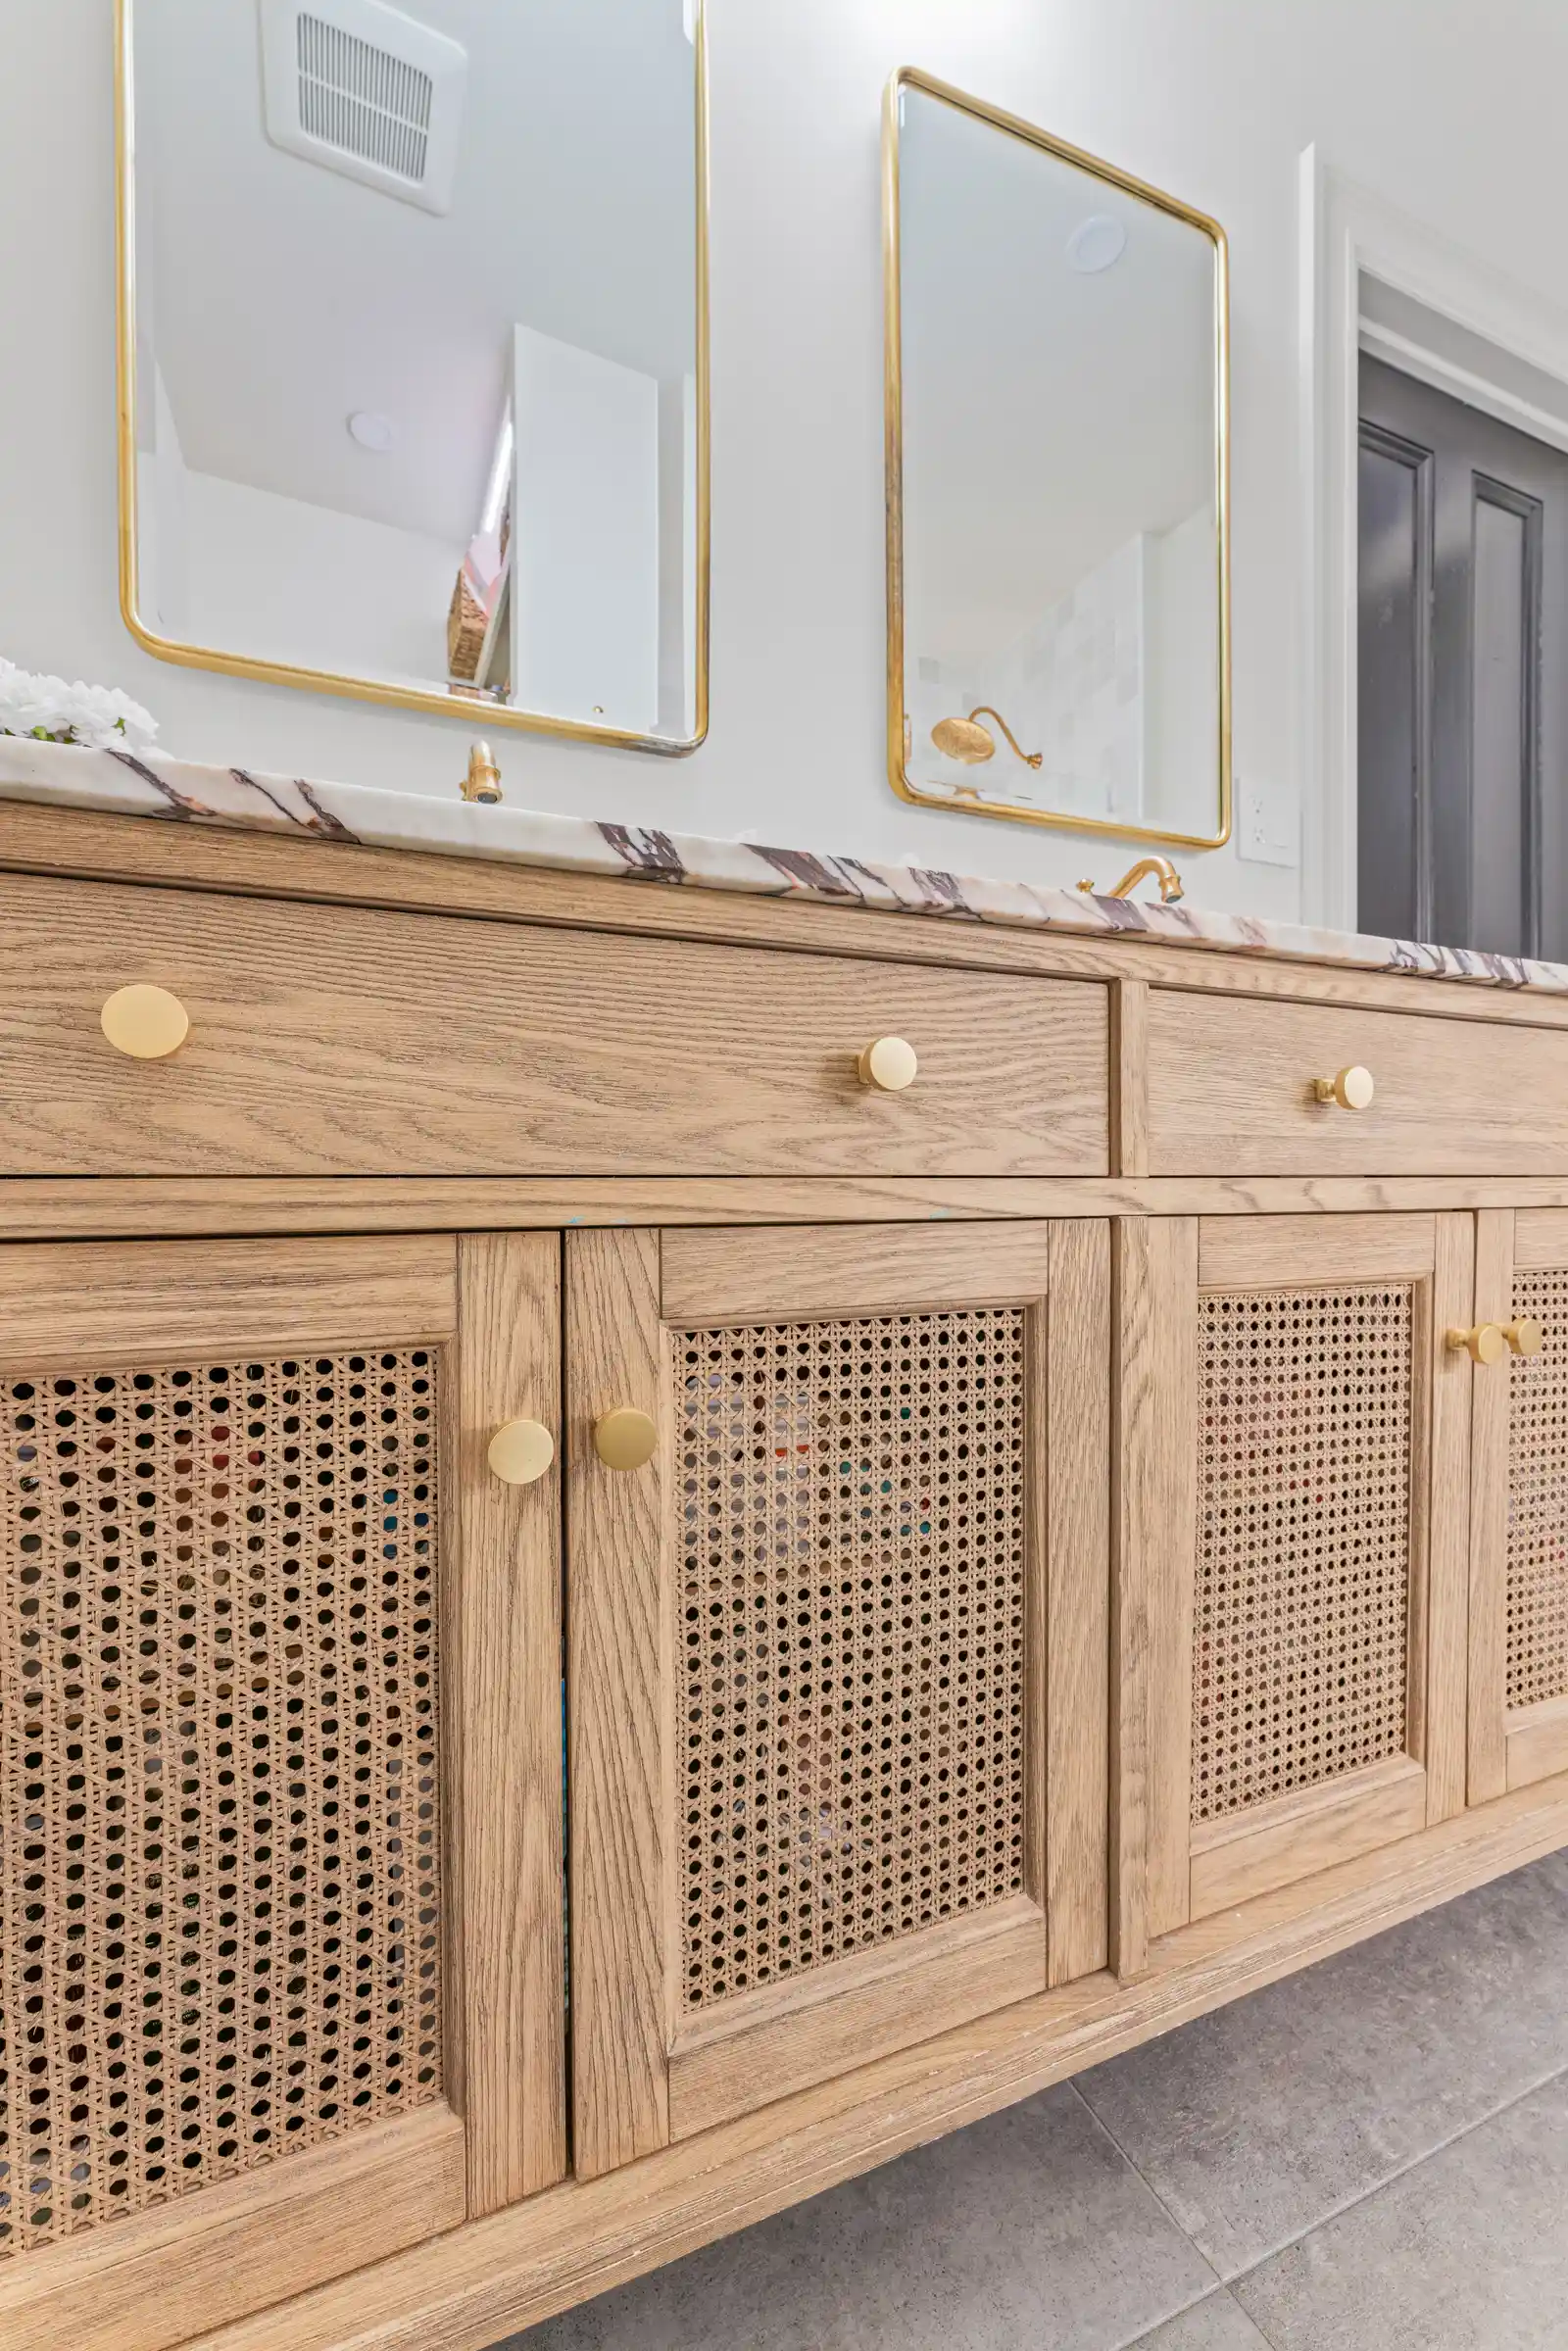
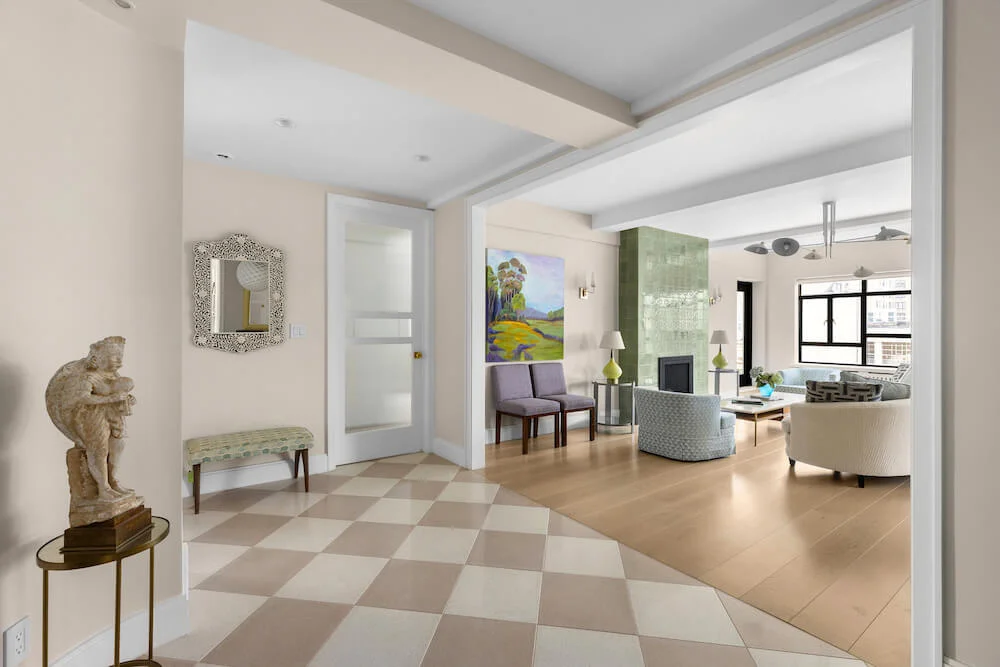
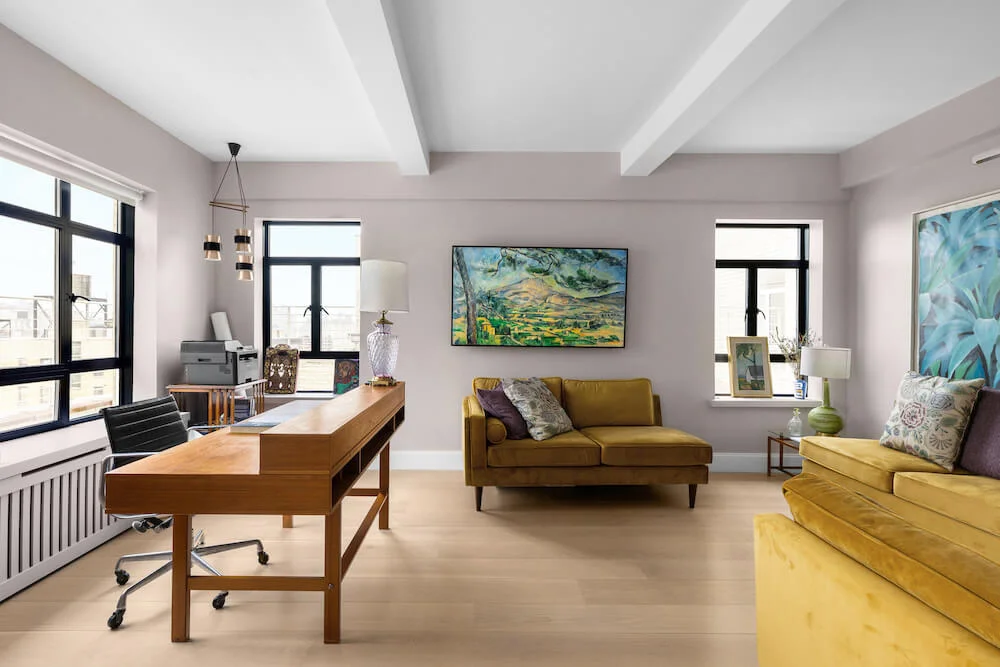
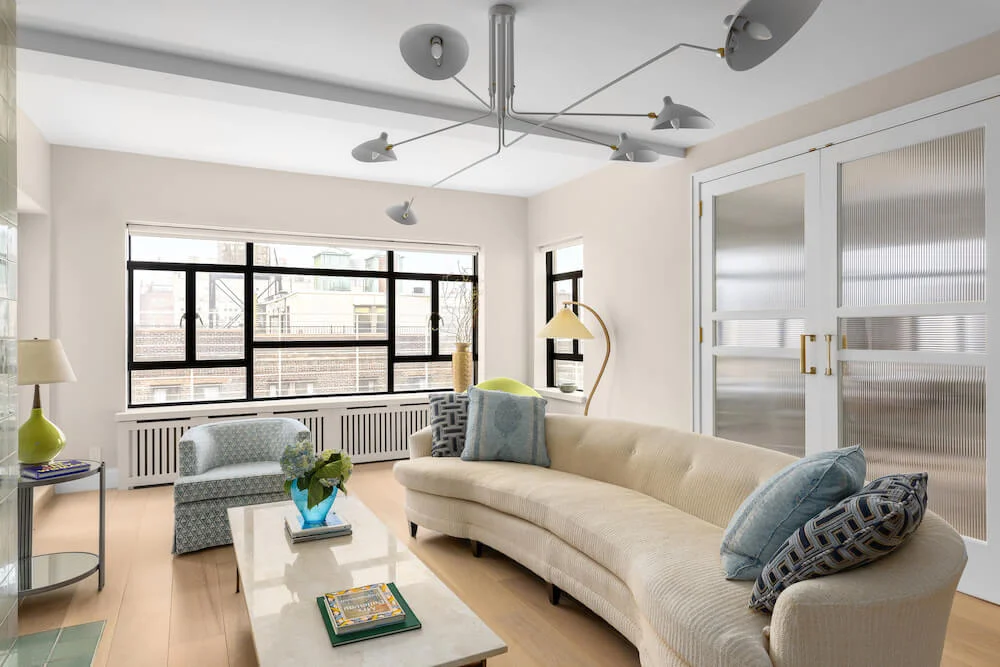
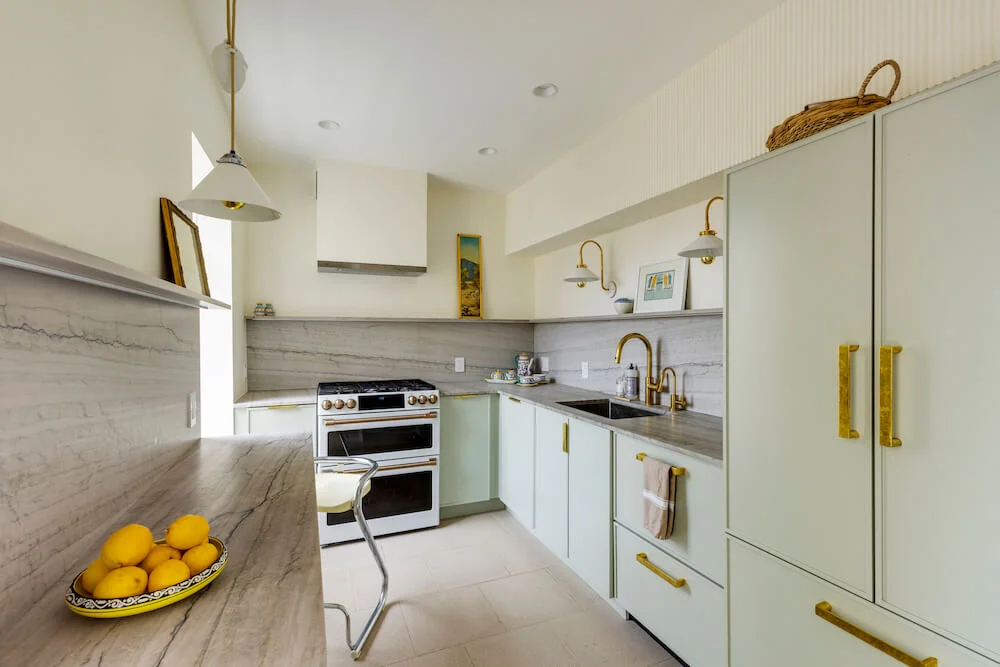
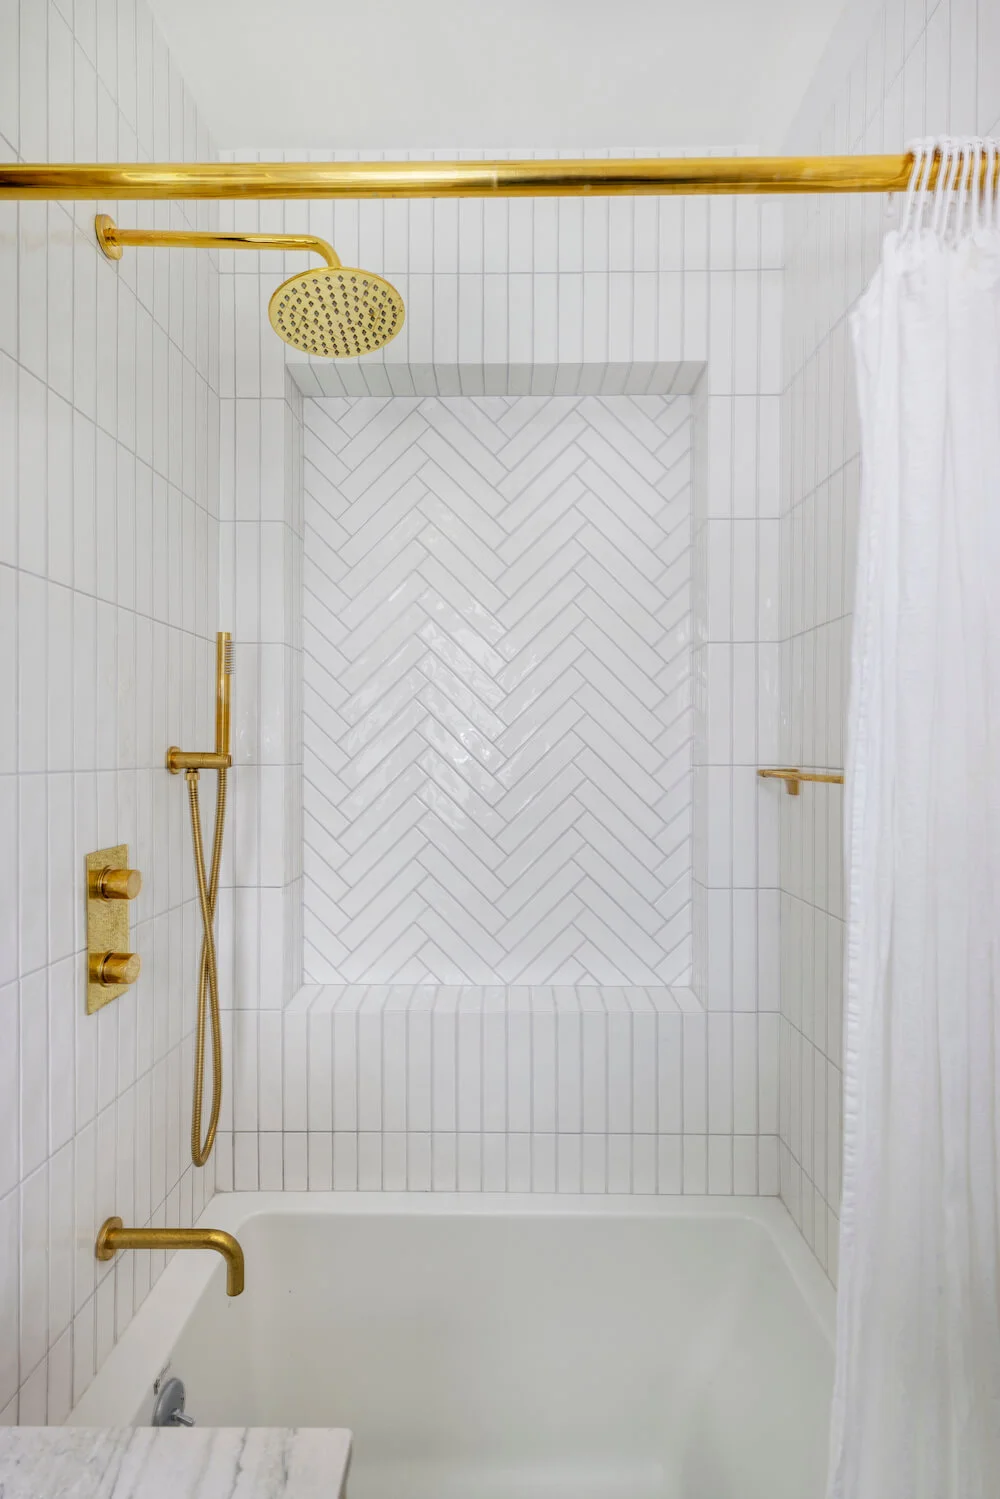
The post How to Remodel an Apartment in Chicago appeared first on Sweeten. from Sweeten https://sweeten.com/process-and-planning/renovating-in-the-midwest/how-to-remodel-an-apartment-in-chicago/ via IFTTT Via https://vegetablenirvana.blogspot.com/2023/05/how-to-remodel-apartment-in-chicago.html Tips for your NYC bathroom remodeling project — including permitting and board approvals, cost factors, tub-to-shower conversions, and adding a washer/dryer![]() If you’re planning a full bathroom gut renovation or a simple refresh in NYC, your renovation team will guide you through the process. It’s important, however, to have a general understanding of what you can expect, especially if you’re not familiar with the city’s unique challenges. We’ll outline how to remodel a bathroom in NYC and how to attain your vision that fits your budget. Permits and plan approvalsIf you understand what makes NYC such an attractive city to live in, you won’t be surprised why it also has some of the most restrictive building and health codes in the US. A high population density, aging infrastructure, and historical preservation mean most remodeling work needs to be permitted. The approval process includes an unbiased third party (in this case a building inspector) to inspect and approve the work. Additionally, all permitted work must be handled by either a New York State Licensed Professional Engineer (PE) or an architect registered with the State of New York. While time-consuming and complex, it’s an effort to maintain buildings’ structural integrity. For example, many NYC bathrooms have been remodeled countless times, so requiring a standard level of quality is important for future residents of the building. However, there are projects that don’t require prior approval and which won’t affect any MEP (mechanical/electrical/plumbing) or change support structures. This includes projects that only change the appearance of the space. Some minor alterations such as resurfacing existing floors do not need a permit. However, the contractor must be licensed with NYC. NYC remodeling factorsCondo and co-op board approvals and restrictionsCondo and co-op boards can impose restrictions on your remodeling plan depending on where you live in the city. Before finalizing your budget planning, identify any potential approvals you may need to avoid surprises. Approval process: Boards typically require detailed renovation plans, including architectural drawings, materials, and a timeline. These need to be in compliance with building rules, regulations, and bylaws. Permits and insurance: Proof of the correct permits and insurance coverage needs to meet legal and safety standards. Contractor approval: To maintain quality control, some buildings require contractors to be licensed and insured. We can connect you with vetted Sweeten firms who have experience with your scope. Fees: Depending on the bylaws and boards, the homeowner may need to pay a fee for administrative work, common area usage, or any potential damage. Gut remodel vs a “rip-and-replace”Will your remodel simply be replacing what is already existing or will the space be redesigned? A “rip and replace” refers to the process of removing an existing feature such as a sink vanity or a shower and installing a direct replacement. The most straightforward type of remodel is where no electrical or plumbing is being moved elsewhere in the room. Conversely, a gut remodel is a space that is redesigned or reimagined. Here, walls, plumbing, or electrical are removed or added and the process must follow NYC’s strict building codes. An architect will need to submit plans for these types of changes and have permits approved. Also during a gut remodel, your contractor may discover an apartment’s electrical circuit capacity or plumbing is not up to code and needs to be updated. These can be a surprise for first-time renovators, so your Sweeten contractor can walk you through the process. Tub-to-shower conversionsBathtubs are usually about 3’ wide and 5’ long. Converting a tub space into a shower can include body sprays and other amenities, since there is nearly 15 sq. ft. to work with. Keeping the shower drain in the same location simplifies and speeds up the connection process. However, if the drain and supply pipes need to be relocated, the cost will increase depending on the extent of the required work. With the popularity of accessible and universal design concepts, tub-to-shower conversions have been increasing. These concepts align with the Americans with Disabilities Act allowing for easier access without the need to step over high tub rims or shower curbs. The addition of grab bars also helps prevent slips. These changes provide greater independence for aging homeowners. Debbie posted a project for her father whose wheelchair and walker would not fit in his bathrooms. Their Sweeten contractor created one large bathroom with a walk-in shower, grab bars, and a pull-down seat. Adding a Washer/Dryer to Your BathroomIf space allows and your building’s alteration agreement allows washer/dryer installs, it’s often possible for a bathroom to accommodate the units by rearranging the floorplan. Isis and Stephano’s Sweeten contractor knocked down a wall and took over two adjacent closets to build a new one inside the bathroom. To fit a pair of 24-inch stacking units, it “took amazing Tetris skills” on the part of their contractor, noted Stephano. Take note that installing a washer/dryer combo requires additional services. You will need both cold and hot water connections, a new drain system, and a new 50A electrical circuit at a minimum. It will also need an exhaust vent. If your building and contractor agree it’s possible, consider a ventless unit. Sweeten homeowners Lynn and Craig added a compact ventless washer and dryer in their 24-square-foot half bath. “Remodeling this room has been a life-changer,” she said. Check building access and hoursMany buildings in NYC have limited access to elevators or have narrow staircases, making it difficult to move materials and equipment to the renovation site. Check your alteration agreement on any rules for handling common areas during construction. There may also be certain hours that construction is allowed to happen as well as the use of the elevator. Budgeting and cost factors for bathroom remodeling in NYCBriefly, here’s what you can expect when putting together your budget. The primary cost considerations for a bathroom remodel include size, finish level, scope, and service. A full renovation (without layout changes) of a medium-sized bathroom with just a general contractor will begin at:
Post your project on Sweeten and you’ll be connected with a selection of vetted contractors in NYC. They will have experience with a scope like yours and within your budget range. If you’d like to walk through your budget before meeting with any contractors, we can jump on a call and help you. Identifying your renovation team and finding a contractorBased on your scope, here are the renovation professionals you may need on your team. For projects without any layout changes and you’ve already done research on style and materials, you can hire a general contractor directly. Partner with an architect for a more complex scope, or an interior designer if you need their services. A hybrid design-build firm is also an option. We suggest getting at least three bids to compare. Our free matching service will connect you with general contractors or design-build firms in NYC including women- and minority-owned companies. How long does a bathroom remodel take?Typically, we recommend planning for a timeframe of 2-4 months, start to finish, for the completion of a bathroom remodel, including 4-8 weeks for the construction phase. However, each project is different. The timeframe depends on factors such as the complexity of the project, the size of your bathroom space, and the scope of work involved. For instance, if you’re not making changes to the bathroom’s layout, electrical or plumbing systems, and opting for materials that are in stock, you can expect the renovation to be finished within a few weeks. However, it will take longer if you’re relocating plumbing and electrical, need permits and board approvals, or ordered custom items. Sweeten homeowner Erica gutted her small NYC bathroom but without moving any plumbing and revamped the entire look. They encountered no obstacles during the process, and the project took five weeks to complete. Here’s a general breakdown of the step-by-step process and estimated timeframe. Phase 1
Phase 21. Demolition – Plan on demolition taking a few days to a week depending on the complexity of the demo. Expect delays if issues are discovered when the walls come down. For example, in NYC, demolition is carefully monitored to prevent asbestos, lead, and other harmful elements from being released. If any are found you’ll need the services of an abatement company, so budget accordingly. 2. New framing – If no additional framing is required, this step can be skipped. 3. Tub and/or shower installation 4. Plumbing, electrical, and HVAC – This stage involves roughing in new plumbing and electrical lines or adjusting existing ones. If there are no issues, it can can take a few days to a week. At this stage, the project will be re-inspected by an official before the work is covered by drywall, plaster, or finished flooring. If any corrections are needed, they are made and the work is re-inspected and approved. Phase 3
Tips on surviving a bathroom remodel in NYCSurviving a bathroom remodel in NYC can be challenging, but with proper planning and preparation, you can make the process more manageable. Here are some tips to help you and your family navigate: Plan aheadCreate a detailed renovation plan and timeline before starting the project. Consider factors like permits, material selection, and contractor availability. Planning ahead will help you stay organized and minimize disruptions. Set realistic expectationsUnderstand that bathroom remodels can be messy, time-consuming, and disruptive. Be prepared for inconveniences such as limited access to the bathroom, noise, and dust. Having realistic expectations will help you stay patient throughout the process. Communicate with your contractorMaintain open and frequent communication with your contractor. Discuss project timelines, progress updates, and any concerns you may have. Good communication will help address issues promptly and keep the project on track. Create a temporary bathroom setupIf possible, set up a temporary bathroom arrangement such as a family or neighbor’s bathroom to make your daily routines more convenient. Protect your belongingsPrior to the remodel, remove or protect any valuable or fragile items in the vicinity of the bathroom. Dust and debris can travel during construction, so covering furniture and belongings will help prevent damage. Maintain a flexible scheduleUnderstand that unexpected delays or changes may occur during the remodeling process. Be flexible with your schedule and prepare for adjustments as needed. Practice self-care and a positive mindsetRemodeling can be stressful, so remember to take breaks and step away from the construction zone. Remind yourself that the inconvenience and disruption caused by the remodel are temporary. Focus on the end result—a beautiful and functional bathroom that enhances your living space. If you’re ready to renovate your NYC bathroom, we can match you with vetted contractors who have experience similar to your scope, in your location, and within your budget. Post your project to get started! -- Sweeten handpicks the best general contractors to match each project’s location, budget, scope, and style. Follow the blog, Sweeten Stories, for renovation ideas and inspiration and when you’re ready to renovate, start your renovation with Sweeten. 
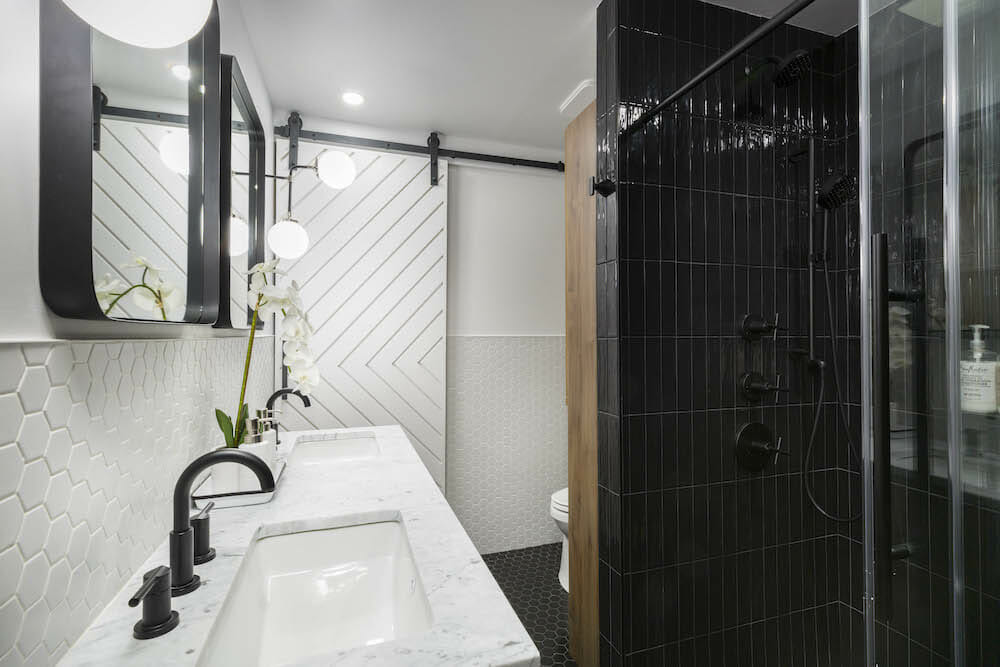
The post A Guide to Remodeling Your Bathroom in New York City appeared first on Sweeten. from Sweeten https://sweeten.com/process-and-planning/renovating-in-the-northeast/how-to-remodel-a-bathroom-in-nyc/ via IFTTT Via https://vegetablenirvana.blogspot.com/2023/05/a-guide-to-remodeling-your-bathroom-in.html Located in a Chicago greystone building, a couple relocates the apartment entrance with updates throughout
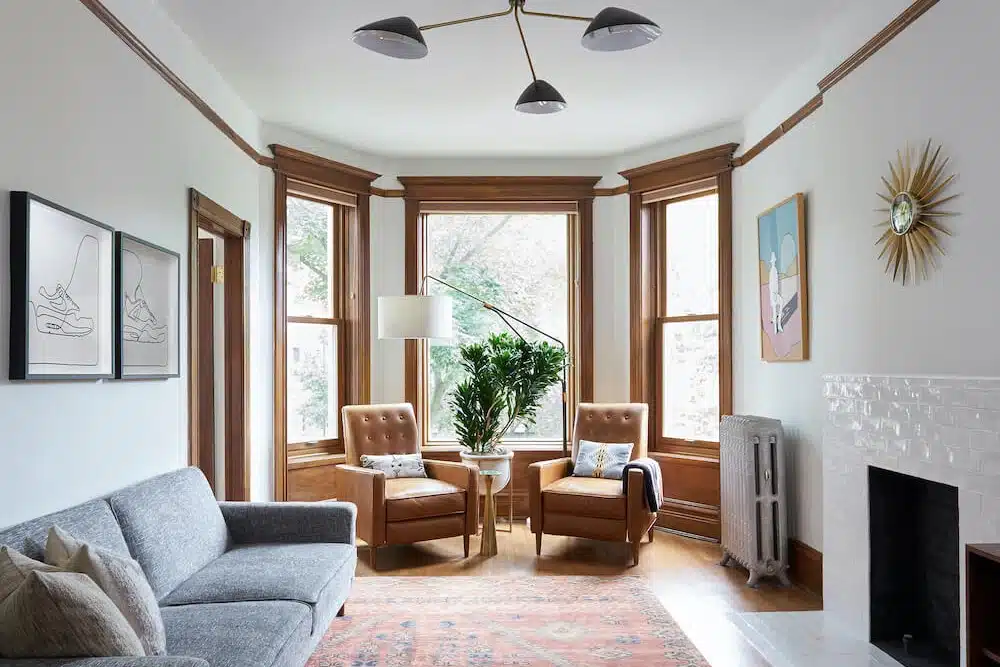
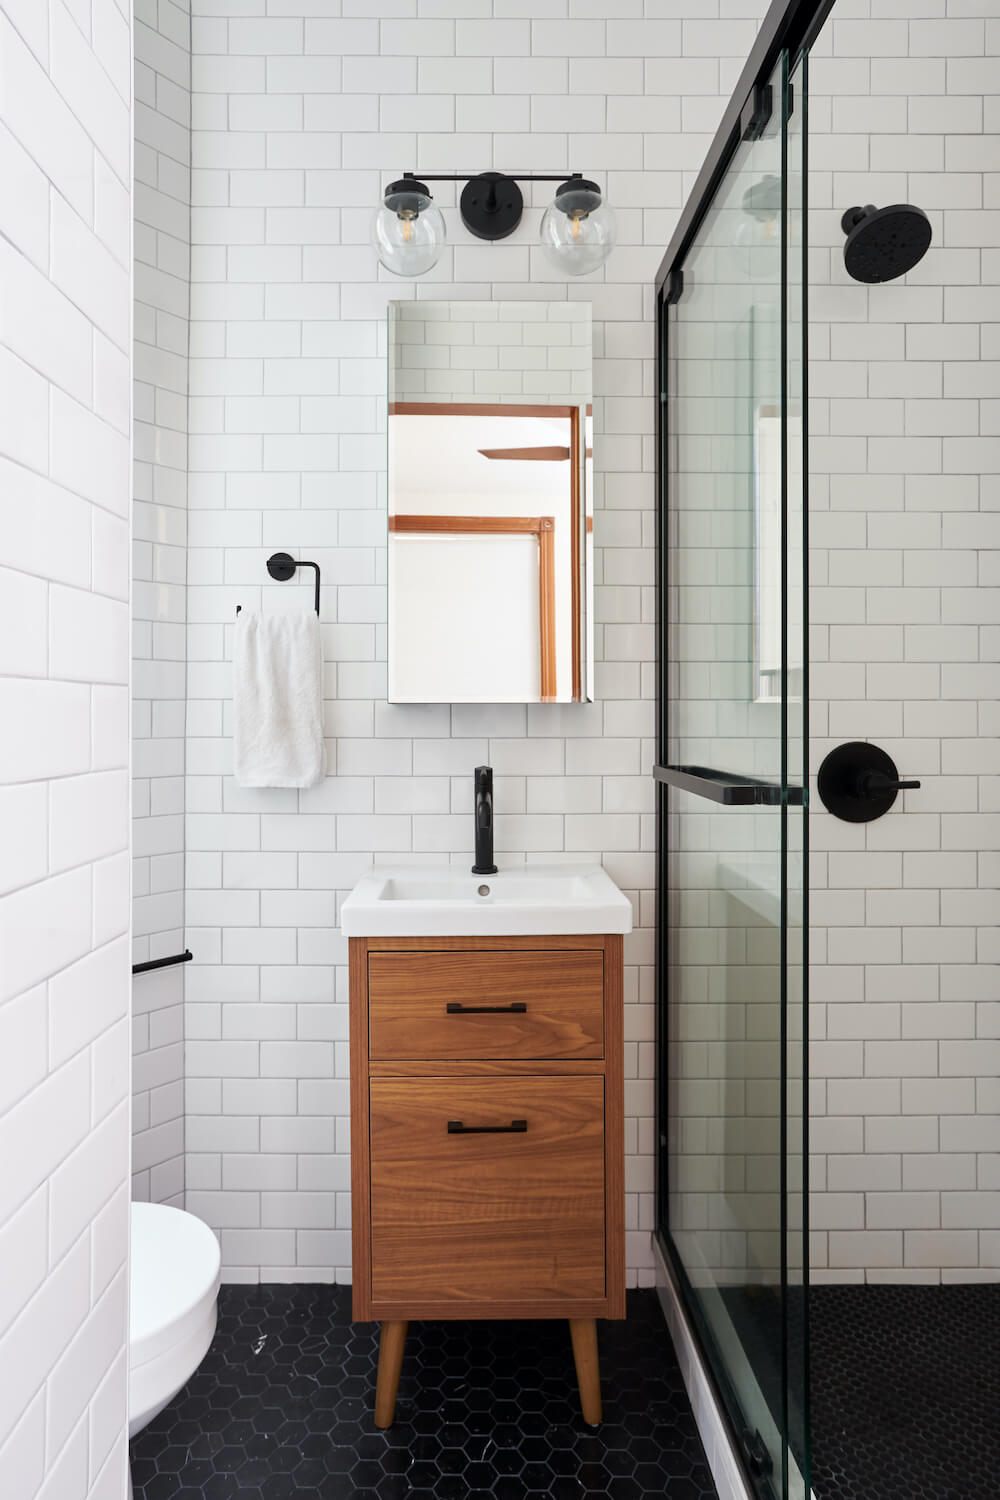
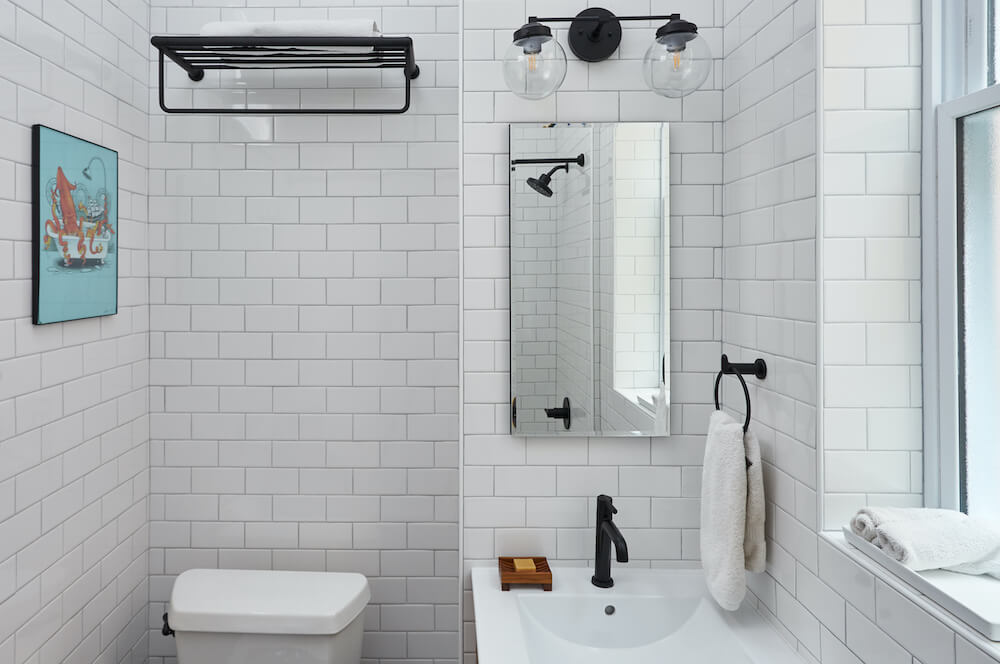
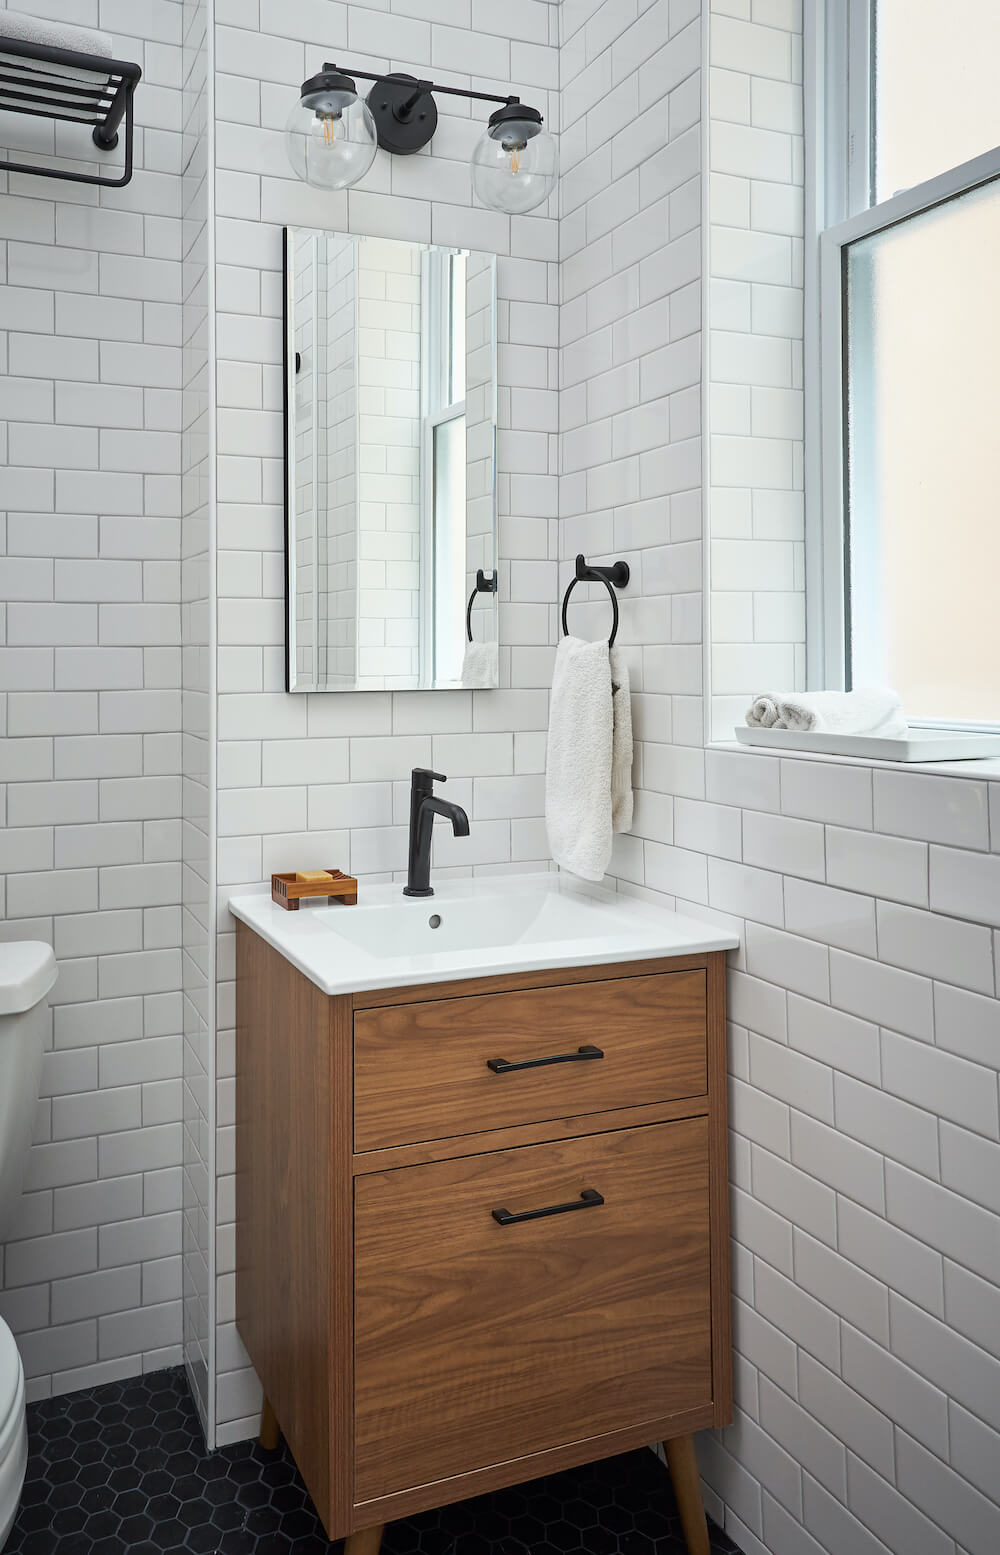
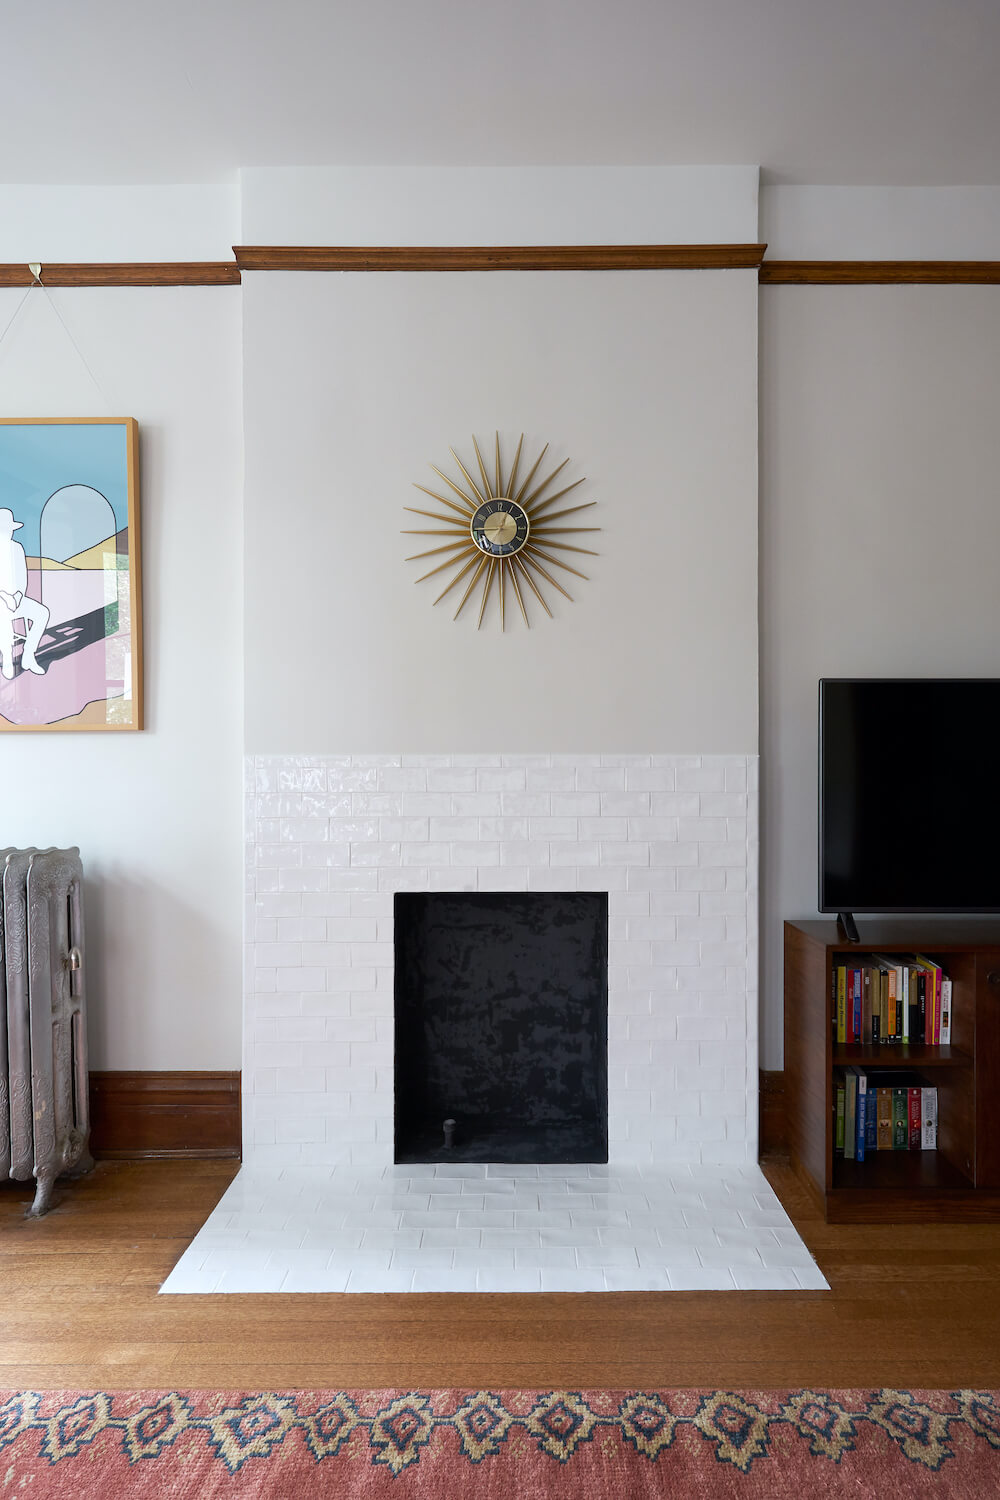
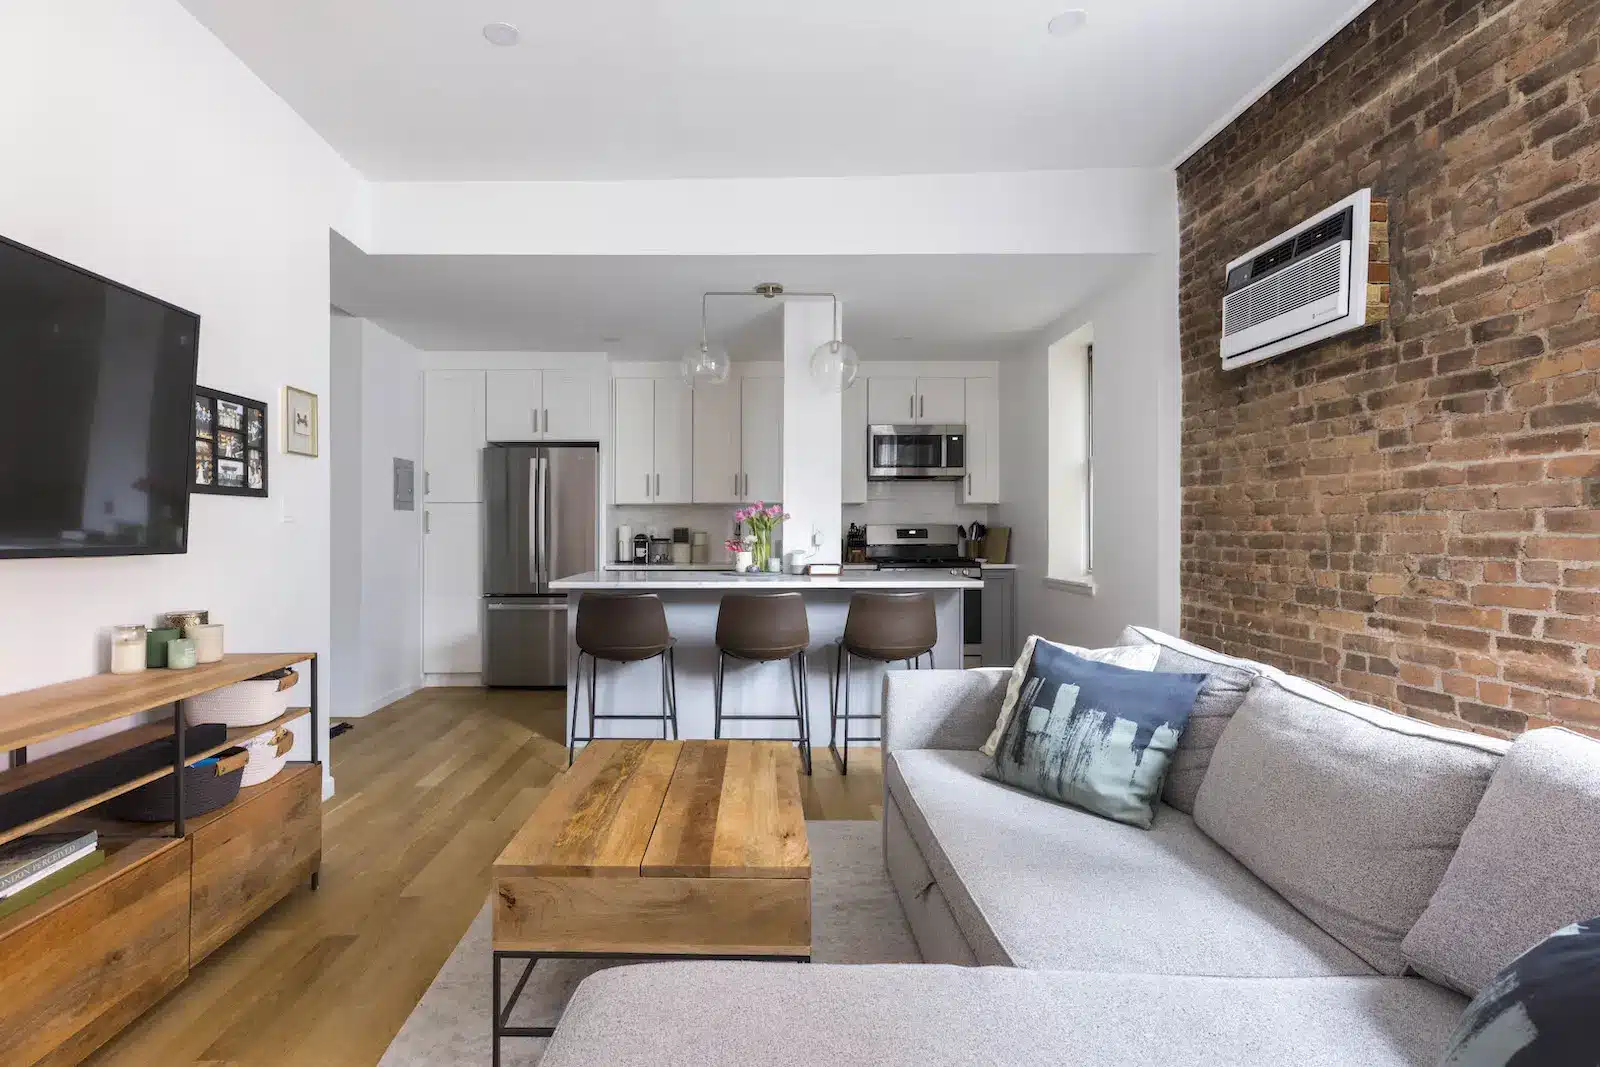
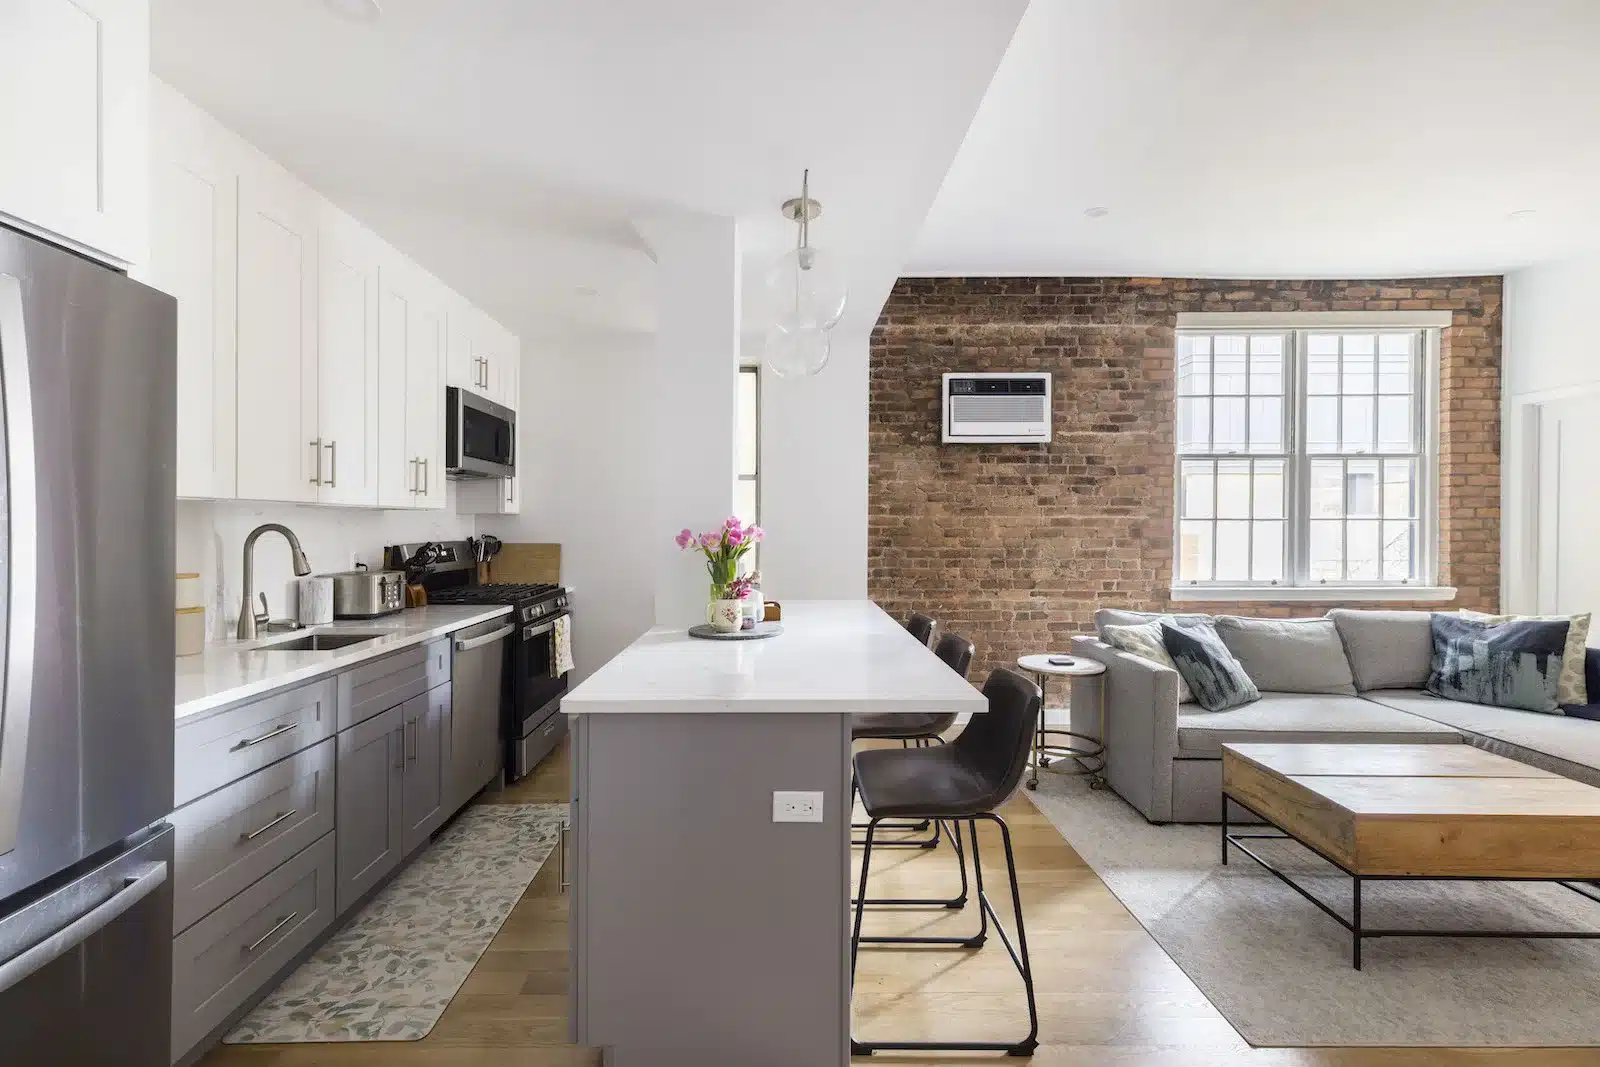
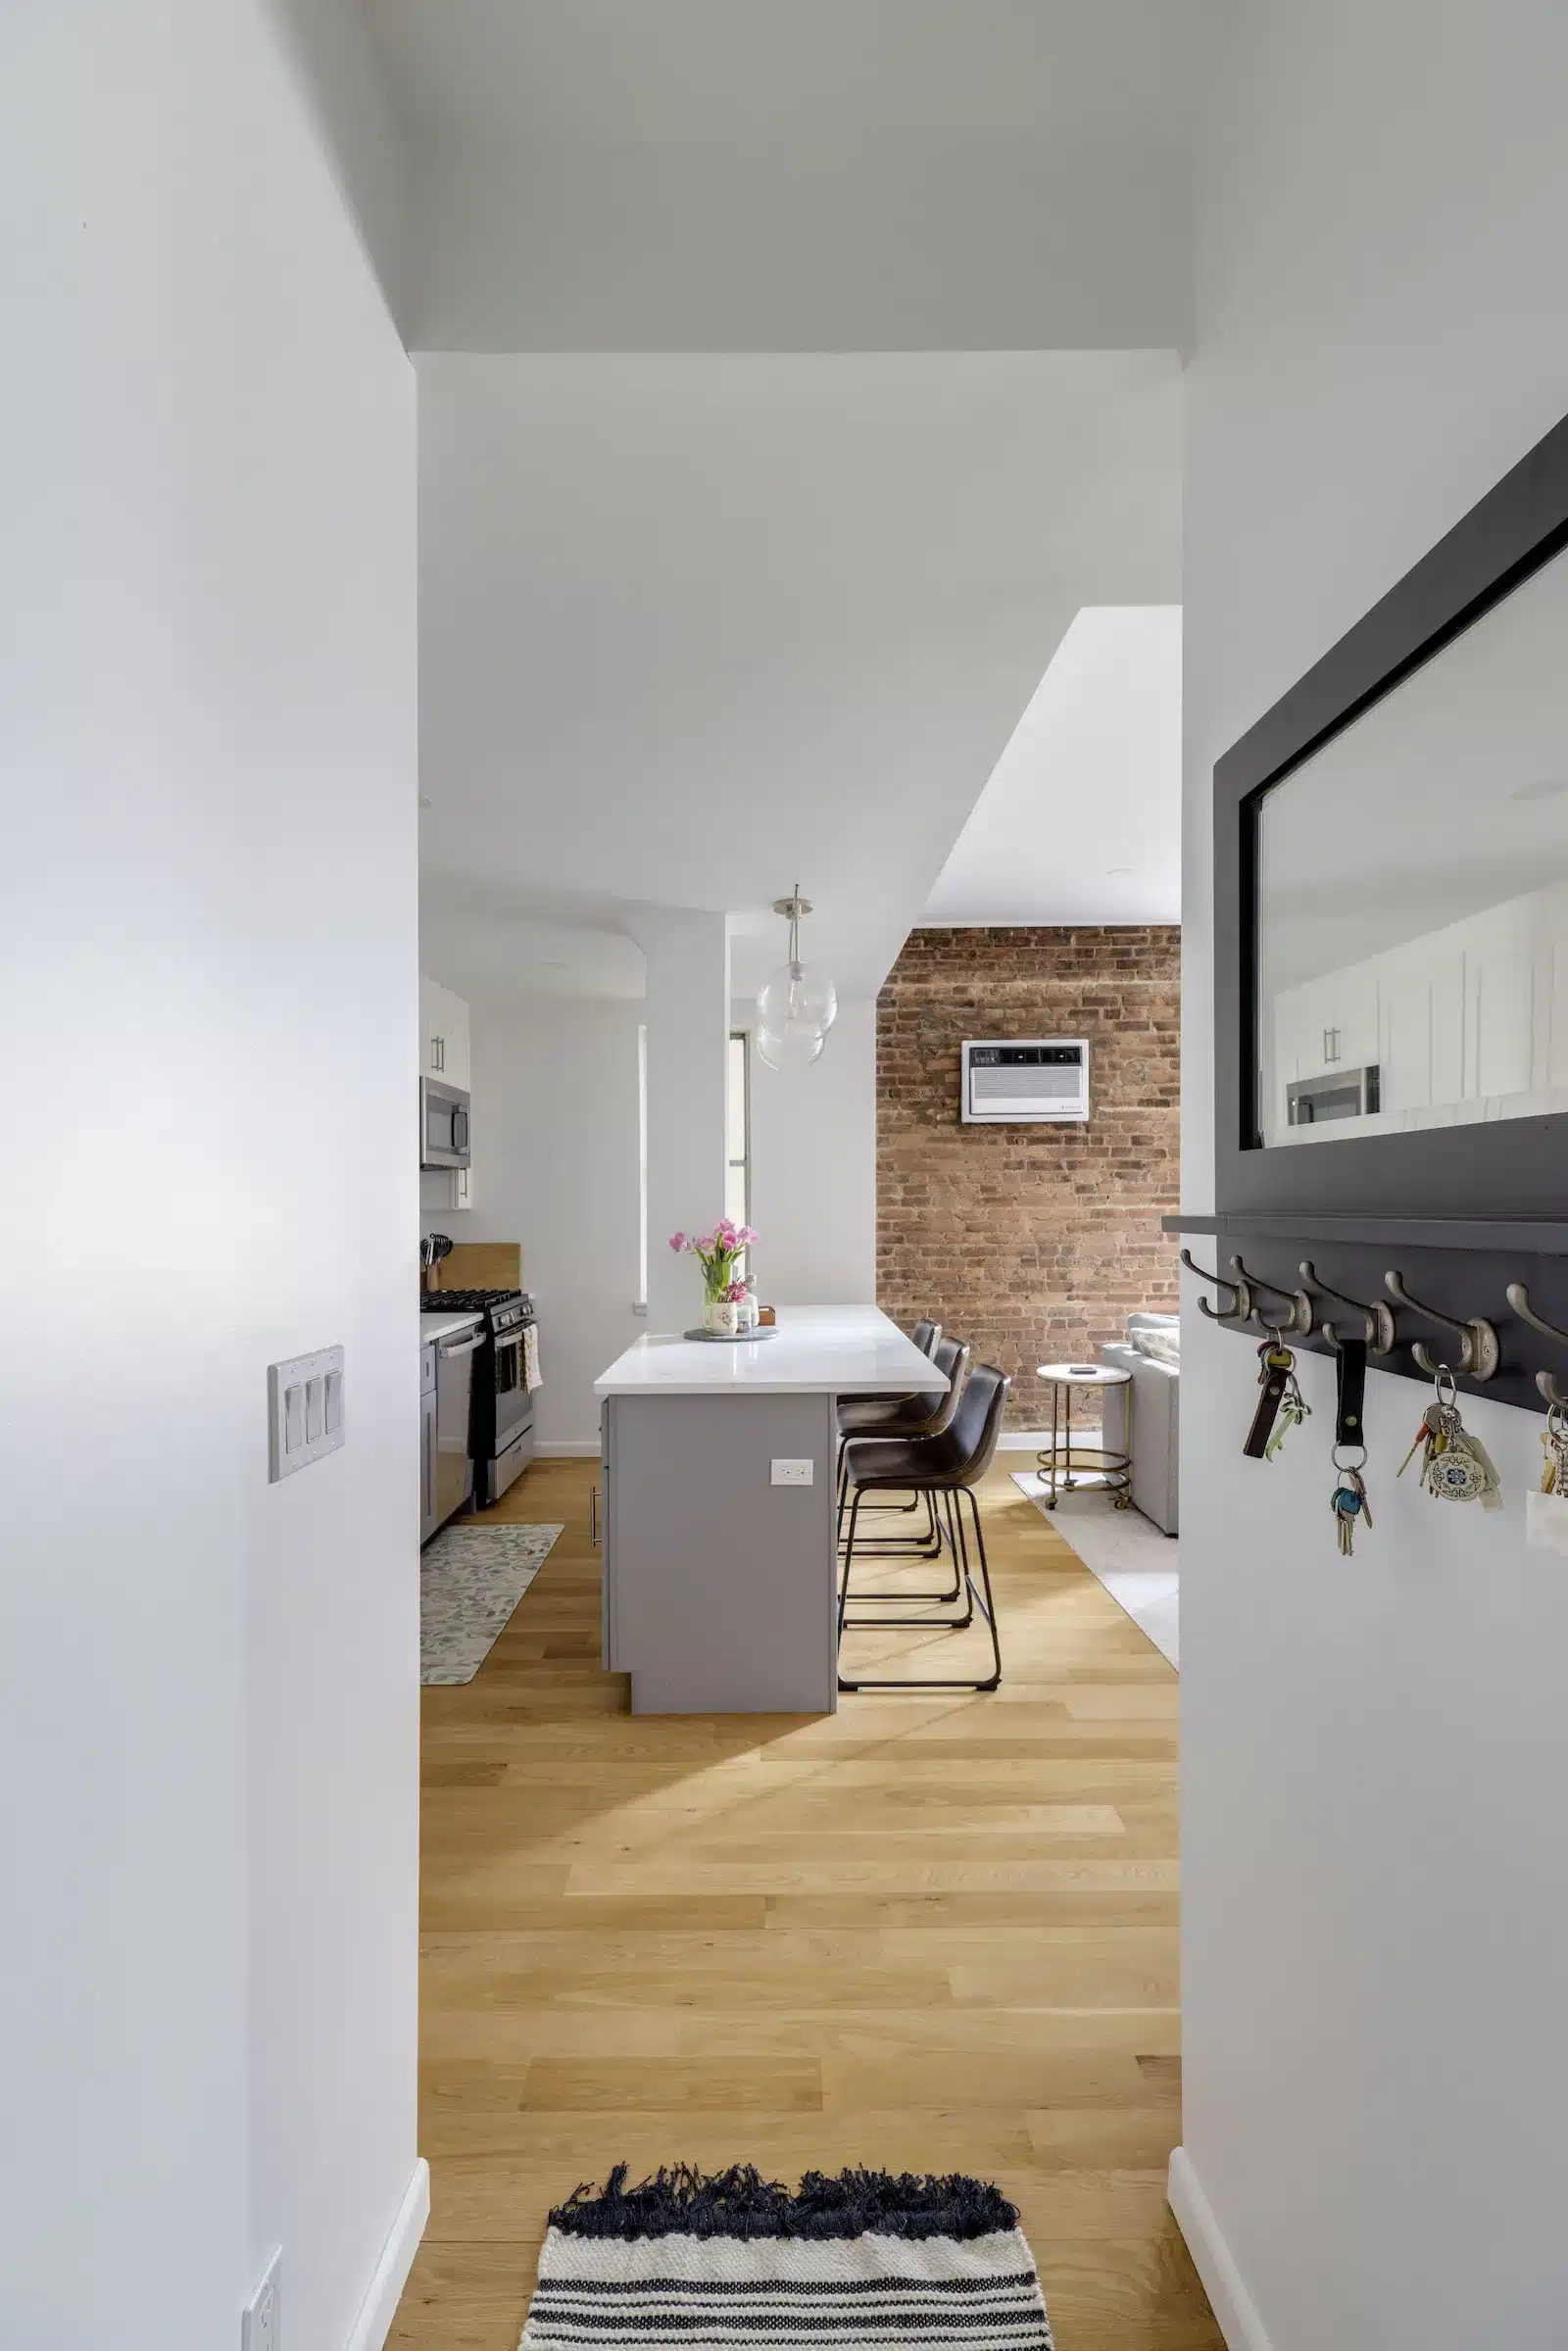
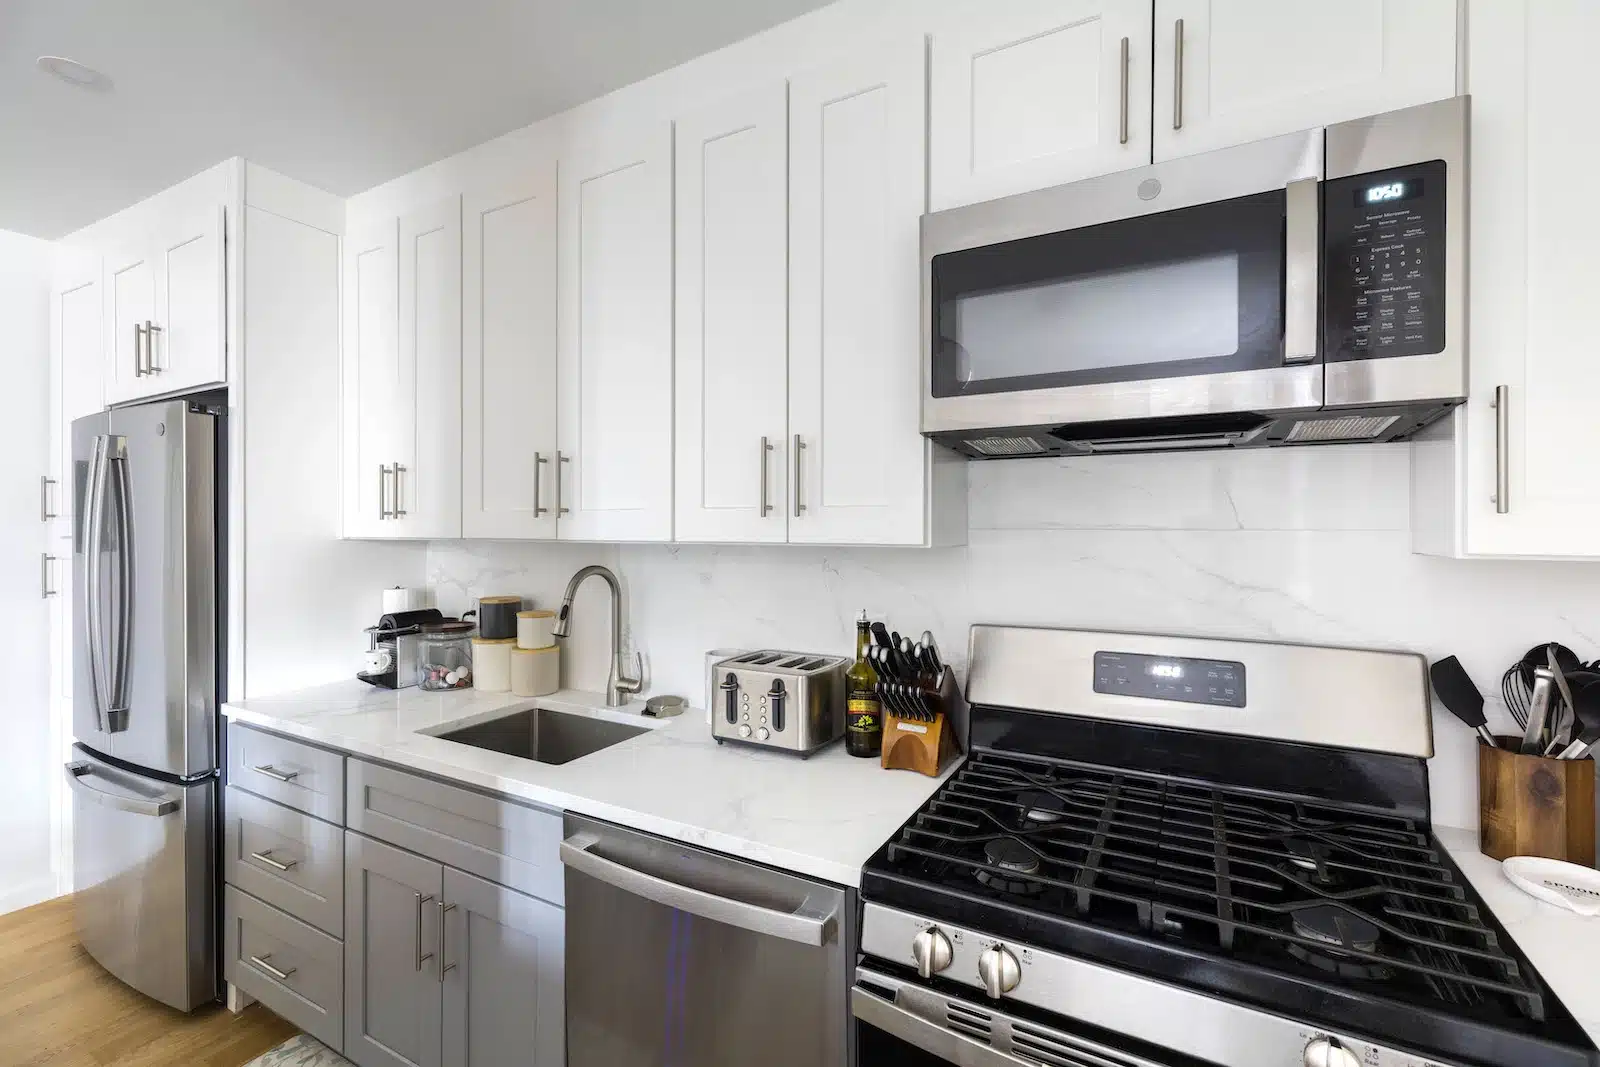
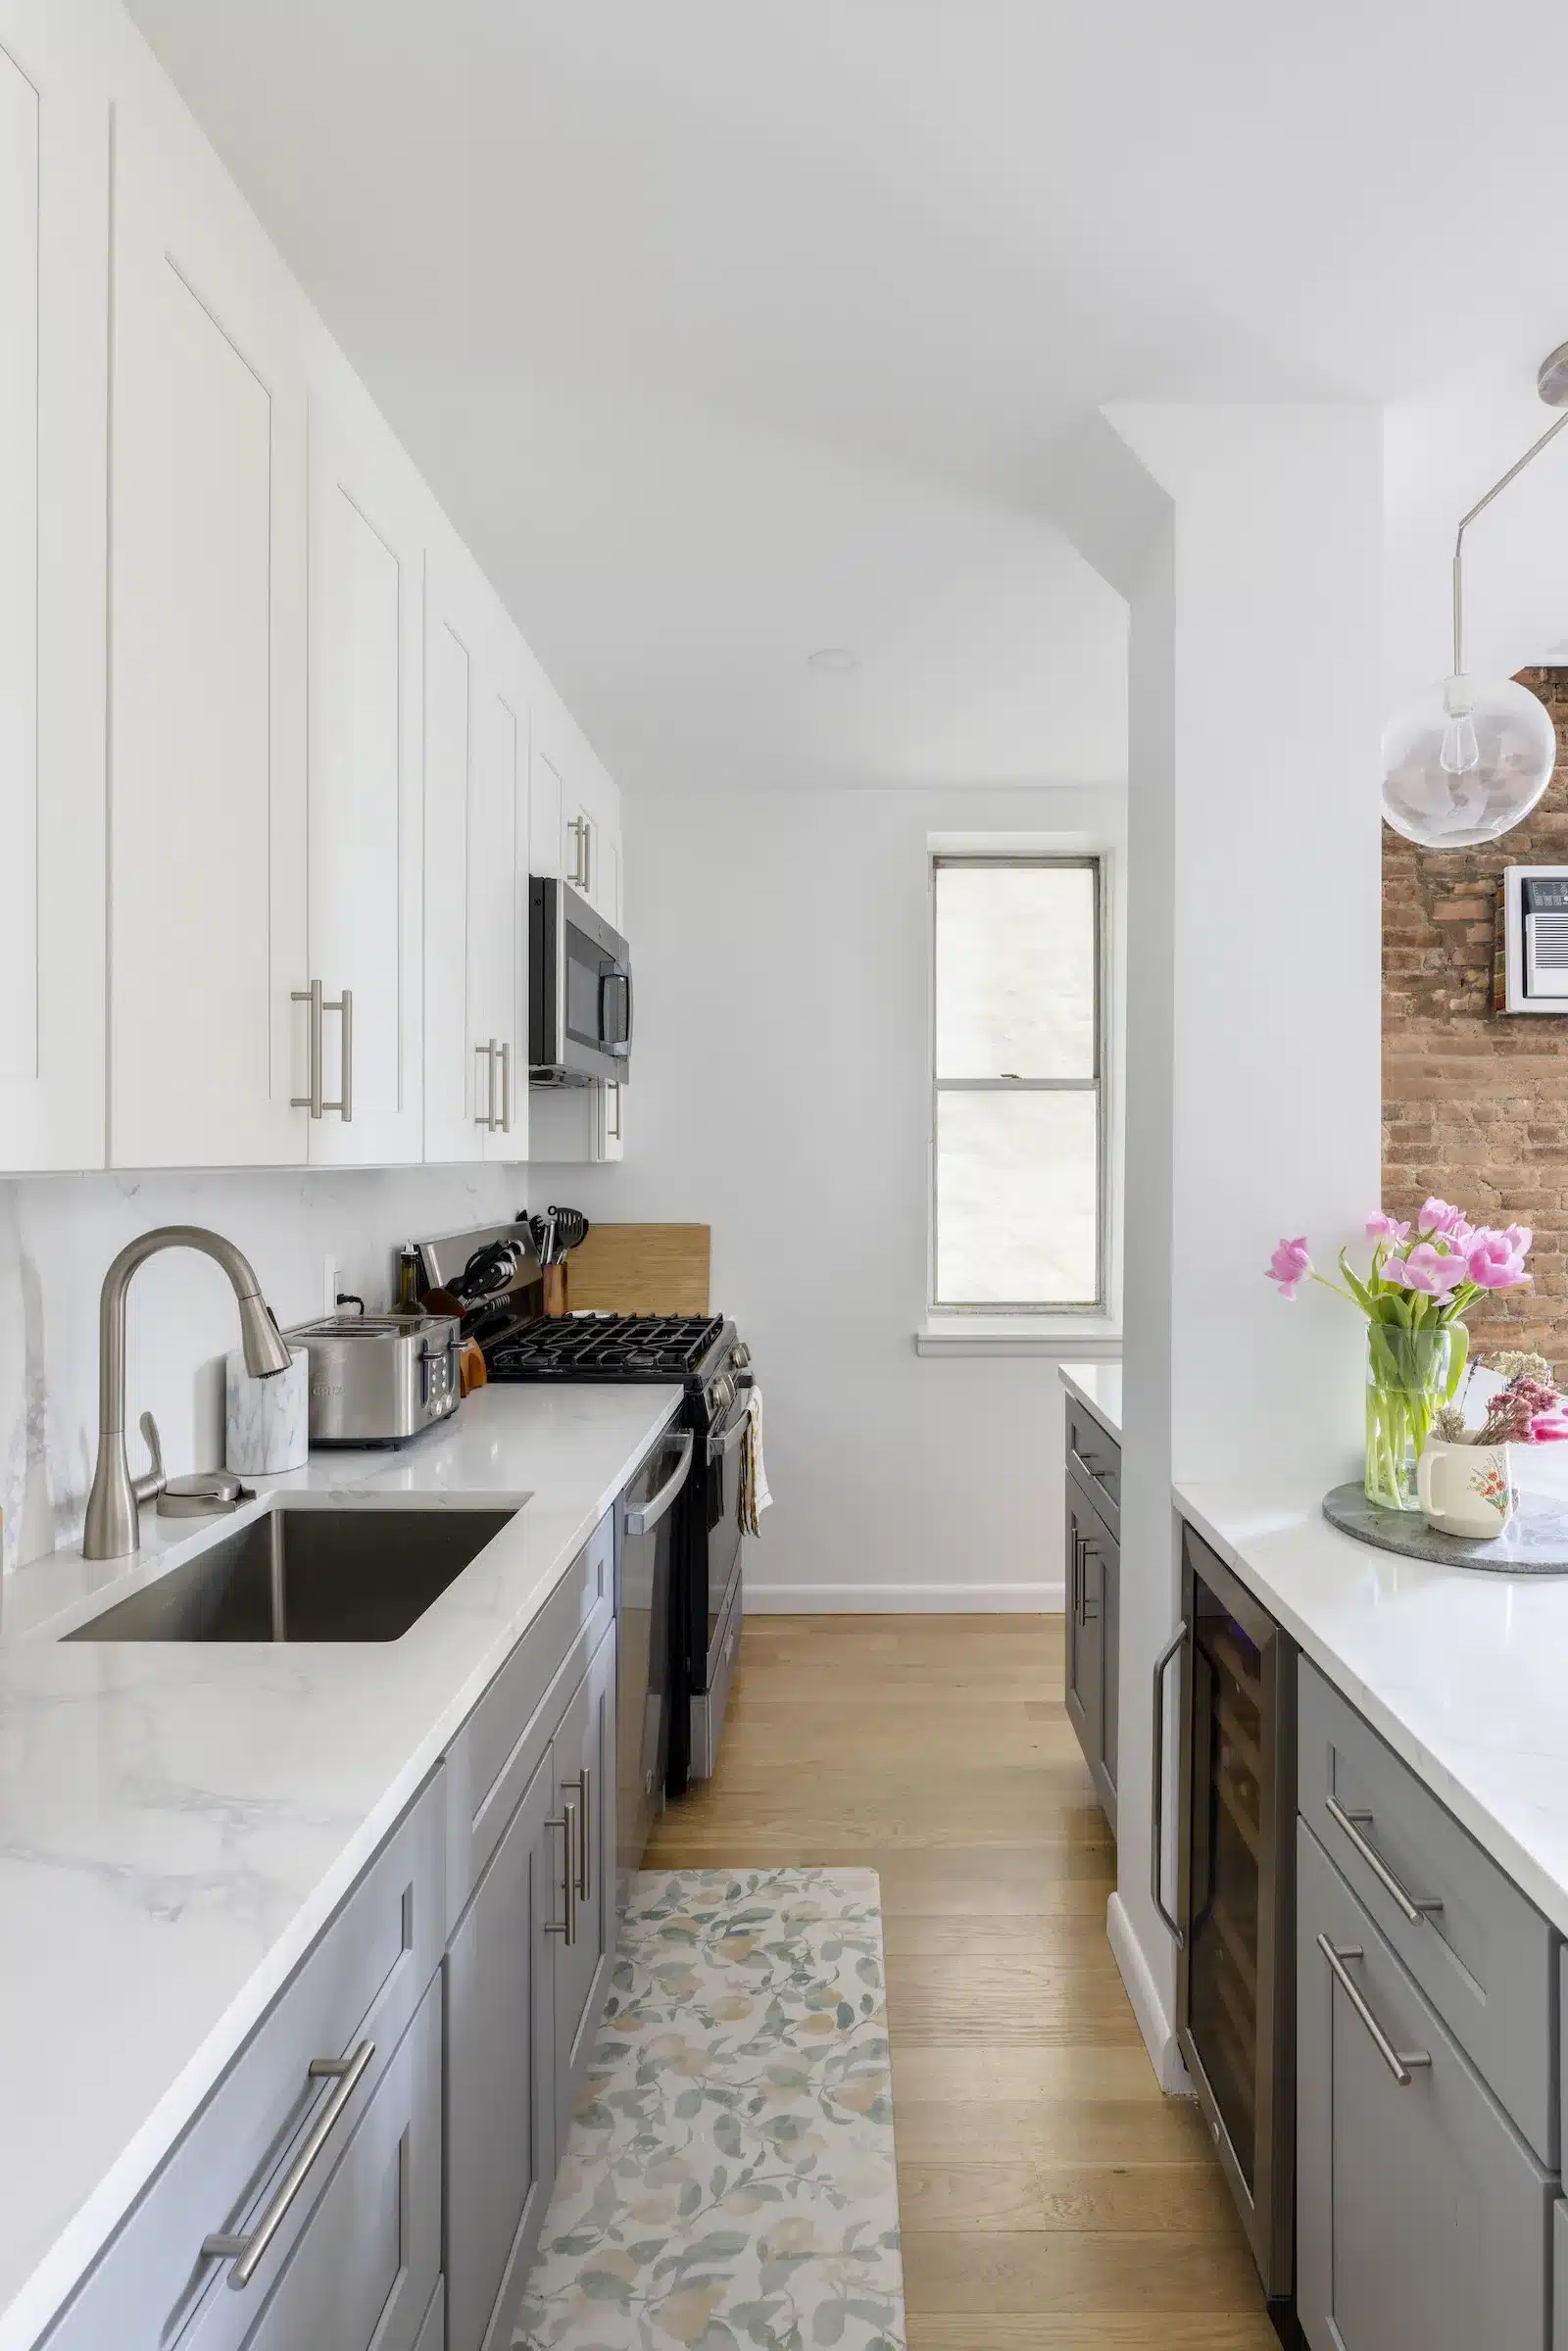
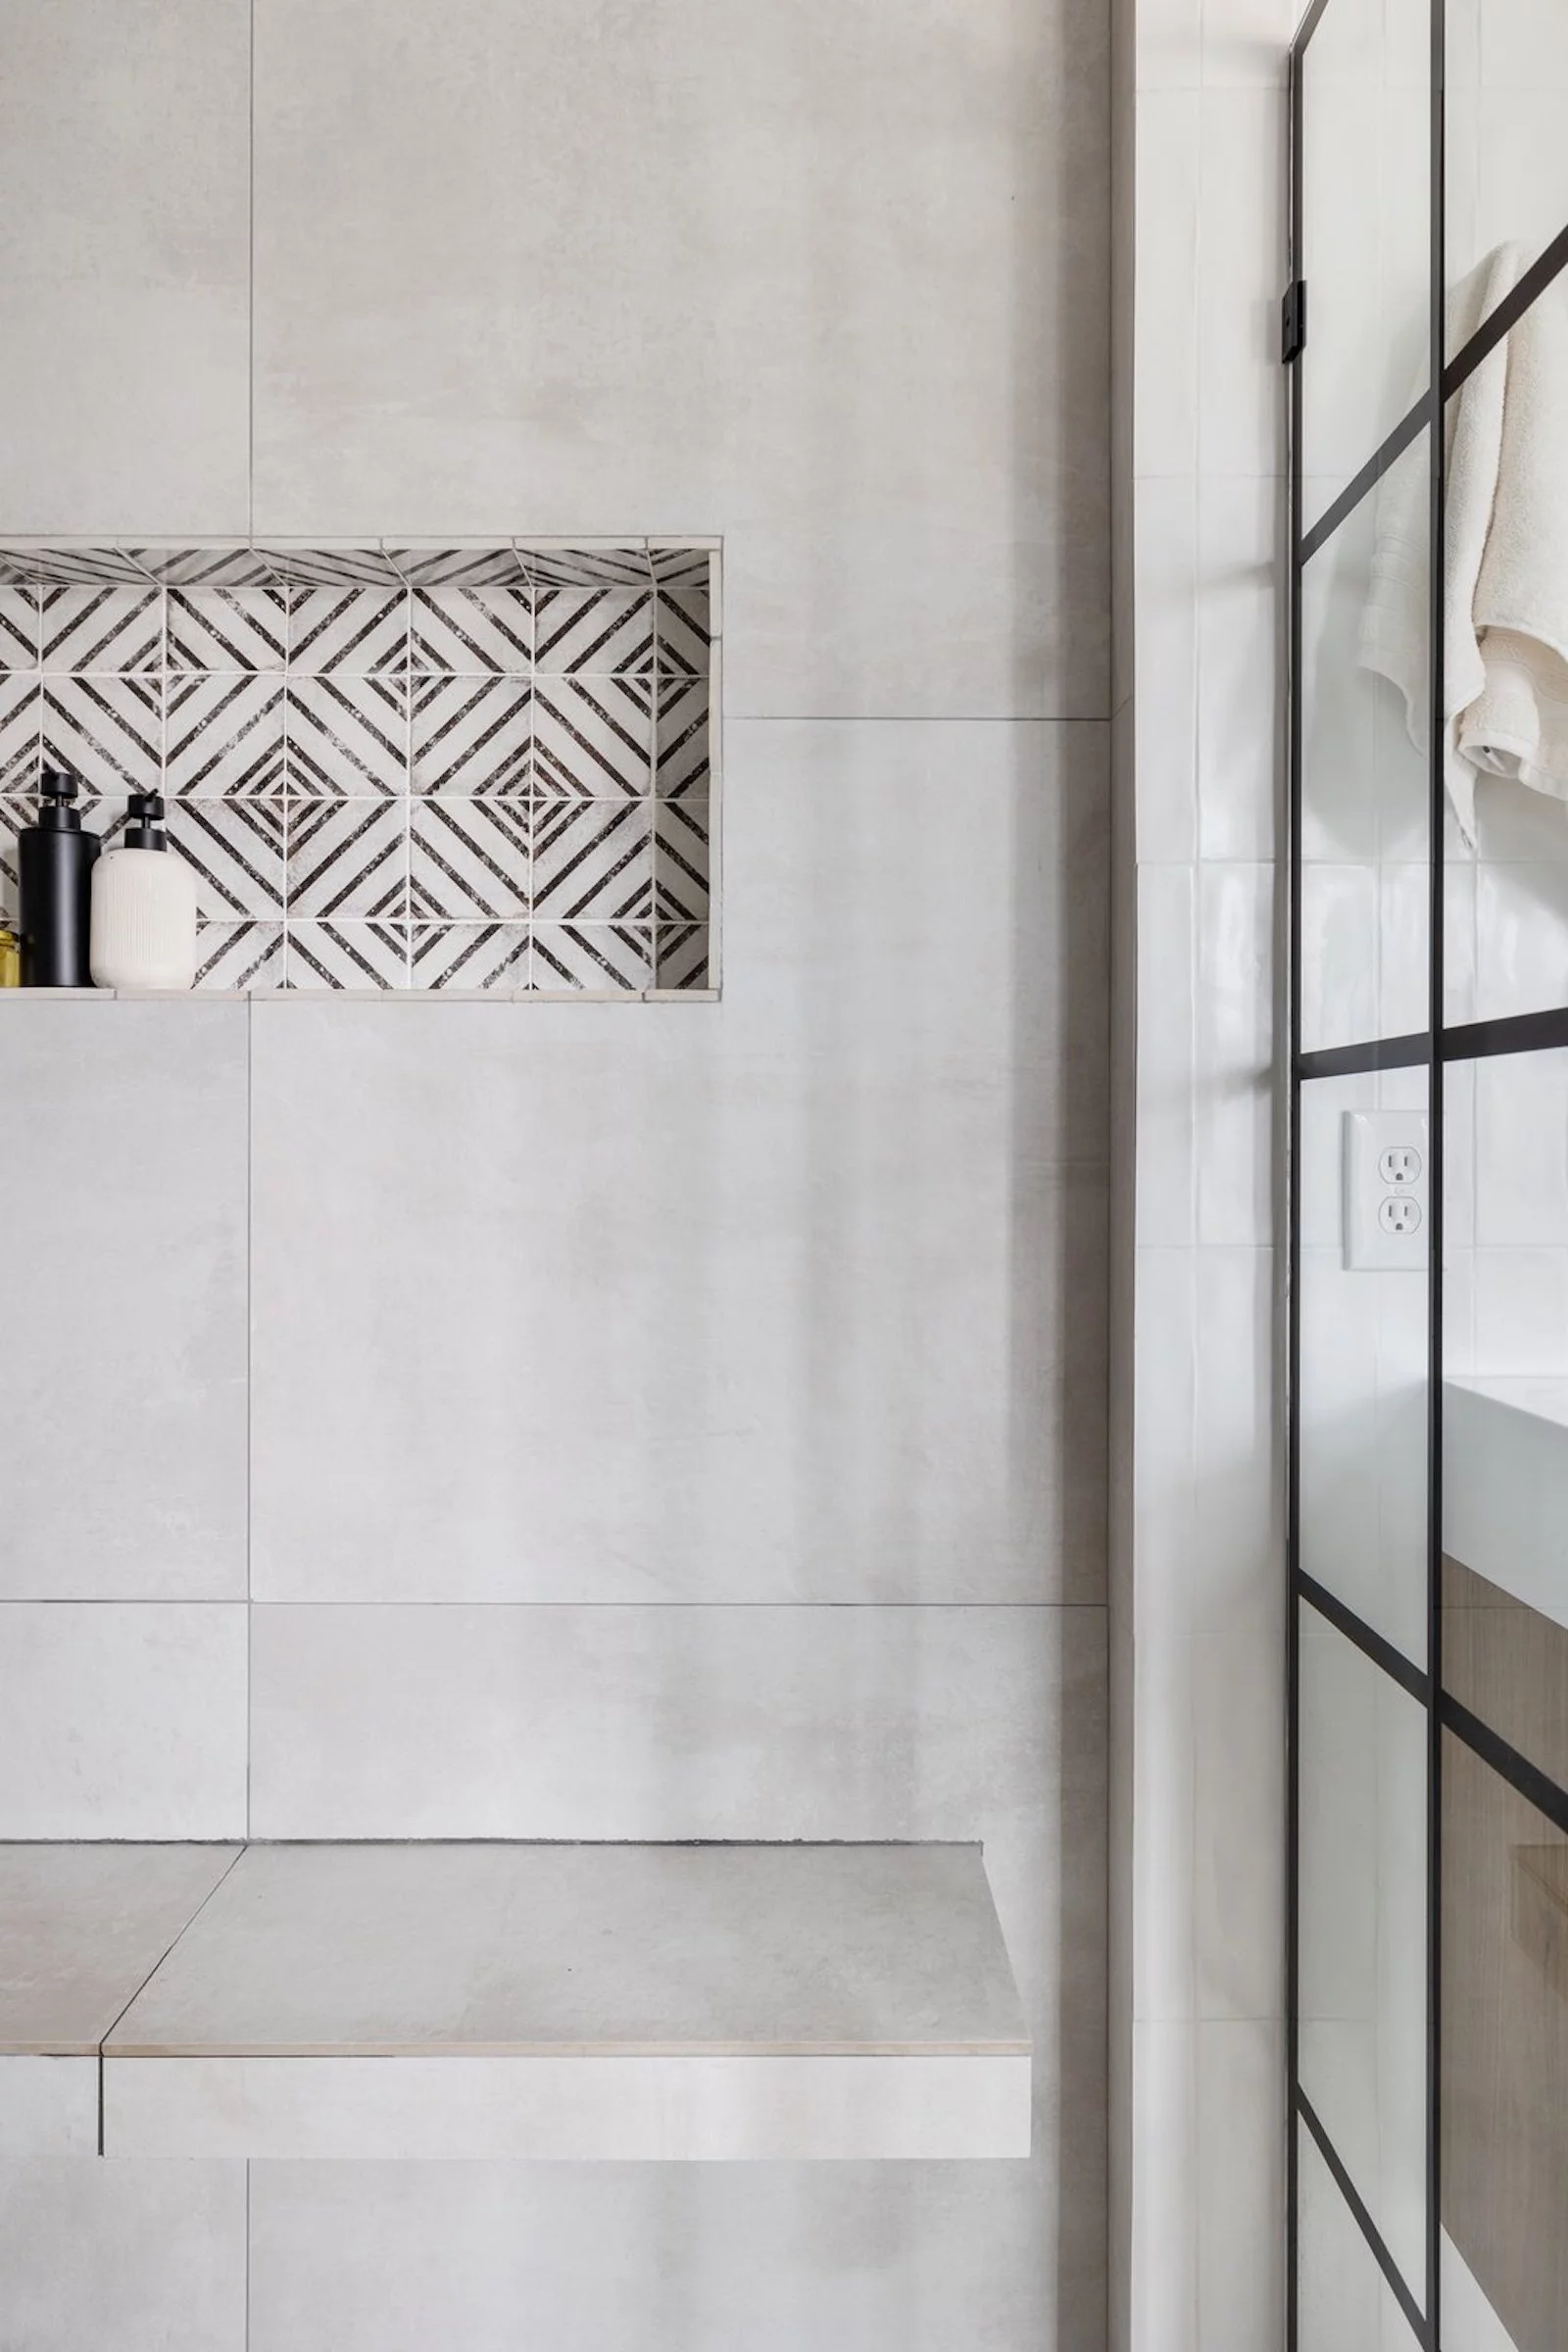
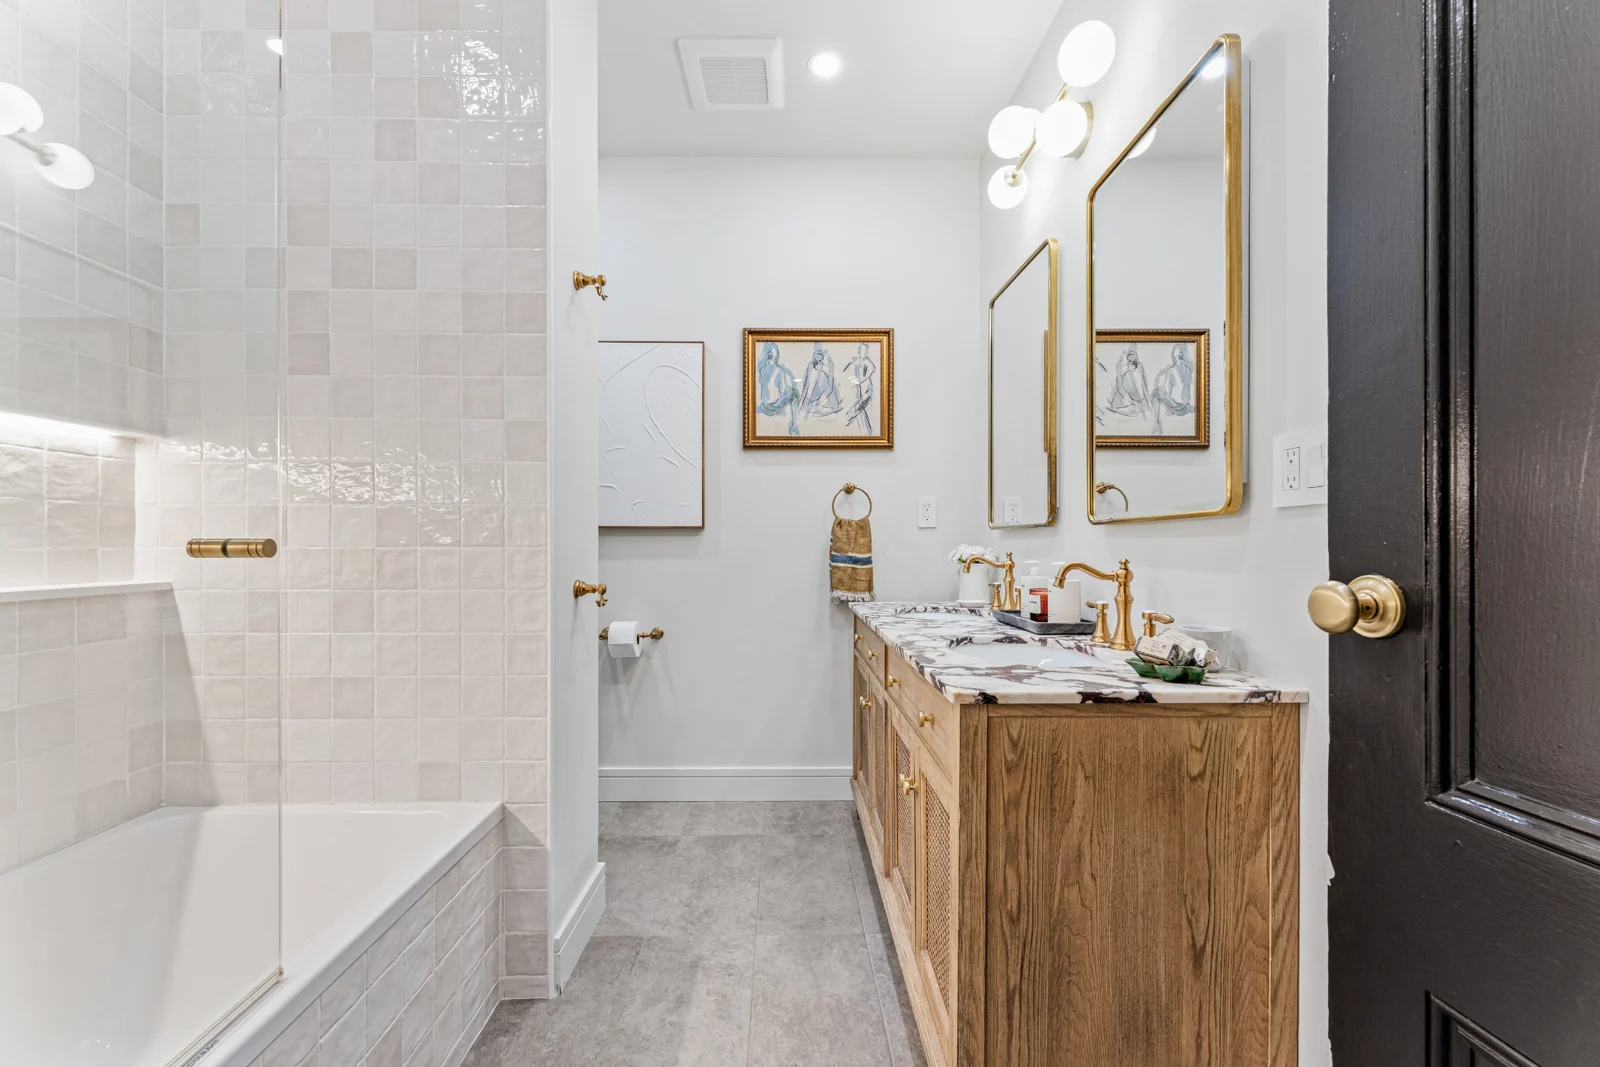
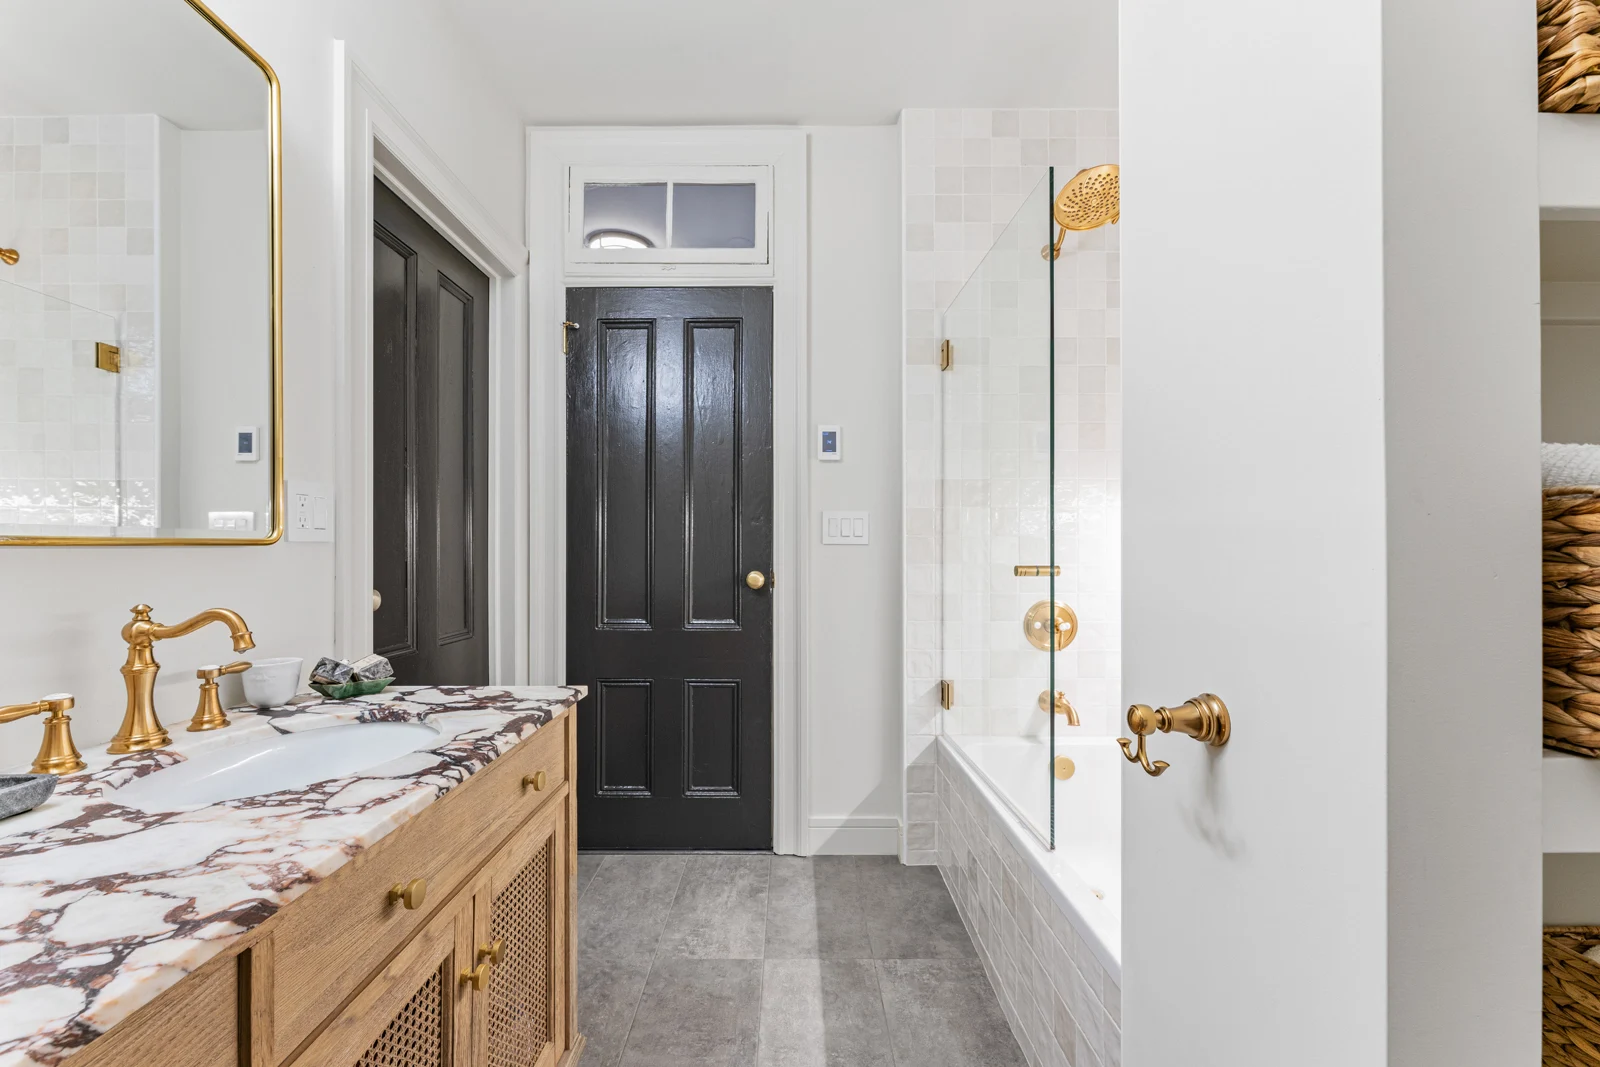
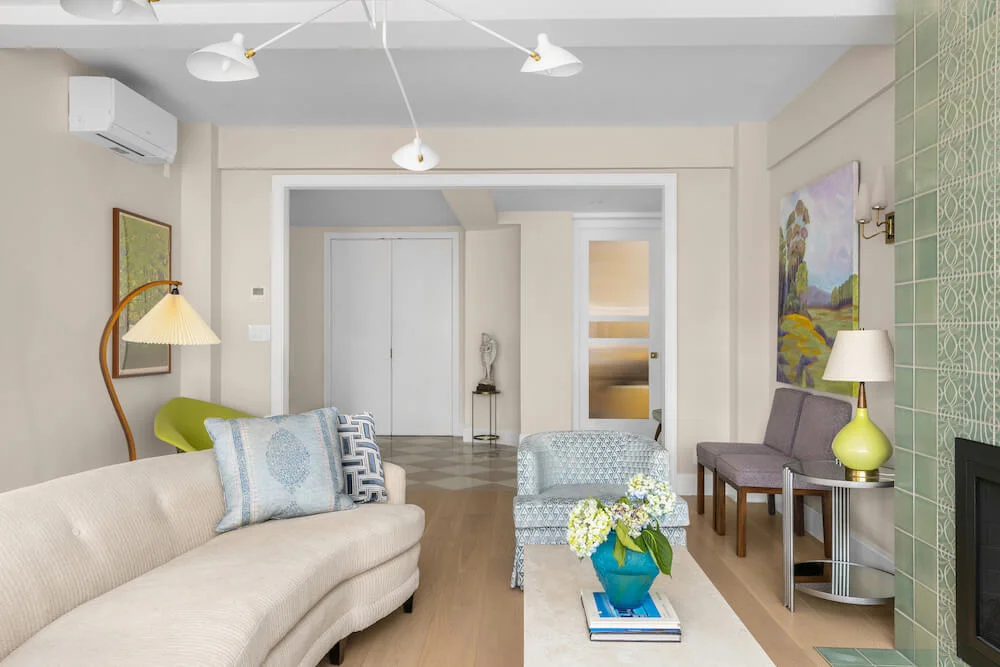
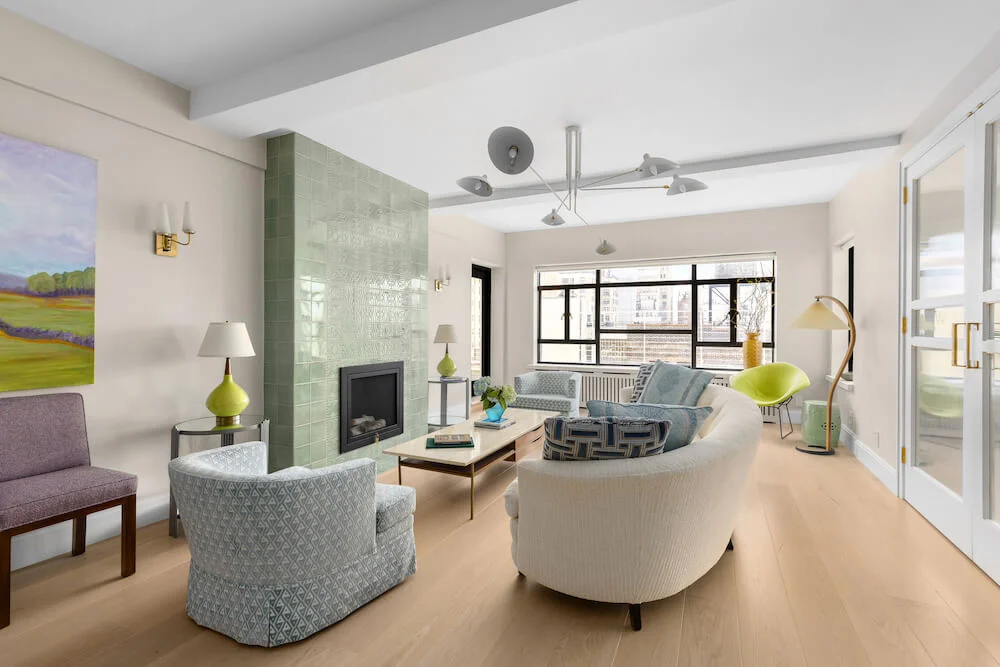
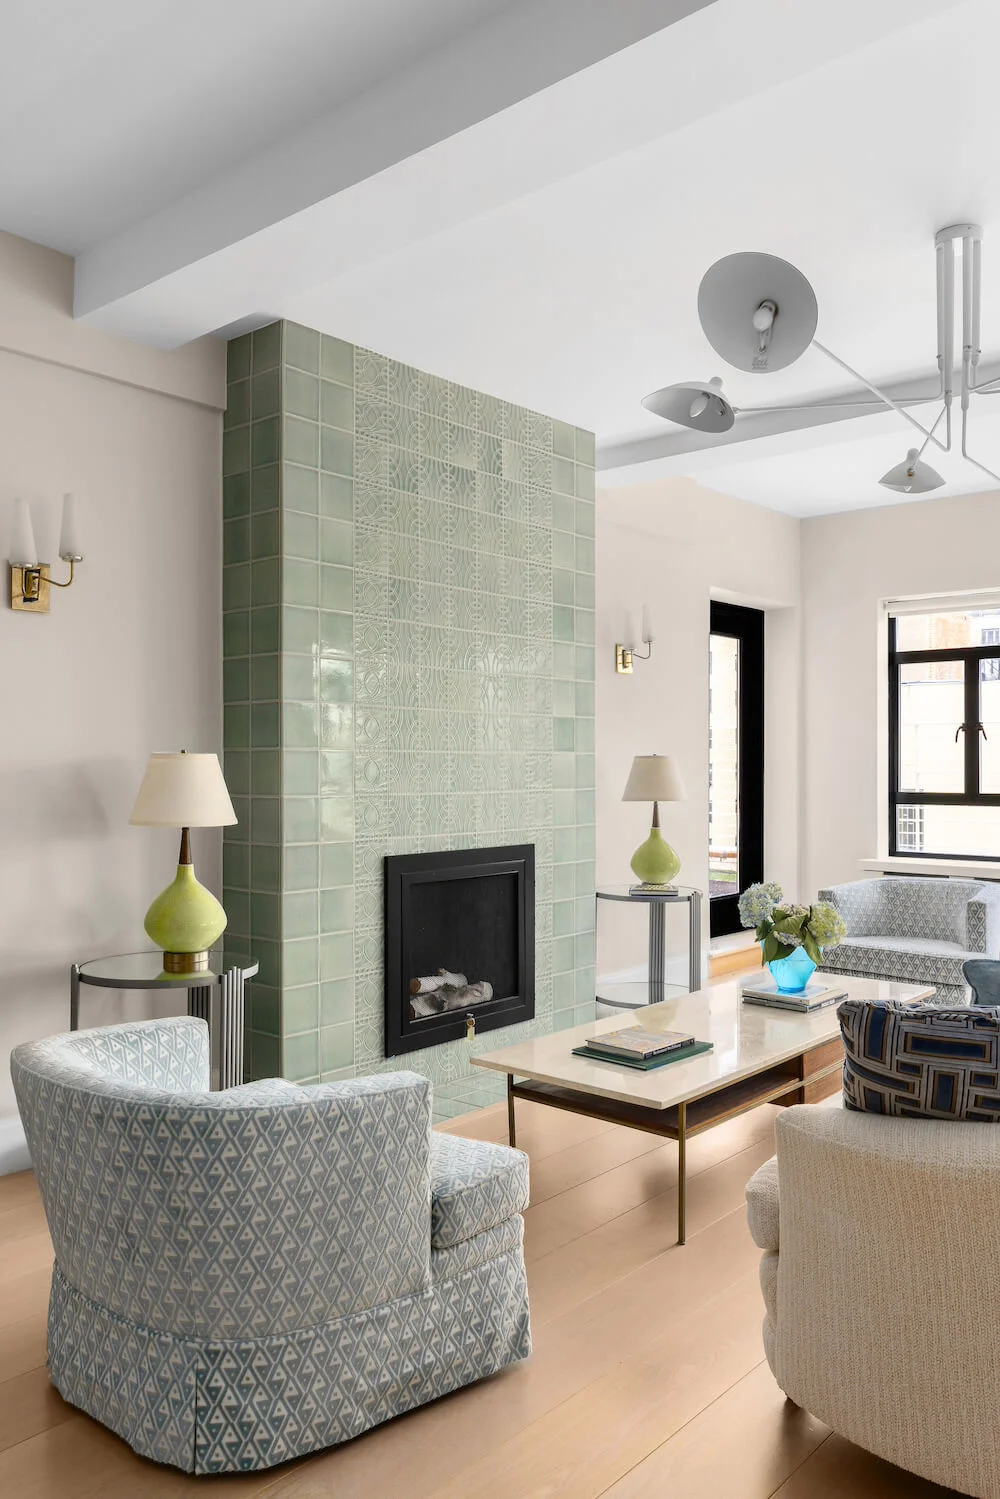
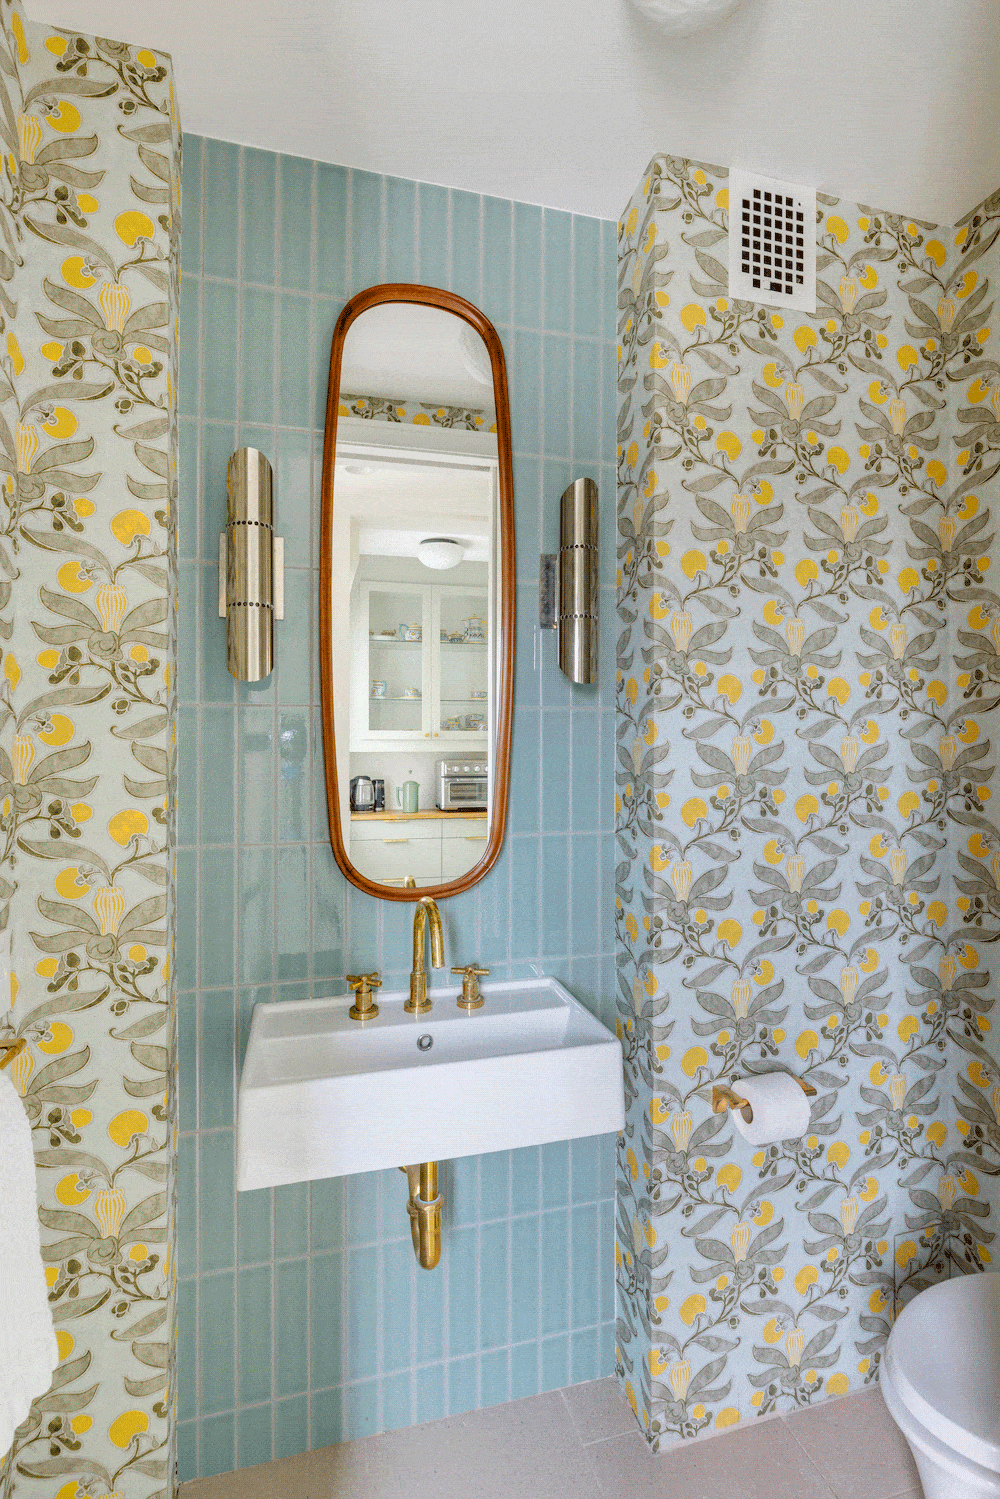
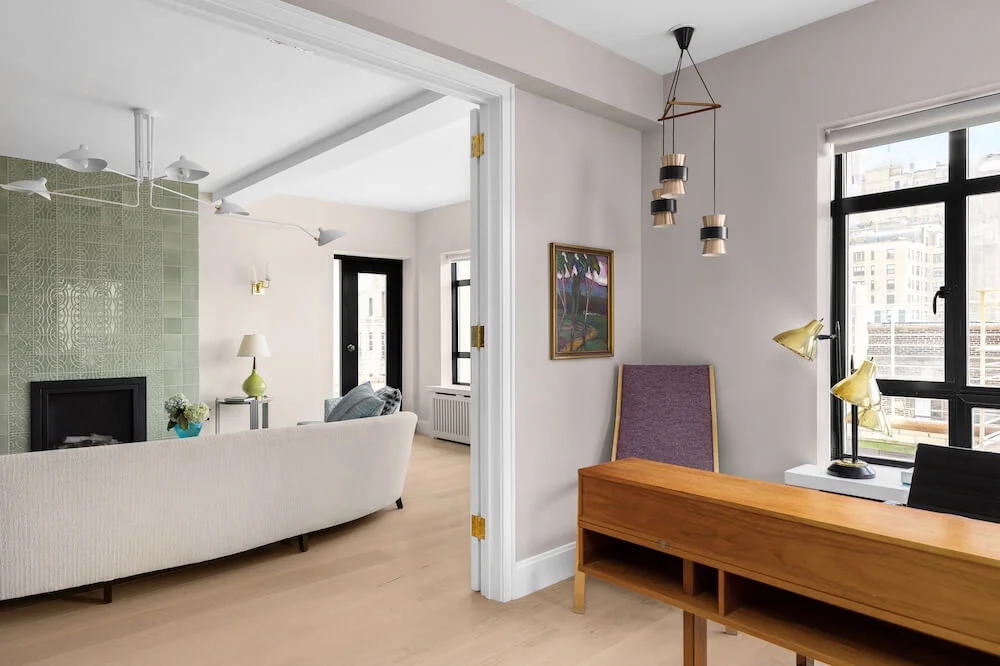
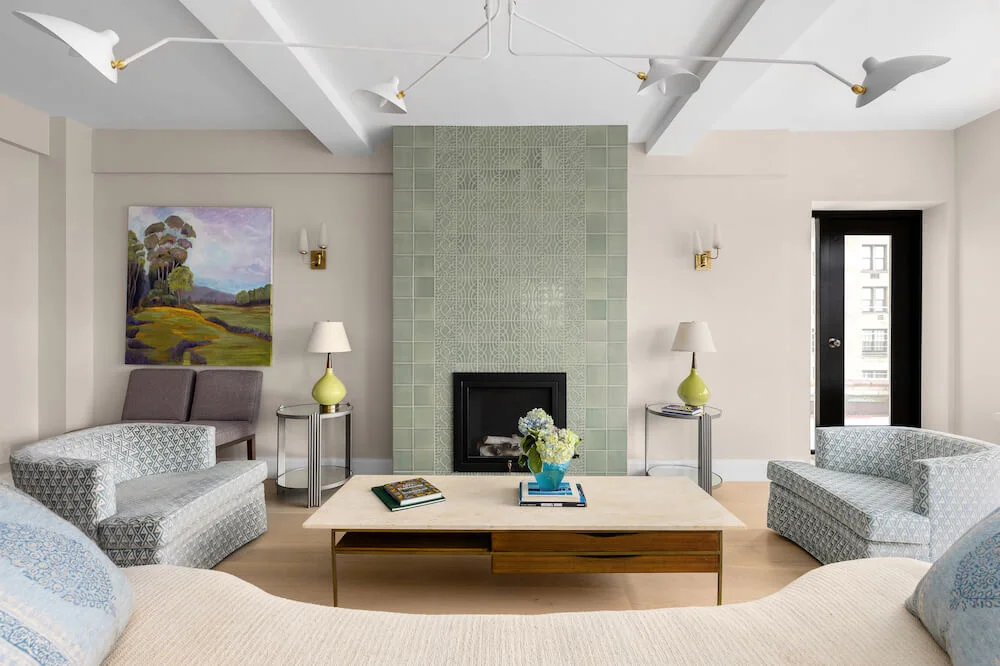
Written in partnership with the homeowners. “After” photos by John Laning. Landing a historic fixer-upper in ChicagoOur apartment, which we bought in 2019, is in a historic greystone building in Chicago’s Lakeview East neighborhood. A three-bedroom fixer-upper, we chose it knowing we could renovate it to our exact specifications. The unit had, curiously, two front doors, neither of which was in a logical location, and we wanted to find a solution to that problem. We needed to renovate the two bathrooms, which had been largely untouched for decades. And finally, we wanted to redo the living-room fireplace façade as a finishing touch to our renovation. 
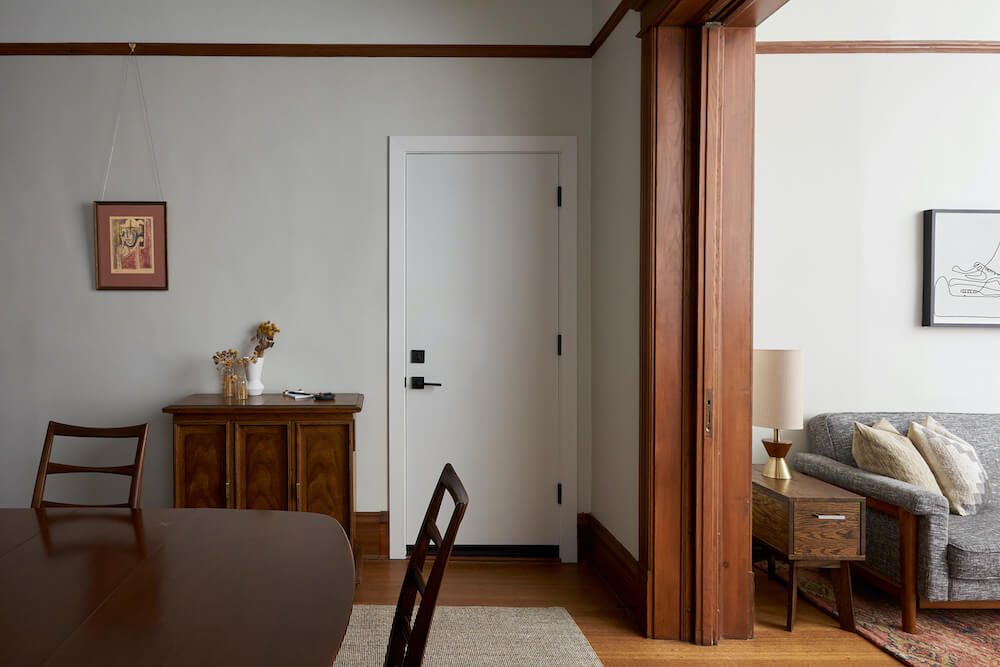
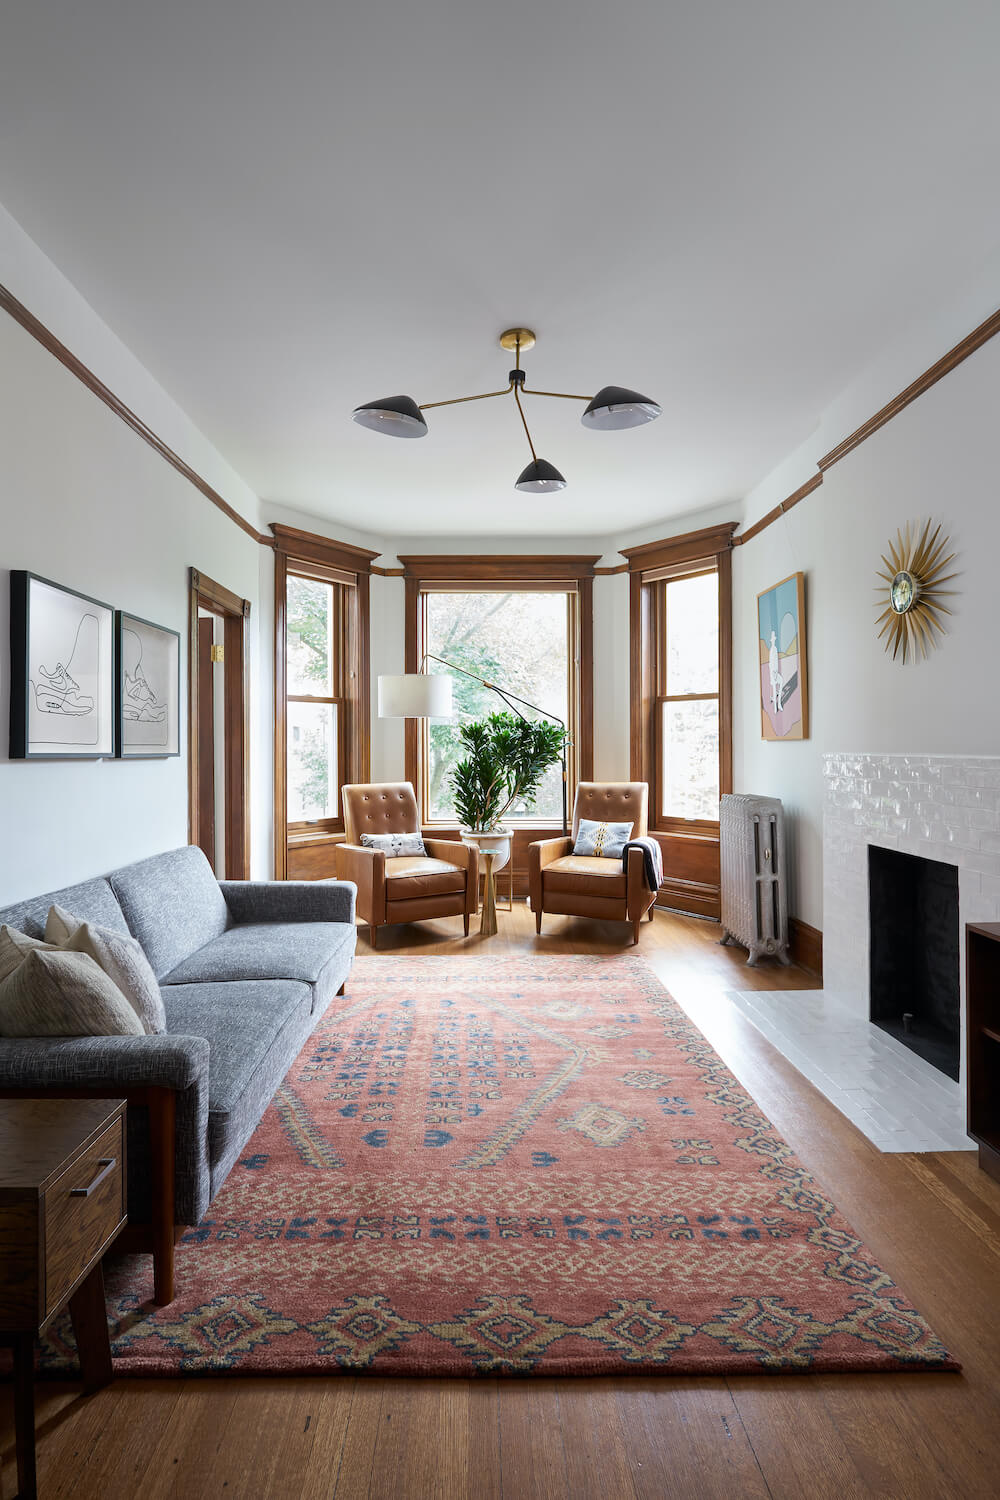
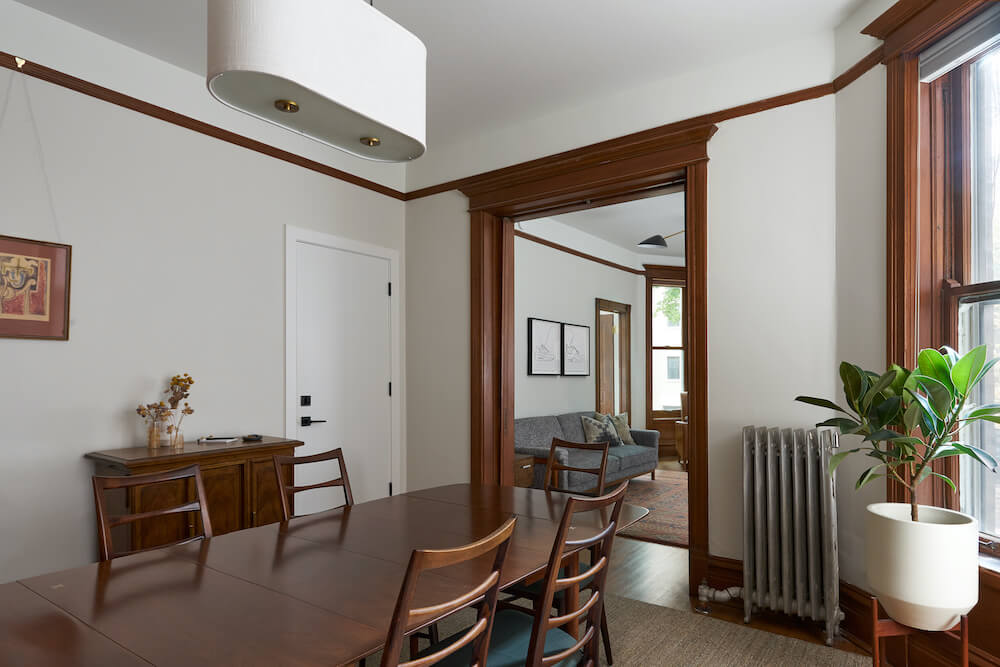
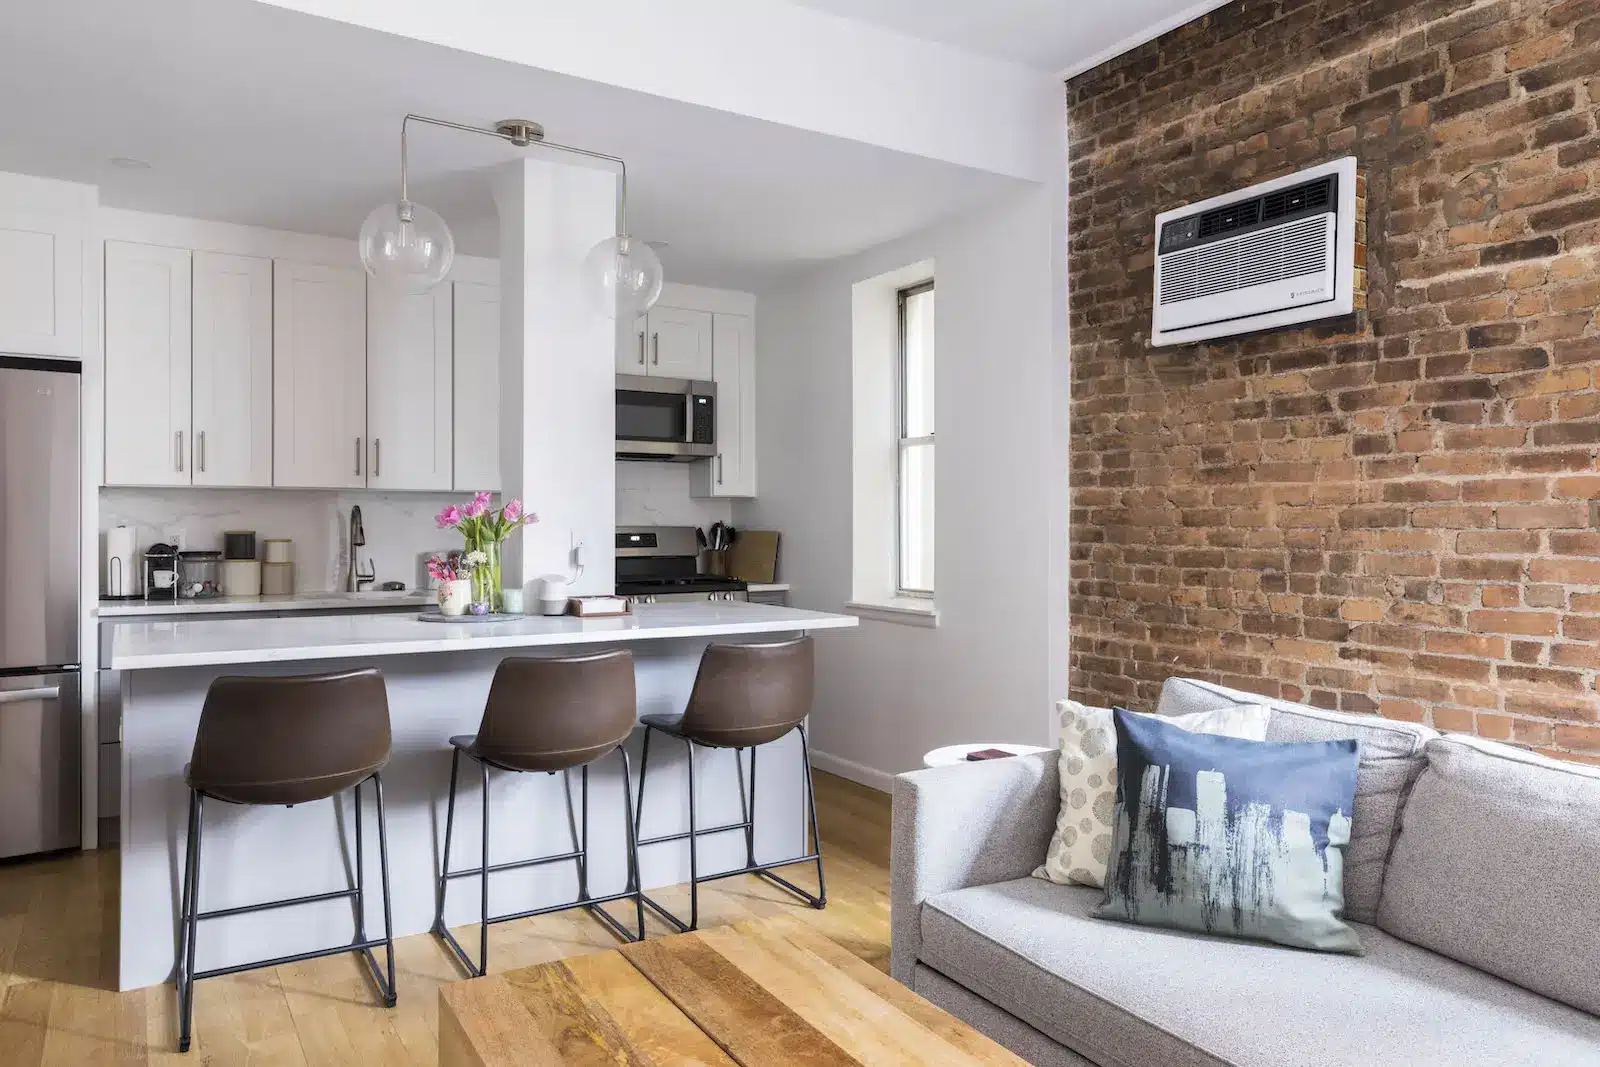
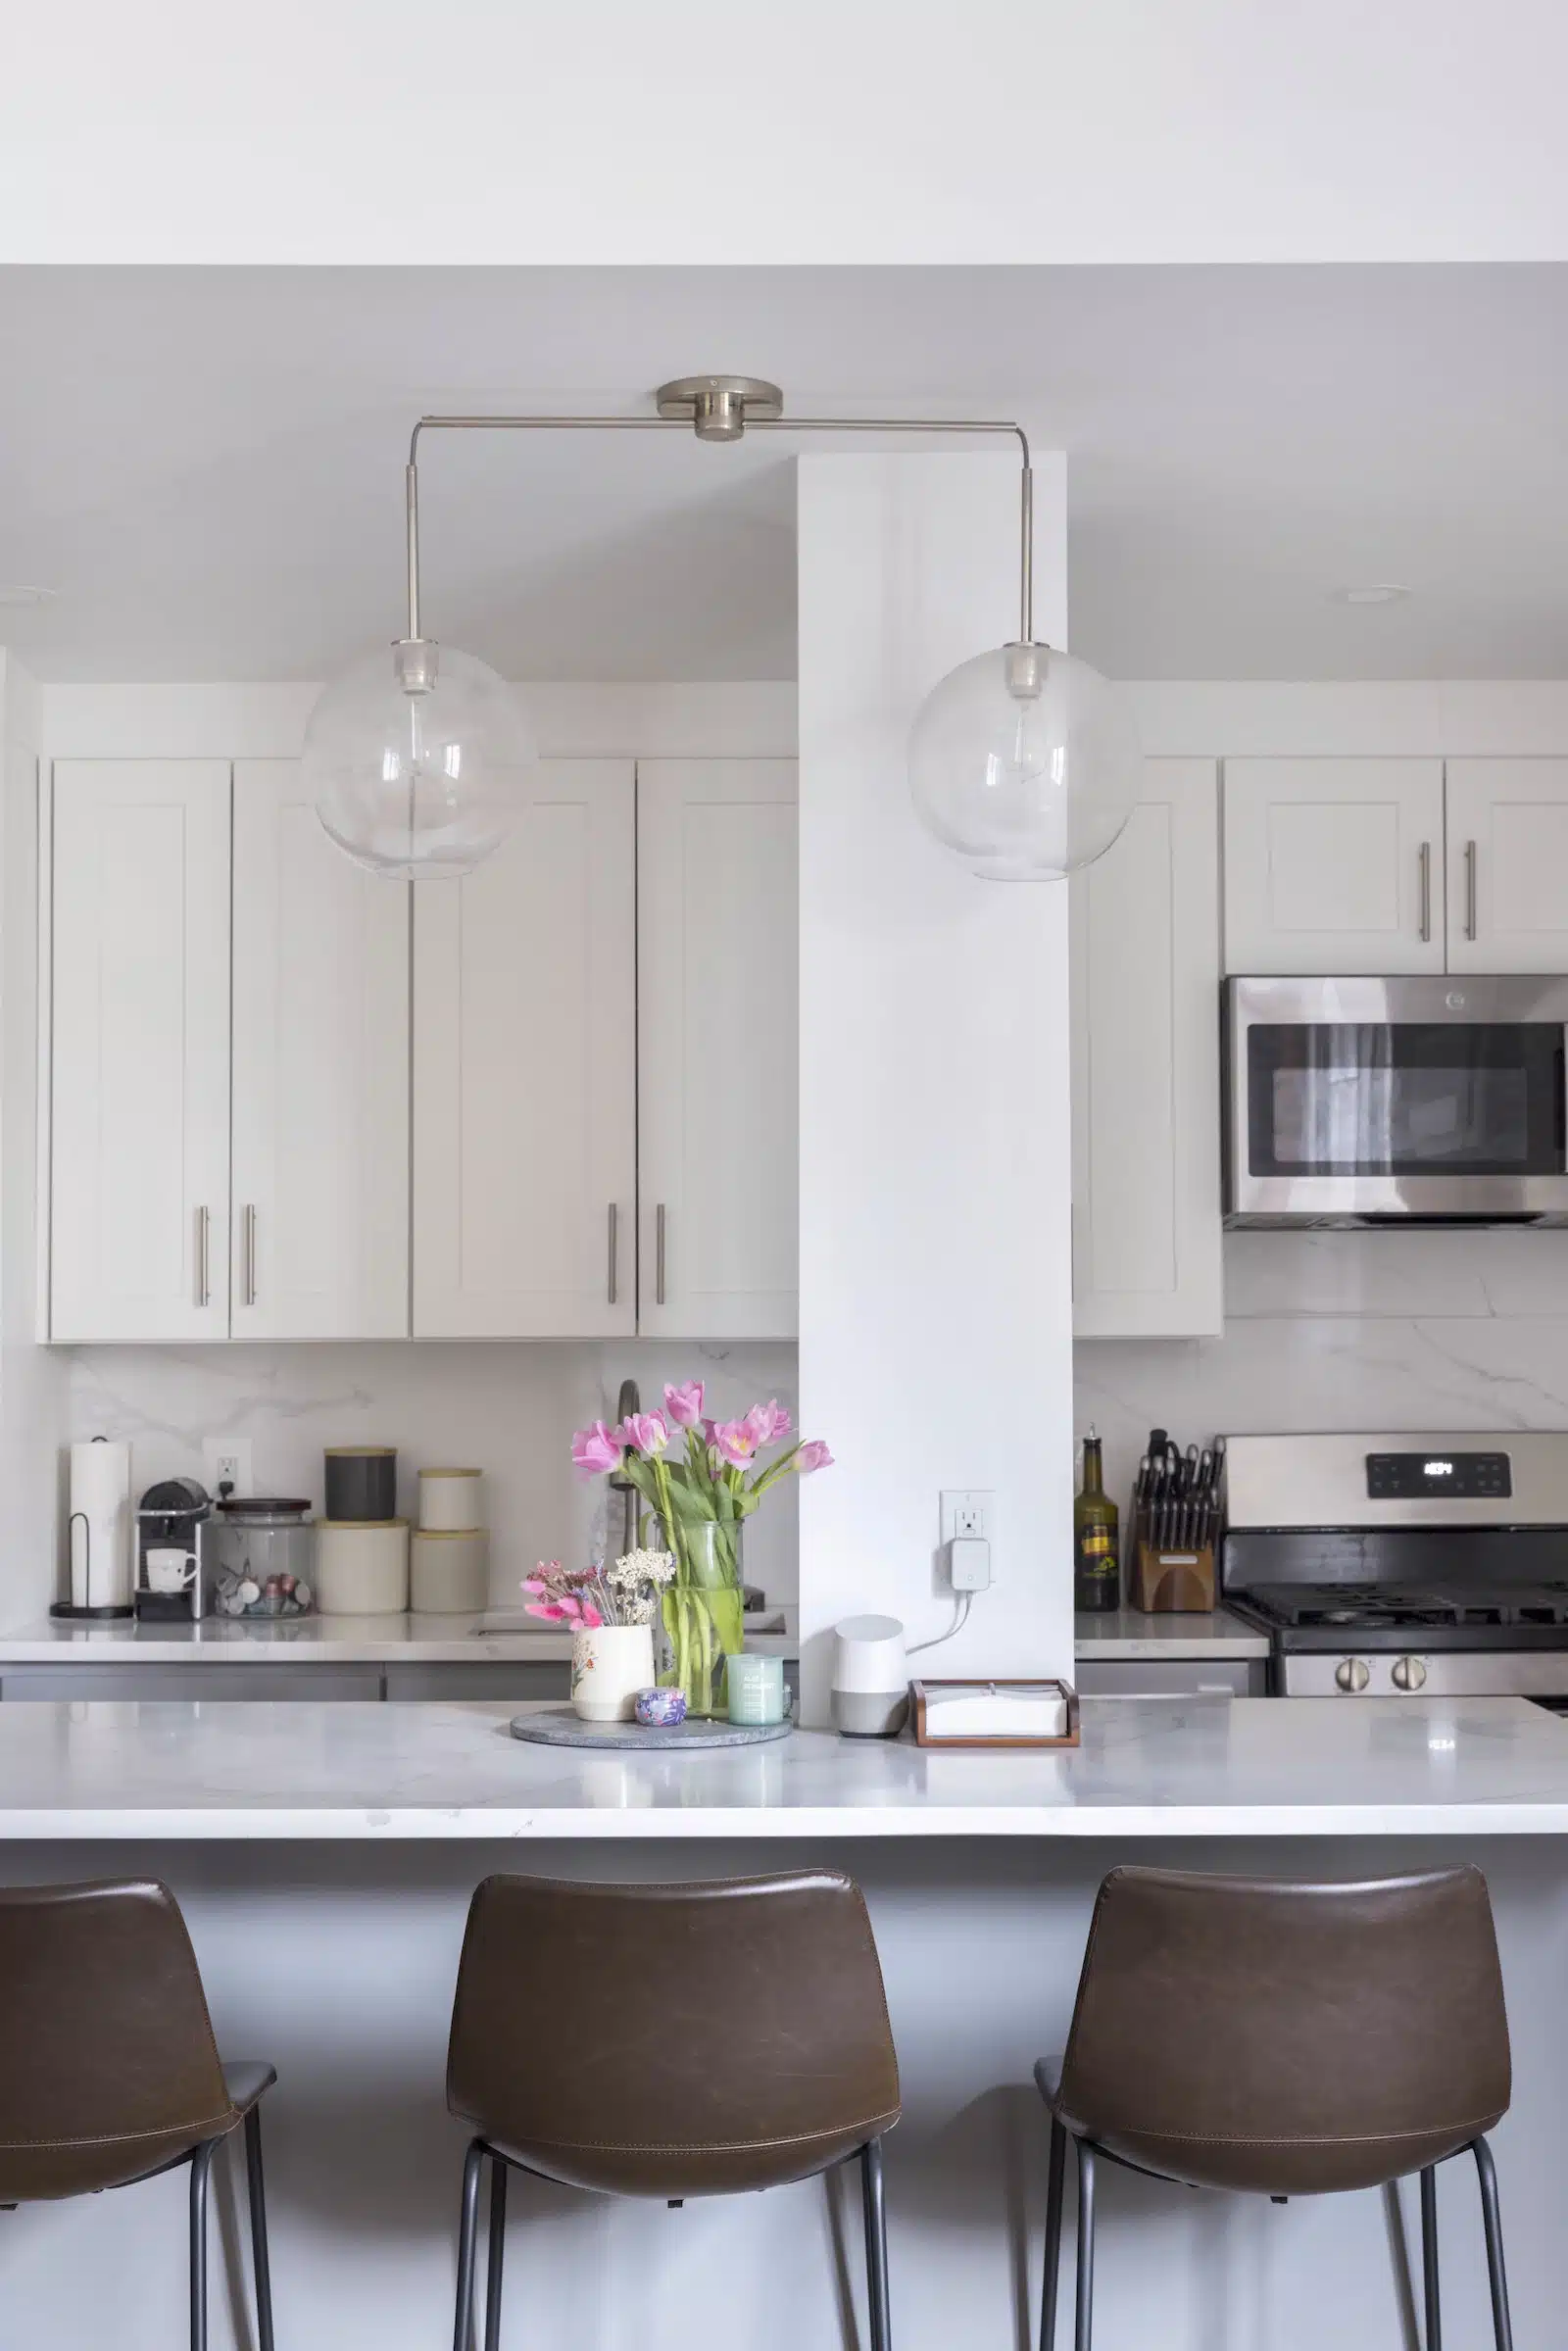
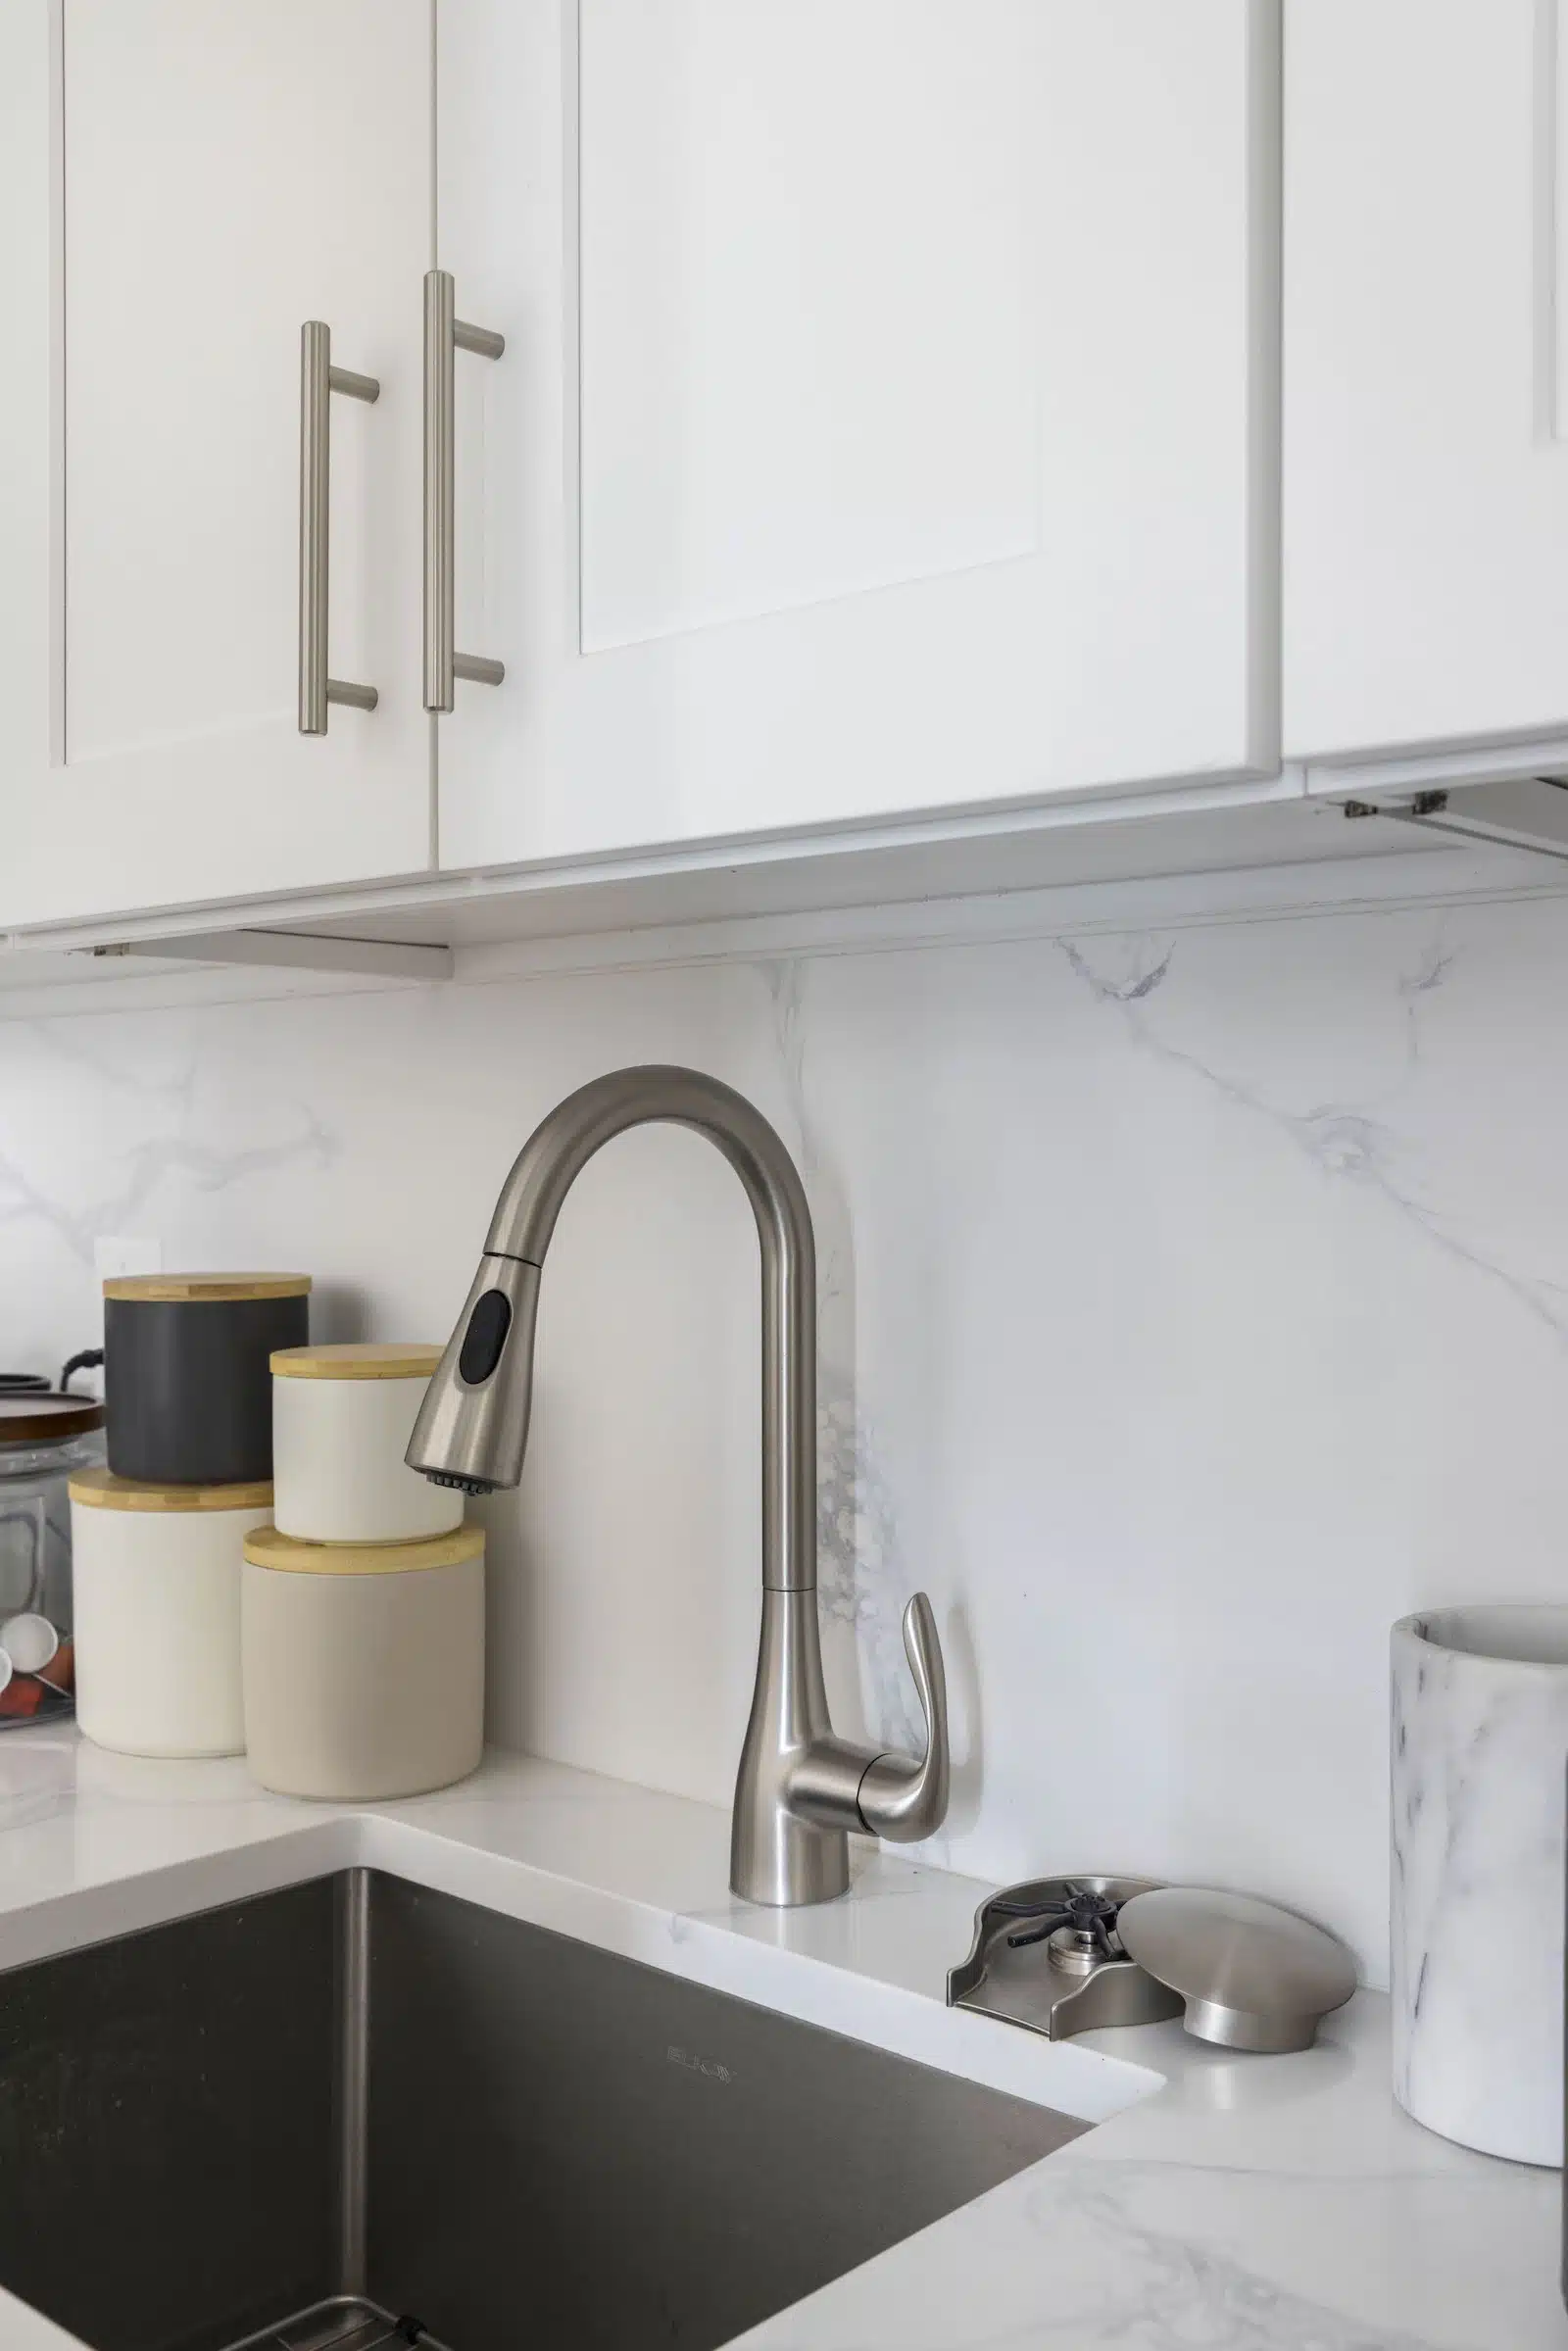
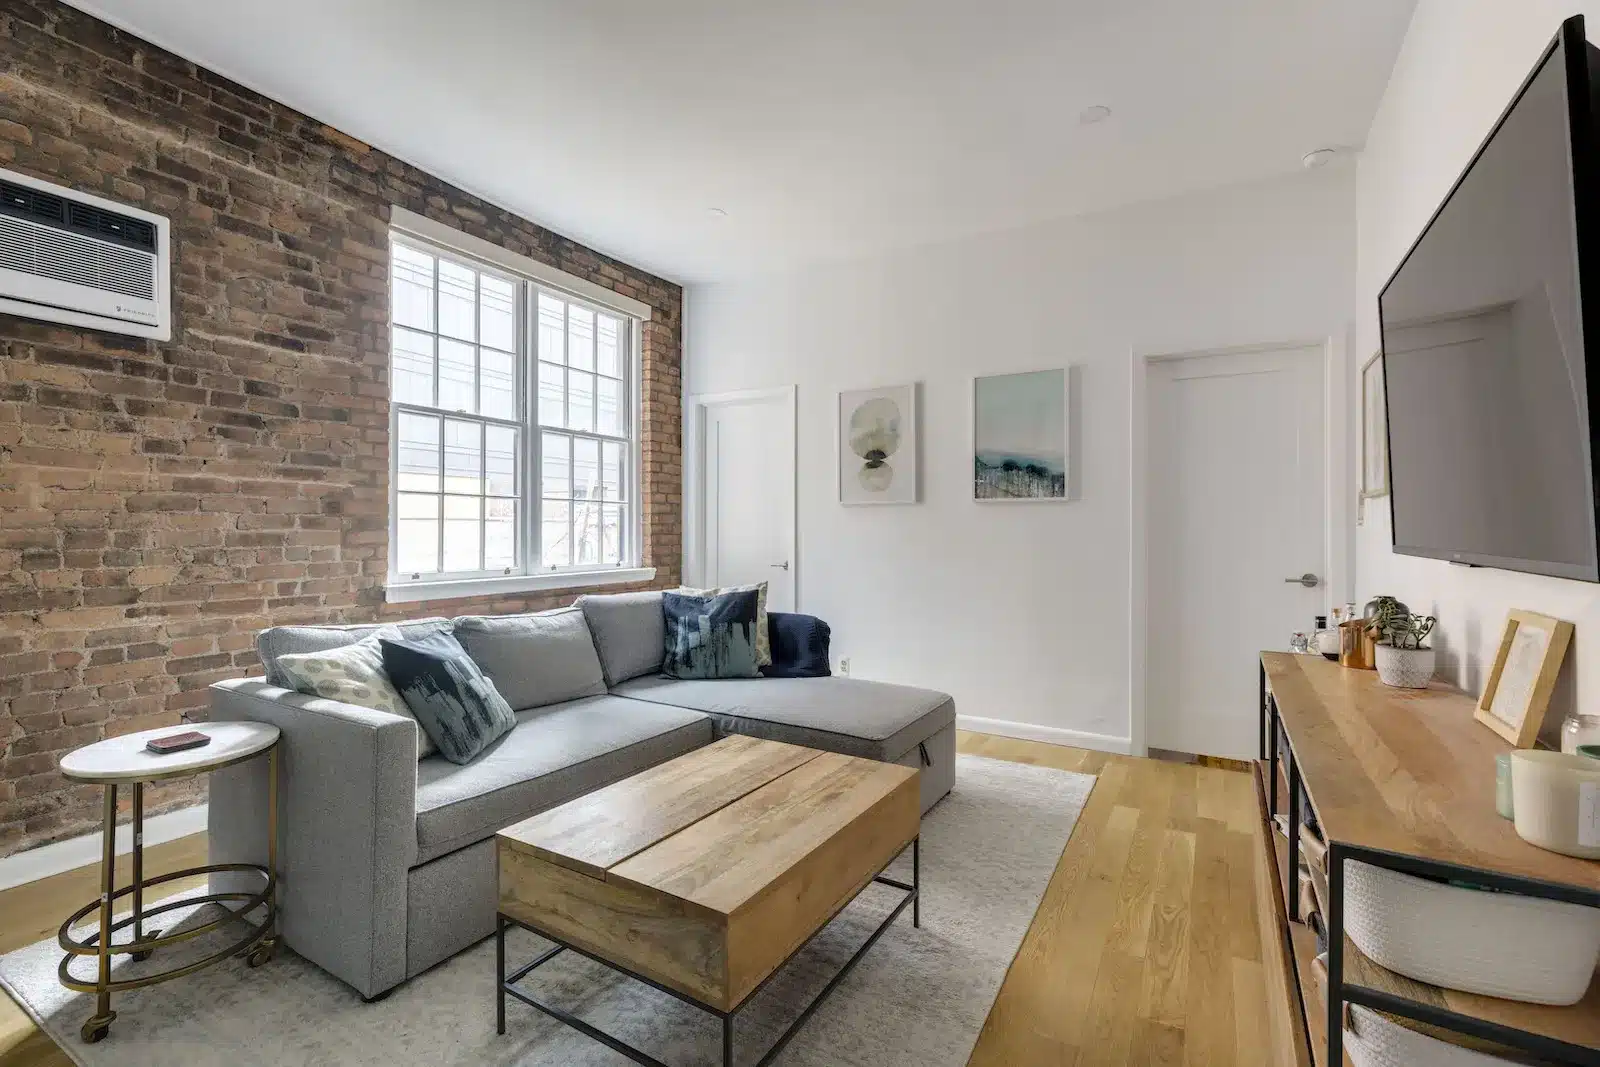
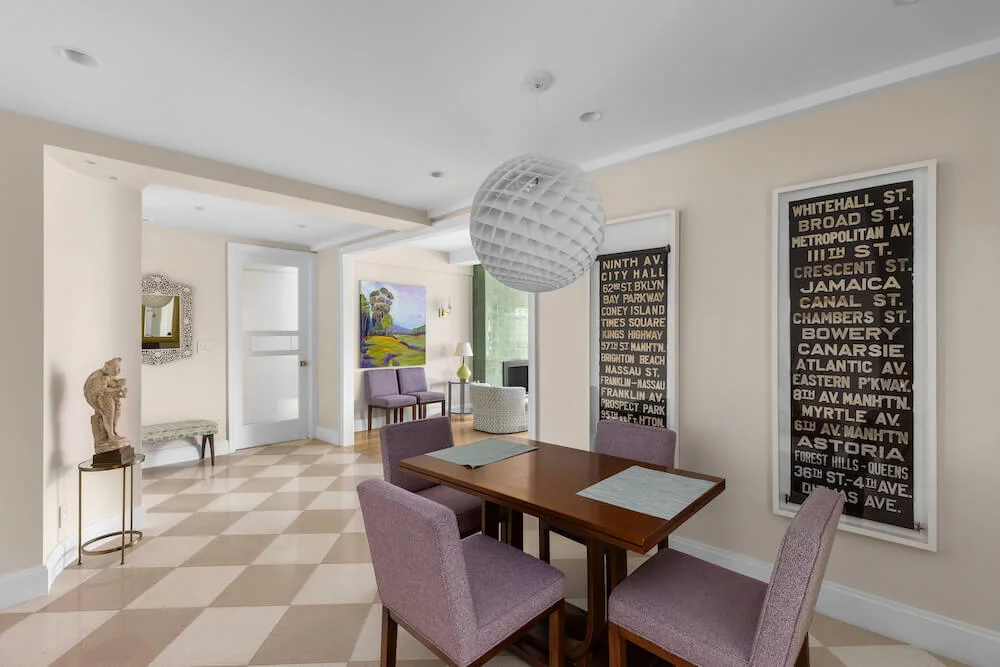
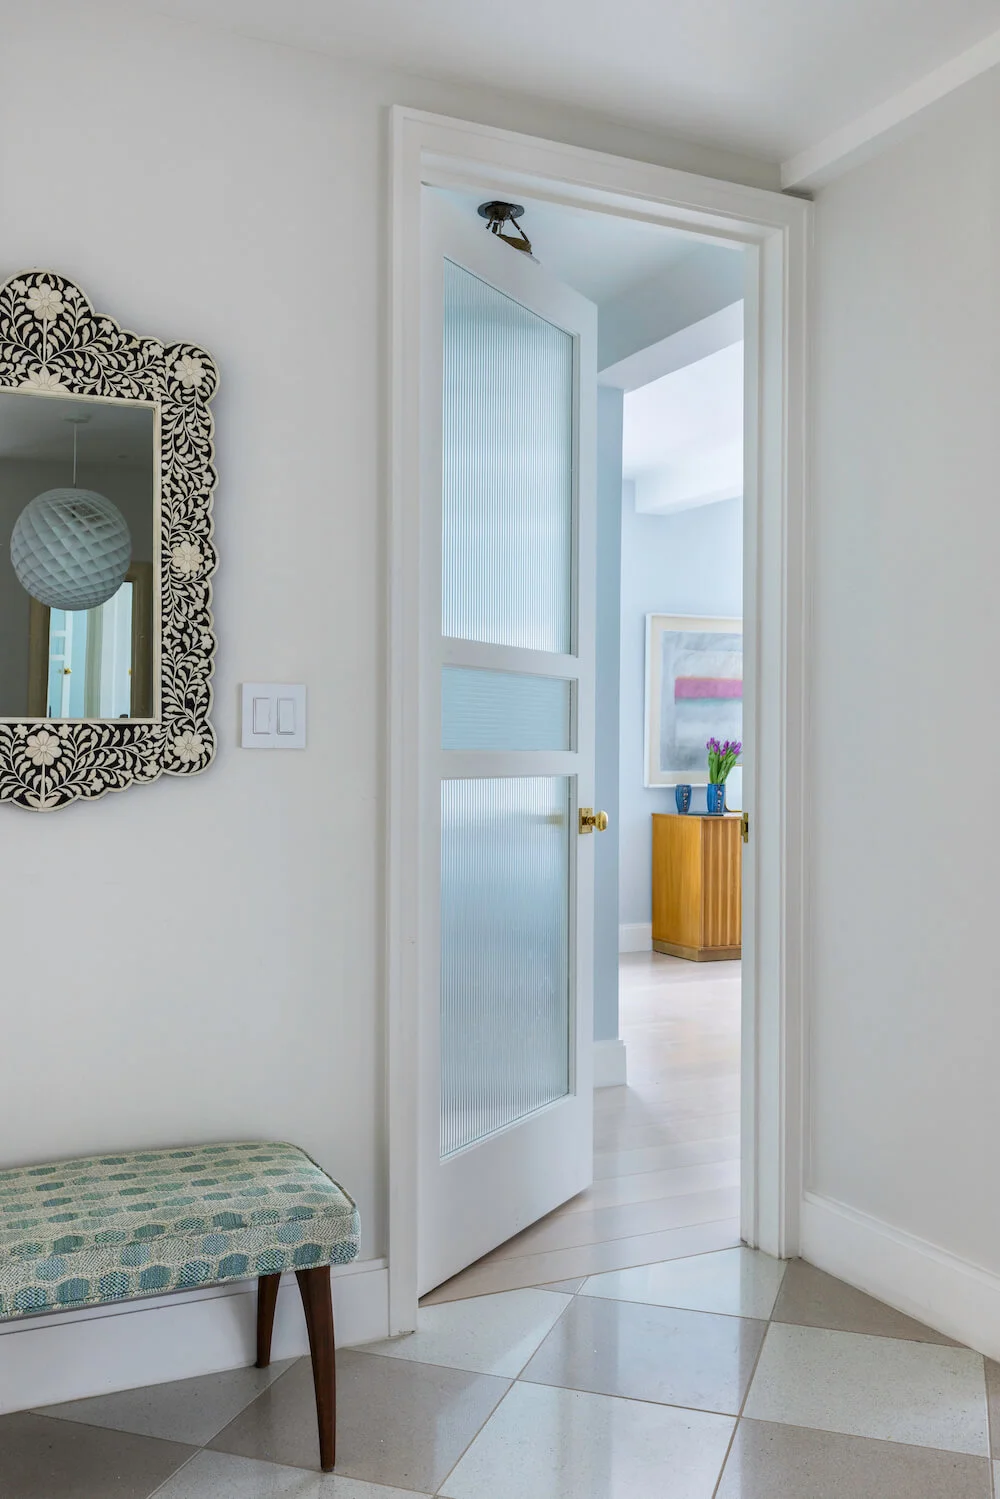
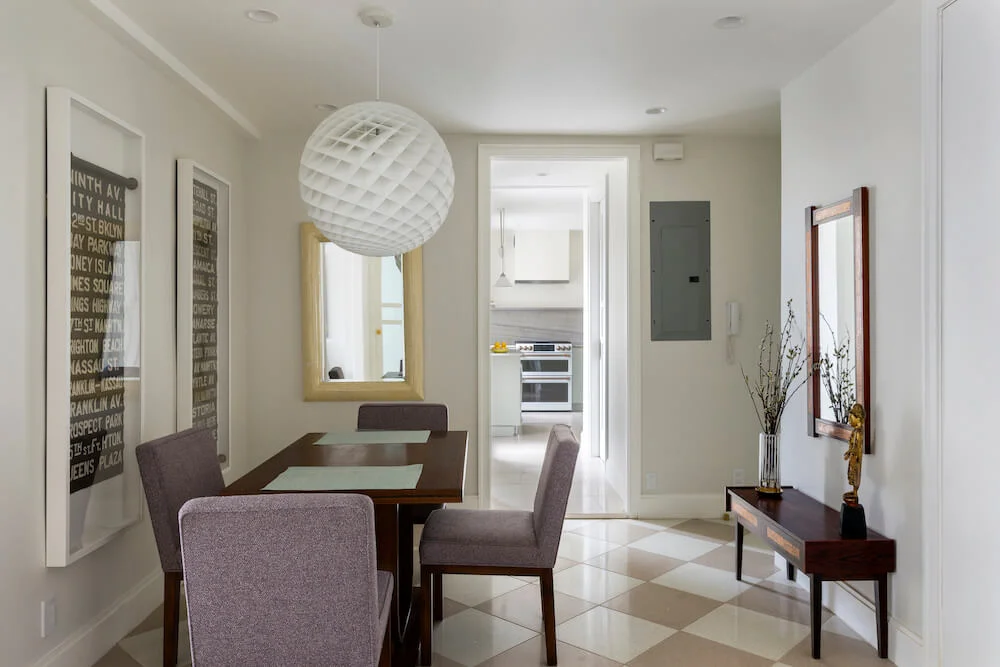
The apartment is a full-floor unit in a three-flat building; it’s around 1,575 square feet and has a 160-square-foot rear deck. We have two French bulldogs and wanted the condominium for its generous size, but we also appreciated its historic status and original character. We’d noticed that historic properties often had their period aspects stripped out. We wanted to bring modern updates to the space, maintain its vintage features, and incorporate mid-century touches into our design. We’d recently completed a challenging remodel of the condominium’s kitchen, and felt we needed a new contractor to tackle the next phase. We posted our project on Sweeten, fielded responses, and soon found a contractor we believed was well-matched to the job. Solving an odd problem: two front doorsMoving our home’s entrance door was perhaps the change that required the most thought. Originally, the apartment had two front doors! One went into the living room, and the other opened into the smallest of our three bedrooms, which we think was the housekeeper’s room at some point. Door No. 1 limited the wall space in our relaxing and entertaining room. Door No. 2 made that tiny bedroom even smaller and less functional. 
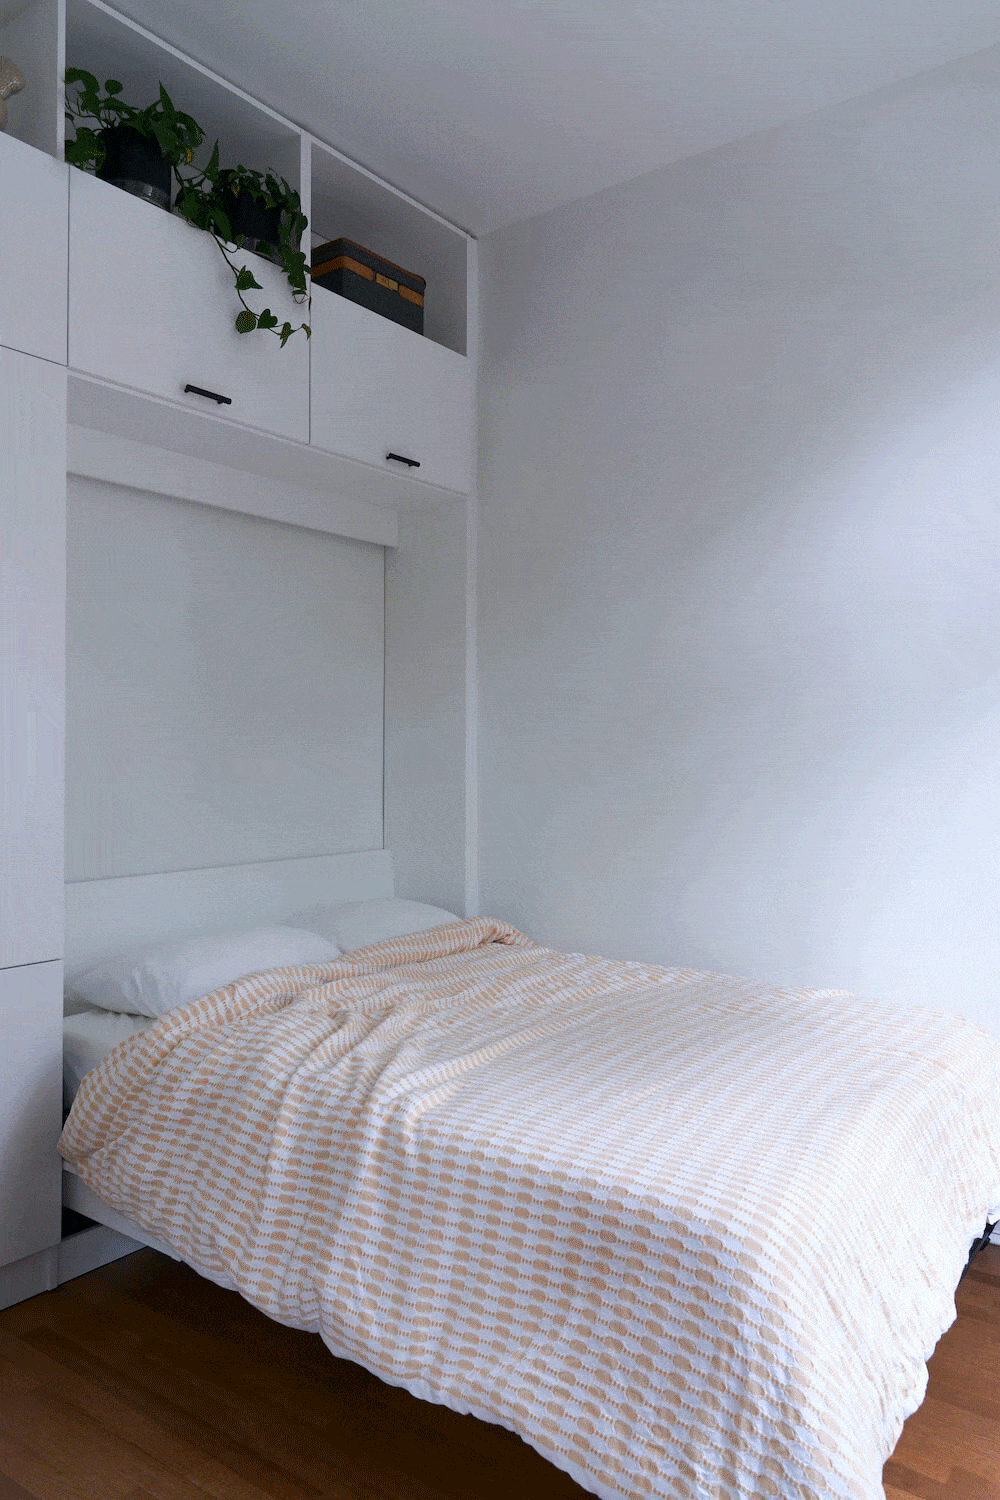
Initially, we’d decided to make the door to the small bedroom our primary front door, converting that room to a foyer. We’d tear out the door leading to the living room and drywall over it. This approach would have required only a slight expansion of the width of that door opening to the bedroom, and replacing trim in a couple of spots. But in the end, we decided the quick fix wasn’t the best option. Remodeling a new apartment entryAfter discussing it with our Sweeten contractor, we decided on a plan to create yet a third door. We would close off the two original entry doors and move the apartment’s front door to a new location in the dining room. These changes would give us full walls in both rooms. Closing Door No. 1 ultimately allowed for a friendlier, more functional furniture arrangement in the living room. Eliminating Door No. 2 created space for us to install a large storage system comprising a Murphy bed and a desk in the former housekeeper’s room. Two absolute wins. Now our apartment needed an entirely new entry. For the new opening, we chose a modern front door that contrasts with the vintage character of the dining and living rooms within. We’re particularly happy about the contrast between “new and old” as you enter our home. Two black-and-white bathroom upgradesNext, we moved on to updating the two small bathrooms. We wanted to update the plumbing, tiling, and fixtures, plus add exhaust fans to both baths. We planned to source and provide all fixtures, including a bathtub, faucets, lighting, fans, and more. To stay on budget, we asked our contractor to provide only the rough materials and labor.
Aiming for a clean aesthetic consistent with our just-completed kitchen, we chose to tile every wall surface from floor to ceiling with white subway tile. We’re pleased with the way this brings attention to our 10-foot ceilings. We chose similarly timeless black marble hex tile for the floors, hoping it would conceal dirt, hair, and other buildups between regular cleanings. Finally, we indulged our love of mid-century furniture, integrating matching bathroom vanities of that era’s style. Achieving a sleek subway tile fireplaceThe last idea we wanted to implement was in the living room, where we’d decided to add decorative subway tile around the original fireplace. When we purchased the apartment, the walls around the firebox were drywalled; we wanted to reclaim the fireplace’s role as a focal point for the living space. We chose a glossy white subway tile for the new fireplace façade to brighten the space. The key to finding the right general contractor in ChicagoEverything went remarkably smooth with the string of projects. Our Sweeten contractor was professional and provided clear advice on issues big and small, including the placement of fixtures, the color of the grout, and more. We leaned heavily on our contractor’s expertise. We experienced no real challenges—this was in contrast to our experience during other phases of our broader renovation, with different contractors. We’ve renovated before, and we know: The wrong contractor can add unnecessary stress, delays, and cost. The right contractor can make the process relatively painless. We found Sweeten’s detailed contractor reviews helpful, and credit those in part for our successful hire. We appreciated the additional insurance—and assurance—Sweeten provided. The right resources helped us to mostly stay on budget, too. We had no major cost overruns. A few of our fixtures arrived damaged, but we were able to quickly source replacements and stay on schedule. The end result has made us very happy. We’re satisfied with our design choices, and the way our contractor’s work and craftsmanship aligned with our vision. It’s all about finding the right partner for the project. Thanks to the homeowners for sharing your Lakeview, Chicago condo remodel story with us. Renovation MaterialsDINING AND LIVING ROOM RESOURCES: Fireplace Tile: The Home Depot. BATHROOM RESOURCES: Restore 3 in. x 6 in. bright white ceramic subway wall tile: Daltile. Nero Marquina 2″ black honed marble mosaic hexagon floor tile: The Builder Depot. Small dual flush one-piece toilet with soft closing seat and 12” rough-in: Horow. Nicoli 1.2 GPM single hole bathroom faucet with pop-up drain assembly and matte black one-handle bathtub and shower faucet with valve: Delta. Encore chrome 44-48” x 76” semi-frameless bypass shower door: DreamLine. Franca 24” single-sink vanity: Pottery Barn. PL series 15-1/4″ mirrored single-door cabinet: Robern. Mena two-light globed wall sconce with 6” globes: Illuminate Vintage. Originally published December 30, 2021 Updated on May 18, 2023 --Sweeten handpicks the best general contractors to match each project’s location, budget, scope, and style. Follow the blog, Sweeten Stories, for renovation ideas and inspiration and when you’re ready to renovate, start your renovation with Sweeten. The post My Sweeten Story: A Home Remodel in a Lakeview East Condo appeared first on Sweeten. from Sweeten https://sweeten.com/sweeten-renovations/chicago-condo-remodel-of-a-fixer-upper-new-home/ via IFTTT Via https://vegetablenirvana.blogspot.com/2023/05/my-sweeten-story-home-remodel-in.html A big plumbing surprise didn’t stop these homeowners thanks to their contractor and helpful neighbors![]()
Written in partnership with homeowner Sammi and Matt. “After” photos by Kate Glicksberg. Big move, big plansThis was our first home purchase. Matt and I moved from San Francisco to Brooklyn and when we put in the offer we’d already sketched out what we wanted the floorplan to look like on paper. We still have the original drawing! ![]() Matt and I had been living in San Francisco for only a few years when we realized it was time to move closer to family. Since a lot of our family was in New York, it was an easy decision to make Brooklyn our next home. Post-pandemic interest rates made buying a realistic option.
Previous
Next
![]() Our home is an 800-square-foot co-op in Cobble Hill, Brooklyn. It’s in a 1901 classic brownstone building with 10 units, located in a landmarked historic area. We lived in our place for about a year before starting construction. Getting over contractor fearsFinding a contractor can be daunting. We were new to the area and didn’t know any local firms or have connections. It was hard to place our trust in someone for such a significant project. Since this was our first home renovation project, we wanted to understand what we were getting into and set expectations for each step of the way. Sweeten was patient and attentive walking us through our scope and listening to our concerns. They offered sound advice from their past experience with different firms. Ultimately, we were able to make a great contractor choice because of their guidance. ![]() Fixing past mistakesGoing back to that early sketch, we knew how we wanted to proceed. The space was technically two units—a one-bedroom and a studio that had been partially (and poorly) combined. The floors were creaky, worn and bowed in many places. The kitchen was small and had too many walls, making the space feel maze-like. Our goal was to properly merge the co-op and transform it into a functional, modern, open-concept living space with the new kitchen as its center. Kitchen vision: clean and contemporaryWith a clear vision of our desired modern look, we went with a dual-tone cabinet color scheme: white on top and gray on the bottom. All doors and cabinets are shaker style with bar-style door handles and pulls. We complimented the color scheme with white marble quartz countertops and matching backsplash, along with stainless-steel appliances. ![]() ![]() We’d known from the day we moved in that we needed to replace the floors in the unit. We wanted a bright, natural wood feel. We went with four-inch white oak flooring, unstained, throughout the co-op. Surprises behind the wallsOur job’s biggest challenge came after the demolition phase. When the Sweeten contractors removed the wall between an existing half-bathroom and the kitchen, we found vertical water pipes running floor to ceiling in the middle of what would be our new open kitchen, rather than next to the waste stack or along the back wall, as the contractor expected. To make matters worse, the pipes were not copper but brass; that meant they couldn’t be cut and re-piped without additional stabilization for risk of cracking a pipe.
Solving the issueOur neighbors in the units above and below us were helpful, allowing the plumbers to stabilize the pipes so that we could safely relocate them, and to replace the old brass with softer, more resilient copper. Fortunately, we had planned to have a column in the kitchen to hide some other plumbing, so now they all run together inside the column. ![]() ![]() The process included change orders and extra costs, but luckily our contractor, plumber, and the building board acted fast, helping us to keep on schedule. Towards the end, everything came together quickly and the day-to-day changes were noticeable. We left for a trip and when we returned, the kitchen was done. It was incredible to see our vision and the plans finally realized. Strong partnership with our general contractorSweeten was extremely helpful throughout the process, providing an intuitive web platform where we could compare different contractors based on past projects, customer reviews, and reputation. Our Sweeten contractor and his team performed multiple walkthroughs in the early stages of the project to make sure we were all on the same page about the work. The contractor also organized the plumbing and electrical subcontractors and found an architect to formalize our plans for approvals by the board, the building’s architect, and New York City’s Department of Building. ![]() ![]() Once the work began, the on-site team was punctual, courteous, and attentive to detail. We relocated during the renovation but kept in constant communication during the work via text and email, as well as with in-person check-ins. We were never left wondering when the workers would be back to finish the next steps like so many horror stories I’ve heard from other renovation projects. Tip: Prepare for the unexpectedOur best advice as new renovation veterans is to add in padding for your timeline and budget. We went in thinking that we’d never need a change order, but unforeseen circumstances require on-the-spot changes. You don’t want to be stuck with a half-finished project because you’ve run out of money. How do we feel? At home! We have great natural light throughout the day, which is a huge bonus when working from home. Our vision came to life exactly as expected. Thank you, Sammi and Matt, for sharing your new home with us! -- Sweeten handpicks the best general contractors to match each project’s location, budget, scope, and style. Follow the blog, Sweeten Stories, for renovation ideas and inspiration and when you’re ready to renovate, start your renovation with Sweeten. Renovation MaterialsKITCHEN RESOURCES:
The post An Open-Plan for a Kitchen Remodel in Cobble Hill appeared first on Sweeten. from Sweeten https://sweeten.com/sweeten-renovations/kitchen-renovations/kitchen-remodel-in-cobble-hill/ via IFTTT Via https://vegetablenirvana.blogspot.com/2023/05/an-open-plan-for-kitchen-remodel-in.html With less storage and a full suite of fixtures, a bathroom is streamlined and functional for $30,000![]()
Written in partnership with homeowner Lauren. “After” photos by Josh Gremillion. Priority list: bathtub, storage, flowMost of what drove my primary bathroom renovation was aesthetic. However, there were functional points that I hoped to address in the design change. I wanted the bathtub to be accessible, not walled in. I wanted storage that worked for me—and actually less of it. And I wanted a modern look and a neutral color palette. ![]() My name is Lauren and I’m a mechanical engineer working in the oil and gas industry. I live in downtown Houston—in an eastern area locally referred to as “EaDo.” My house, an approximately 2,600-square-foot single-family home, was built in 2005.
Previous
Next
![]() When I moved in, the whole length of the bathroom had a countertop with cabinets and drawers under it. I simply did not need that much storage space. The lower cabinets felt clunky and made my bathroom look smaller. I wanted more strategically placed storage. I take a bath most days, too. It bothered me that my bathtub was built-in by two stubby walls, creating small rectangular spaces on each side that wasted space. An update with feminine flairAesthetically, I was going for a more modern look. I’m typically drawn to industrial styled spaces, but I wanted to soften it with some curved lines. And I wanted to work with a neutral color palette but didn’t want the space to look washed out. ![]() ![]() A design professional lays the groundworkTo help me get the look I wanted, I worked with a remote interior designer, Shelley Stotz of House of Stotz. She did a great job incorporating my preferences, using Modsy, the online site to design the bathroom. (Editor’s note: Modsy is now defunct). It let her include product links to items and materials she chose. I was then able to swap out some for more cost-effective alternatives. But the platform helped me visualize how the cheaper options would look. Finding confidence to search for a contractorMy bathroom was my first renovation project, and I was intimidated about the idea of looking for a contractor. They needed to be reasonably priced but do a quality job. Sweeten provided me the opportunity to post my project to multiple contractors and have those well-suited to my job come to me. I was able to get three to four labor quotes for my project and knew I would pay a competitive price since I could compare against multiple data points. ![]() I wanted to find a contractor who was okay with my handling material purchases, since I wanted to control my costs. Sweeten also talked me through what would happen if hiccups during the process brought cost increases. I didn’t want to take on uncertain financial liability. Resolving outlet issues and other bumpsThe project’s biggest challenge was centering the vanities and pendant light sockets above them. The original sockets had been centered over the old mirrors and sinks. Since we extended the shower space, they were now off-center. My Sweeten contractors repositioned the light sockets toward the end of the project once we realized the discrepancy. ![]() ![]() Another glitch was when we discovered that two little walls that stuck out between my old mirrors were structural. I wanted that wall to be flat! In order to install my new tile, vanities, and mirrors, we filled in the recessed portions of the wall so the structural columns no longer stuck out. This made the bathroom four inches narrower, but it wasn’t a big deal in the grand scheme.
I was able to remove the mini walls on each side of my bathtub. The fully enclosed shower would change to a “seamless” one. The contractors altered the level of my shower floor removing the existing shower subfloor and building a new one. It angled toward the bathroom’s exterior corner so that water would drain away from the shower door opening. I love my new shower, especially the rain shower head, hand attachment, and “foot warmer” on the shower floor. Aesthetically, I am so happy with the tile in my shower niche and the wallpaper behind my bathtub. Both give the bathroom a unique look. (I’m also thrilled with the hand attachment on my bathtub faucet—it makes hair-washing easier!) ![]() Working with conscientious contractorsSince the bathroom project was on my house’s third floor, I knew extra manpower would be required to move materials and construction debris up and down the stairs. My contractor’s workers were conscientious, protecting my home when carrying these things through. My Sweeten contractor was also schedule-conscious. We stuck to the project timeline and there were not many days when no one was there progressing the work. Also, only five to six people entered and exited my house. I wasn’t home on my work days—it was nice knowing there wouldn’t be many unfamiliar people circulating through my house. ![]() ![]() A bathroom worth the waitI knew when I purchased my home that I would make changes, but it took me a few years to figure out which spaces I could decorate to modernize and which ones I had to renovate. In my primary bathroom, the remodel was necessary. Even though I spent more than I’d budgeted—my total costs were around $30,000 ($19,000 in labor and $11,000 for materials)—it was worth it. I love my beautiful bathroom! -- Sweeten handpicks the best general contractors to match each project’s location, budget, scope, and style. Follow the blog, Sweeten Stories, for renovation ideas and inspiration and when you’re ready to renovate, start your renovation with Sweeten. Renovation MaterialsBATHROOM RESOURCES:
The post A Softer Look for a Bathroom Remodel in Houston appeared first on Sweeten. from Sweeten https://sweeten.com/sweeten-renovations/bathroom-renovations/bathroom-remodel-in-houston/ via IFTTT Via https://vegetablenirvana.blogspot.com/2023/05/a-softer-look-for-bathroom-remodel-in.html On a $50,000 budget, a bathroom becomes an en suite with a calming mix of materials![]()
Written in partnership with homeowner Amanda. “After” photos by Andrew Chui. Prior to 2016, we’d already been renting in Hoboken, NJ to make sure it was really the place for us before buying. Our home is in uptown Hoboken. It’s in one of the earlier buildings in town–a condo building from around 1920. When we walked into it for the first time, it had an amazing footprint and feel for a condo. ![]() Over time, we were sure we could make the 1,450-square-foot space perfect for us. That was preferable to paying more for something in Hoboken that still wasn’t ideal, so we bought it. Now, our focus was on our final project: remodeling the bathroom.
Previous
Next
![]() ![]() Planning for a lifestyle boostWe are Amanda, Head of Beauty Sales for the US for a french contract manufacturer, Bob, who works for ATP, and our children, Penny (8), Ruby (3). Our renovation project was the bathroom, an ‘80s throwback in desperate need of a decor update–and a working shower. Adding another sink was also on the list. But the biggest change was a walk-in closet build-out that allowed us to add a bathroom door from our bedroom. This upgrade to a jack-and-jill entry was a major improvement, since we now have a primary suite. ![]() With better functionality taken care of, it was time to think about style. I was after something that felt spa-like—a place to escape and have time for myself. It should feel updated, yet traditional and smart in terms of maximizing storage. A renovation plan moves forwardEven though we already had some renovating experience, we reached out to Sweeten for help. We needed help to determine the feasibility of having dual bathroom entryways, the timing, and the cost of what we wanted to do. Sweeten matched us with a contractor that was amazing and honest. Our contractor sourced everything, kept us on track with the timeline, and truly made my ideas come to life. ![]() A primary suite comes into viewThe new entry from our bedroom was where it got complicated. Breaking through the wall was the only way to add the door that would make it a jack-and-jill. Then, ripping out our two separate bedroom closets gave us space to build one walk-in closet. This also made room to create a small hallway from our bedroom to the closet to the bathroom. It’s so nice to now have an entry to the bathroom straight from our bedroom, while still keeping hall access. Ditching trendy for timelessWith a contractor chosen and a plan in the works, it was time to choose the actual materials. Given the ‘80s vibe we were getting rid of, I would avoid anything trendy. Each item needed to be elevated and modern to make sense for my lifestyle today—but also classic. I didn’t want to be sick of it in five years. My obsession was a countertop that would make a statement. We sourced the dramatic black-and-white stone from a separate fabricator, and our contractor attached it to the vanity we picked out. ![]()
We were more cost-conscious when shopping for tile, so we didn’t completely go overbudget. A peaceful and neutral gray Fordham Grigio tile for the bathroom floor laid the foundation. For the shower walls, a refined 5” x 5” ceramic tile offered the perfect texture and shine without breaking the bank. Gold-tone fixtures with graceful lines add a touch of warmth and elegance. Looks aside, ample storage space was also essential to make the space work. Built-in shelves were a definite must-have. ![]() ![]() Spending more was worth itThe closet addition did increase the overall cost and put us overbudget. We also paid more than we had to for a full-price vanity and the custom countertop, but we’re happy with those choices. The approximately $50,000 we ended up spending was almost double what we had budgeted, but we love the results. ![]() A successful renovation partnershipSweeten helped pair us up with a few great candidates to meet. What we wanted was someone who was reliable, respectful, and didn’t give any BS. Our contractors were all of this. At the end, this was our best and most efficient renovation we’ve done. The serenity when you walk into the updated bathroom still takes my breath away. The countertop is stunning, and the heated floors make it so comfortable. But honestly, the shelves might be my favorite! In an apartment, smart storage is truly everything. Thank you, Amanda and Bob, for sharing your new bathroom with us! -- Sweeten handpicks the best general contractors to match each project’s location, budget, scope, and style. Follow the blog, Sweeten Stories, for renovation ideas and inspiration and when you’re ready to renovate, start your renovation with Sweeten. Renovation Materials
The post A Jack-and-Jill Bathroom Remodel in Hoboken appeared first on Sweeten. from Sweeten https://sweeten.com/sweeten-renovations/bathroom-renovations/apartment-bathroom-remodel-in-hoboken/ via IFTTT Via https://vegetablenirvana.blogspot.com/2023/05/a-jack-and-jill-bathroom-remodel-in.html Garage door remotes are a convenient and essential tool for homeowners, allowing them to easily open and close their garage doors without having to get out of their car. However, like any technology, garage door remotes can experience issues that can prevent them from working properly. In this article, we’ll take a closer look at some of the most common garage door remote issues and provide solutions to help you fix them. Remote Not WorkingOne of the most common garage door remote issues is that the remote simply stops working. If this happens, the first thing to check is the batteries. Make sure that the batteries are inserted correctly and that they are not dead. If the batteries are fine, the issue may be with the remote itself. Try reprogramming the remote to the garage door opener by following the manufacturer’s instructions. If reprogramming the remote doesn’t work, the issue may be with the garage door opener. Check the opener to make sure that it is receiving power and that the antenna is properly attached. If the opener is still not working, it may be time to call a professional garage door technician to diagnose and repair the problem. Remote Range IssuesAnother common garage door remote issue is a limited range. If you find that you have to be very close to the garage door to open it, the problem may be caused by interference from other electronic devices or objects in the area. Try moving the opener antenna to a different location, away from other devices or objects. If this doesn’t work, the issue may be with the remote itself. Try replacing the batteries or using a different remote to see if this resolves the issue. If the problem persists, it may be time to call a garage door technician to diagnose and repair the issue. Interference from Other RemotesSometimes, garage door remotes can experience interference from other remotes in the area. This is especially common in areas with multiple garages in close proximity. If you find that your remote is activating your neighbor’s garage door, the first thing to do is to change the remote’s frequency code. Most garage door openers have dip switches or buttons that can be used to change the frequency code. Follow the manufacturer’s instructions to do this. If changing the frequency code doesn’t work, you may need to purchase a new remote that uses a different frequency. Be sure to check with the manufacturer to ensure that the new remote is compatible with your garage door opener. Broken Remote ButtonIf one of the buttons on your garage door remote is not working or has broken off, you may still be able to use the remote. Many garage door remotes have multiple buttons, so try using a different button to see if it activates the garage door. If none of the buttons are working, you may need to purchase a new remote. Be sure to check with the manufacturer to ensure that the new remote is compatible with your garage door opener. Opener Not Responding to RemoteSometimes the garage door opener itself may be functioning properly but not responding to the remote. The first thing to check is the opener’s power source. Ensure that the outlet is functioning and the cord is securely plugged in. If the opener is getting power, the issue may be with the remote’s programming. Try reprogramming the remote by following the manufacturer’s instructions. If this doesn’t work, check to see if the remote is still under warranty and contact the manufacturer for assistance. Dirty Remote ButtonsDirt and debris can build up on the buttons of garage door remotes over time, making it difficult for the remote to send a signal to the opener. Try cleaning the buttons with a soft, damp cloth and see if this resolves the issue. Malfunctioning Opener Logic BoardIn some cases, the issue may be with the garage door opener’s logic board. This is the circuit board that controls the opener’s functions. If the logic board is malfunctioning, it can prevent the opener from responding to the remote. If you suspect that this is the issue, contact a garage door technician to diagnose and repair the problem. Garage door remotes are a convenient tool for homeowners, but they can experience issues that prevent them from working properly. Some of the most common garage door remote issues include the remote not working, limited range, interference from other remotes, and broken buttons. If you experience any of these issues, start by checking the batteries and reprogramming the remote. If these solutions don’t work, contact a garage door technician to diagnose and repair the problem. By following these tips, you can ensure that your garage door remote is working properly and keeping your home secure. Article source here: Garage Door Remote Issues And Solutions source http://roswellgaragedoorrepairga.blogspot.com/2023/05/garage-door-remote-issues-and-solutions.html Via https://vegetablenirvana.blogspot.com/2023/05/garage-door-remote-issues-and-solutions.html How to navigate a renovation in NYC including costs and permits with guidance from your contractor![]() Unique remodeling considerations in NYCFor a remodeling project in most New York City homes, you’ll be dealing with an older, high-density, multi-family building. Working with electrical, plumbing, and structural changes in those types of structures will be more challenging than in a single-family home. While Sweeten contractors can handle these complex projects, having an understanding of how to remodel an apartment in NYC will benefit you during the process. Renovating in NYC means dealing with the Department of Buildings (DOB). Their job is to ensure that all building projects adhere to building codes and zoning. A project will go through the standard plan examination and permit process. Your contractor can help you connect with a Professional Engineer (PE) or Registered Architect (RA), who can act as the Registered Design Professional for your project. The PE or RA will submit your plan to the Department and work with them to gain approval. Much of the city’s housing stock—old and new—is part of a condo/co-op/HOA model. This detail can have a major impact on your project. If this applies to you, check your building’s alteration agreement to know what you can do in terms of remodeling your home. You may have to submit your design to your board, as well as to the Department of Buildings. Cost factors in NYCThe basic reality of remodeling in NYC is that it’s more expensive than in other places in the US. Contractors cover higher business insurance and labor costs, for example. All these costs contribute to a median home cost that’s more than double the median figure in the rest of the country. The cost of living index reaches 168.6 overall. Average renovation costs in NYCYour alteration agreement outlines the building’s logistical requirements that the contractor will need to follow. Allowable construction hours, protecting the common areas, or service elevator hours impact the cost and timeline of your remodel. Apart from logistical considerations, what are you dreaming of for your home? It’s important to know that the “wet” spaces—the kitchen and bathrooms—cost much more per square foot than the other rooms. In fact, you can plan on about $300 – $400 per square foot for these spaces. The other rooms, such as the living room and bedrooms, or the “dry spaces,” will be about $30–50 per square foot, depending on the level of finishes you choose. Sometimes a “dry space” like a living room will surprise you in an older building and add value on its own as it did for Sweeten homeowners Emily and Dan. During the remodeling of their NYC condo, they found old brick hiding behind sheetrock. It turned out to be the perfect iconic New York touch they were looking for. The brick wall is now an architectural focal point. How much a kitchen remodel costsHere are some cost examples for a medium-sized kitchen of 90-120 square feet, excluding the cost of appliances:
How much a bathroom remodel costsIf you’re planning a complete renovation of a standard full bathroom in New York City, with basic general contracting services and no layout changes, here are the estimated starting costs for your project:
Gut or non-gut renovationWith an extensive scope, a gut remodel involves taking the walls down to the studs or framing or when walls are moving for a new layout. A whole-home gut renovation is extensive. A project scope of work can include:
Tina and Andrew’s Sweeten contractor tore down the wall between the kitchen and the living room—but only partially. A large seated countertop was installed in its place. The kitchen now has a view of the three living room windows making it the brightest space in the co-op. In contrast, a non-gut renovation keeps the existing floorplan with no major repairs that need to be made. Barring any surprises, the cost will be less and be finished faster. In a non-gut, a home refresh can include bathroom and kitchen upgrades with new materials and fixtures. The scope can also include whatever fits your vision for your new home, such as new closet builds and refinished hardwood floors. Submitting permitsExperienced construction professionals help you manage the permitting process and the required paperwork for the board and DOB. Depending on your project scope, you’ll need to factor in permit costs. Major work like moving walls, upgrading or installing new electrical, plumbing, HVAC, and gas lines require permits, as well as specialized labor, for the more expensive behind-the-scenes steps. Film director and novelist Jan Eliasberg remodeled her 1,750-square-foot penthouse co-op in NYC. Installing a central air HVAC system caused months-long delays but her Sweeten contractor knew how to keep the project moving along. Upgrading the electrical and plumbingThe cost of a gut renovation depends on the age and condition of the space and the structure it’s located in, whether it’s a building or a house. If the work is in an old building or a historic district, updating house mechanicals, such as electrical panels or old pipes, must also be considered. Pricing for the “unseen” costs of your renovation can be difficult to anticipate which are ususally found after the walls are opened. Adding or upgrading any electrical and plumbing would be considered a gut renovation and an architect would be required to draw up the plans. Keep in mind that different forms of labor can be priced very differently, with wiring and plumbing work, for example, tending to be more expensive. Saving money on these types of infrastructure is not recommended. It is important to hire licensed and qualified experts to handle these jobs. Cutting corners could result in costly issues in the future. You can save money by mapping out a clear plan. Getting an architect or designer on board early for a major transformation can help you avoid costly changes mid-stream. Improving hardwood floorsAnother way to save time and money is to include hardwood floor refinishing or replacing in the scope, if this was something you were thinking about. Since the renovation crew is already on-site, and the contractor has access to flooring subcontractors, you can take advantage of their services and streamline the process. Floor repair is challenging, and matching the existing flooring is unlikely to be perfect, even for skilled professionals. To achieve a consistent result, replacing planks and refinishing the entire floor is necessary. If more than 30% of the floor requires repair, it’s recommended to get a quote for a new floor instead of repairing it. One Sweeten contractor recently refinished the hardwood floors for a 1,600-square-foot apartment in NYC for $12,800 or $8/sq ft. Another Sweeten homeowner replaced the floors of a smaller 616-square-foot one-bedroom apartment. The project installed engineered wood and soundproofing for $8,770. The budget for materials and labor worked out to $14/square foot. Creating an open conceptIf you’re looking to create a new layout and move or bring down any non-structural walls, this will require architectural services. Removing walls for an open concept is still in demand but flex living provides versatility. The popularity of open-concept living has been impacted by the shift to working from home. Sliding doors and partitions help control sound traffic, offer an open view, and define separate spaces. Claire and Dan’s Sweeten renovation turned their NYC co-op studio into a junior one-bedroom with a custom sliding partition. Another option is half walls, which visually create another “room” for privacy. This is the best of both worlds without feeling walled in or blocking natural light. Skim coating for smooth wallsSkim coating is a technique that can make the walls of your home look perfect. Nicks and scratches are filled in and bumps are sanded down. While skim coating is not necessary, it gives your walls a flawless look under any lighting. It can be expensive but many find the results worth the cost. The expense is due to the physical labor of hand-sanding the entire vertical surface of the walls. Contingency planningHomeowners should allocate an extra cash reserve for unexpected issues that may arise during a gut remodel, including those that surface after walls have been demolished. It is not unusual for this to occur. For a non-gut remodel, it’s recommended to add an additional 10 to 15 percent above the expected budget. Add more than 15 percent if your project is a gut remodel. The contractor and the homeowner both sign change orders. These are regular adjustments made to the original contract to address additional work and associated costs. This process ensures that all extra cost issues are documented in an orderly manner. Who should you hire for your NYC apartment remodel?Finding a general contractor with experience in your specific project scope, budget, building type, and location in NYC can be a challenge, although they are readily available. It’s also important to consider their communication style and level of professionalism to ensure a good match. You have three primary routes to choose from: hiring an architect/interior designer alongside a general contractor; opting for just a sole builder or contractor; or partnering with a full-service design-build firm. Each option offers its own set of advantages depending on your specific needs. Partner with an architect/interior designer and contractorAn architect/interior designer and your contractor can pinpoint any potential issues and help distribute the budget to get what you need. Most Sweeten contractors can refer you to an architect who they’ve worked with on past jobs if your scope requires their services. Depending on the scope, an architect can supply drawings for permits or the board, if required. More comprehensive working drawings complete with MEP information can be drawn up if walls or the layout are being altered. Set aside 10-20% of your project funds for this service. Sweeten homeowners, Ilene and Neil, brought in architect, Aaron Davis, to renovate their whole NYC condo. The project transformed the home located in a building constructed as a department store into a residential space. Some of the scope included relocating the front door, installing a new primary bathroom, and swapping a bathtub for a walk-in steam shower. Renovate with a general contractorSweeten general contractors in NYC have the expertise to upgrade your home with a rip-and-replace project or full gut remodel. Some GCs may be able to help with limited design work. It’s best to meet with multiple firms on-site to get a good sense of their experience and their communication style. Every renovation project requires a general contractor to oversee the daily construction work. Hiring a general contractor may best suit your job if there are no layout changes or tearing down walls; gas, electrical, and plumbing remain the same; and there are no changes that require DOB approval. You would also have a general idea of what you’d like to do with the space. Work with a design-build firmWorking with a design-build firm means you will work with designers and contractors, all in one place. This increases efficiency and unity throughout your renovation project. A smart move is to connect with a contractor early on to look over your home as is and talk about what you would like to achieve. A skilled contractor can spot the challenges that older buildings present and can also connect you with an engineer or architect that may be needed as the Registered Design Professional for your project. The first step to getting started when planning your renovation is working with an insured and licensed contractor. At Sweeten, we can connect you with vetted apartment remodeling contractors in NYC who have experience with projects similar in scope to yours, familiarity with your neighborhood, and expertise in your budget. -- Sweeten handpicks the best general contractors to match each project’s location, budget, scope, and style. Follow the blog, Sweeten Stories, for renovation ideas and inspiration and when you’re ready to renovate, start your renovation with Sweeten. The post Remodeling an Apartment in NYC: A Comprehensive Guide appeared first on Sweeten. from Sweeten https://sweeten.com/process-and-planning/renovating-in-the-northeast/how-to-remodel-an-apartment-in-nyc/ via IFTTT Via https://vegetablenirvana.blogspot.com/2023/04/remodeling-apartment-in-nyc.html Jan Eliasberg discovered she enjoyed the hands-on, creative experience of her gut renovation![]()
Written by homeowner Jan Eliasberg. “After” photos by Kate Glicksberg. Architecture is the “complex or carefully designed structure of something.” By that definition, I’ve been practicing architecture for most of my life. As a film and television director, I envision the ideal structure for telling a story and then, in collaboration with other creative artists, bring that vision into reality. ![]() There’s nothing I love more than seeing possibility, an instinct that served me well when I was on the hunt for my NYC apartment. If a listing said, “Bring your toothbrush,” I’d pass, if it said, “Bring your contractor,” I’d rush to make an appointment. I decided to buy a penthouse apartment before I’d even seen it. It was month three of COVID when the NY Times was announcing that “New York is Dead.” Every article in the home section was about New Yorkers moving permanently to the Hudson Valley, or the Hamptons – anywhere but New York. There were no Open Houses. No one wanted to take on the double whammy of buying an apartment and gut renovating it during a global pandemic, except for someone slightly crazy…like myself.
Previous
Next
![]() Tackling her gut renovationThe broker’s listing featured a ground plan: a 1,750-square-foot penthouse; spacious rooms; Central Park views; a wrap-around terrace and light from the South, East, and West. What could possibly be bad? Well…roof leaks and water stains on the ceiling; mold in the closets; linoleum pasted to the floor with asbestos-laced glue; mud brown paint; green shag carpet; and a labyrinthian flow that made me feel like a psychotic rat in an impossibly twisted maze. I held tight to my vision, combed Pinterest for inspirational images, and posted the project on Sweeten. ![]() ![]() Spreading light throughoutThe rooms were already spacious, so I opted against an open concept plan. We created an enormous archway from the dark and confusing entryway into the living room. Suddenly the light from the wall of south facing windows flooded the entryway and illuminated a clear path. We borrowed a design gesture from pre-war New York apartments, connecting the living room and dining room with French doors. The dining room became my dedicated office and screening room (where, as a writer and director, I spend most of my time). It also serves as a third bedroom. ![]() Composing my renovation teamMy Sweeten contractor brought an imperturbable calm that I knew would stand us in good stead when things went pear-shaped (as they inevitably would). He introduced me to Danielle Albert, a terrific architect with whom he’d worked on several previous projects. Together we orchestrated the flow of the apartment with strategic structural alterations. We opened the rooms up to the light, accentuating the streamline moderne elegance of the tall ceilings and original casement windows. And, of course, fixing a multitude of code violations, asbestos hazards, and water-damaged ceilings along the way. ![]() ![]() Danielle and I replaced the low, wooden doors with floor-to-ceiling doors featuring enormous panels of fluted glass that echo the pattern of the casement windows. The ribbed glass gives privacy while allowing natural light to stream into every room from two if not three directions. Overcoming kitchen cabinet challengesThe most challenging aspects of the renovation were the kitchen and the HVAC system. To save money, I did a modified IKEA kitchen. Wanting to maintain as much openness as possible, I opted not to use upper cabinets. Fortunately, Danielle had carved a large pantry out of previously wasted space, so I was able to maximize every inch of storage. I used custom-paneled cabinet doors and drawer fronts from a Canadian company called NIEU. I’m eternally grateful to Julia at NIEU who corrected all my mistakes before I made them. ![]() Coordinating with IKEA, however, dealing with their supply chain issues, returning over-ordered parts became so frustrating that I regretted not doing a custom kitchen. That aside, I’m thrilled with the way the kitchen came out. I particular love the sleek lines of the leathered white Macaubus countertops and backsplash, offering the elegance of marble with the easy maintenance and durability of quartzite. Nature inspires the color paletteTo provide a focal point for the 22-foot-long living room, I added a floor-to-ceiling tiled fireplace. I wanted a tile more delicate and playful than Heath with its earth-tone glazes. I’d been a collector of Rookwood pottery when I lived in California. In a stroke of remarkable synchronicity, I discovered that Rookwood had recently re-opened, once again making their fantastically etched and glazed tiles. I chose a pattern called Jazz in a watery blue-green glaze called Wasser. ![]() Intentionally choosing a color palette is something I’ve always done in my film work; it unites disparate elements. In design, it allows rooms to echo and harmonize within an overarching theme. Streamline Moderne design reached its peak in America on the sunny beaches of South Beach, Florida. So I instinctively gravitated towards a summer palette: the greens and blues of the ocean; the spun gold of the sun at Magic Hour; a hillside covered with lavender. And anchoring it all, wide natural hardwood planks and 24 x 24 terrazzo tiles in “Ivory” and “Latte.” ![]() ![]()
![]() Architectural inspirationMy building was designed by an architect known for his remarkable art deco buildings on the Grand Concourse in the Bronx. Because of WWII, however, materials weren’t available to build until the mid-forties. This placed my building in the period when art deco was becoming streamlined, influenced by the form follows functional efficiency of the Bauhaus. Streamline moderne favors simpler, aerodynamic elegance; sleekly curved corners, with an emphasis on streamlined horizontal lines. ![]() ![]() A new opportunity with the co-op boardThe HVAC system added many months, many delays, and many unnecessary dollars to the budget. The co-op board had never allowed central air in the building, so I was the proverbial guinea pig. We often had to wait weeks and even months to get sign-offs from the building architect and the board. Fortunately, our contractor was nimbly able to juggle and move forward with other parts of the project. When August came and the penthouse could have been baking in the heat of the summer sun, I was grateful that I’d had the patience and tenacity to stick to my guns. My interactions with the co-op board during the renovation process incentivized me to run for the board myself to help streamline the renovation process for future shareholders. I’m now the head of the co-op board’s Design Committee, overseeing upgrades to the lobby, corridors, and elevator. ![]() ![]() 7 tips from a hands-on homeowner1. If you can, do it yourself.I sourced every finish, every tile, fabric, every can of paint. As a result, I never paid fees for purchasing materials. I was also in control of the budget on a visceral level; I was personally responsible for every penny that was spent. It was a lot of responsibility and time, but those hours represent enormous savings and kept me on budget. 2. Google is your friend.When I went to NYC showrooms, I was shocked by the limited color options and the incredibly high prices for terrazzo tiles, which had suddenly become a trendy new material. I found a company in Wausau, Wisconsin that makes nothing but terrazzo – in every color imaginable, with eight blends of crushed stone chips from macro to micro. I chose the Reflections Series and specified that small pieces of mirror be crushed into the mix so that, when the sun hits the tile in exactly the right way, it creates a reflected burst of light. ![]() ![]() 3. Never buy from big box design stores if you can find vintage.My go-to resources were Chairish; Pamono; Etsy; and Live Auctioneers.com. Vintage pieces bring stories and histories, adding layers of authenticity and beauty to your design. 4. Lighting makes or breaks a space.Natural light is key; that was a priority on my “must have” list. Then I searched the world to find focal point light fixtures that command attention: a BTC Original Rise ‘N Fall Pendant light over the kitchen counter; the Louis Poulsen “Patera” Fibonacci hanging pendant over the dining room table; matching Gerard Thurston for Lightolier perforated pendants bookending the bathroom mirror. ![]() ![]() 5. Save money by using inexpensive tile in fresh ways.I went with an inexpensive classic 2″ x 10″ white subway tile in my New York-sized bathrooms. The tile is set in patterns – stacked horizontal up to chair rail height, stacked vertical above and, in the guest bathroom, a herringbone patterned niche contrasting with stacked vertical everywhere else. The patterns catch the eye and lend texture to what would otherwise read as standard issue tile. 6. Whenever possible, re-use, recycle.By re-upholstering, repainting, or changing hardware, I was able to reuse every piece of furniture and art I’d collected over the years. Two beloved Bertoia chairs, two absurdly comfortable Milo Baughman tilt and swivel club chairs; and two prized Arne Jacobsen St. Catherine’s chairs were recovered by the extraordinary folks at Prestige Furniture and Design. My Mads Caprani standing lamps, Peter Lovig Neilsen writing desk (where I wrote my most recent novel, HANNAH’S WAR), and two cherished Henning Norgaard rosewood and glass side tables all found pride of place in my new home. ![]() ![]() 7. If you don’t fall in love, wait.Don’t buy an apartment you don’t love; I looked at more than 100 apartments before I found the one that made my heart sing. It’s better to have no chairs at the dining room table if you haven’t found the right fabric. Haven’t fallen in love with wallpaper for the powder room? Keep scrolling through Pinterest until you see a pattern and colors you can’t live without (for me, it was C.F.A. Voysey’s Passion Flower in cornflower blue and yellow). Far better to stare at an empty wall over the sink than hang a boring mirror or medicine cabinet just to fill the space. With everything finished except for landscaping on the terrace (soon…) I have an immense sense of satisfaction and gratitude. I wake up to the sun rising over Central Park in the morning and watch the sunset over the Hudson at night. Honestly, I can’t think of a thing I would do differently. The only problem is that my renovating hobby has now become an obsession and I’m itching to find another project. So, if you encounter a listing that says, “Bring your contractor…” please send up a flare. Thank you, Jan, for sharing your new home with us! -- Sweeten handpicks the best general contractors to match each project’s location, budget, scope, and style. Follow the blog, Sweeten Stories, for renovation ideas and inspiration and when you’re ready to renovate, start your renovation with Sweeten. RENOVATION MATERIALSLIVING ROOM/FOYER RESOURCES:
OFFICE RESOURCES:
KITCHEN RESOURCES:
KITCHEN PANTRY RESOURCES:
DINING ROOM RESOURCES:
POWDER ROOM RESOURCES (with wallpaper):
GUEST BATHROOM RESOURCES (with soaking tub):
PRIMARY BATHROOM RESOURCES
The post A Film Director and Novelist’s Apartment Remodel on the Upper West Side appeared first on Sweeten. from Sweeten https://sweeten.com/sweeten-renovations/entire-home-renovations/apartment-remodel-on-the-upper-west-side/ via IFTTT Via https://vegetablenirvana.blogspot.com/2023/04/a-film-director-and-novelists-apartment.html |
Other Blogs:
Vegetable Nirvana's Blog Tumblr Weebly WordPress Other Profiles: Gravatar Diigo Evernote GetPocket OneNote IFTTT About.me Instapaper Disqus Nimbusweb.me ArchivesCategories |